C++: 面向对象
- TAGS: C++
封装
属性和行为
#include <iostream>
using namespace std;

// 面向对象三大特性:封装、继承、多态
// 封装指属性和行为的封装

/*
封装的语法:

class 类名 {
访问权限:
    属性(成员变量)
    行为(成员函数)
};
*/

class Hero {
    // 访问权限有3种:public, private, protected
public:
    // 属性:即声明变量
    int m_Id;  // m代表member成员
    int m_Hp;

    // 行为:即定义函数
    void addHp(int hp) {
        m_Hp += hp;
    }

    void subHp(int hp) {
        m_Hp -= hp;
    }

};

int main() {
    // 通过类来生成对象的过程,叫 实例化
    Hero h;
    // 访问对象的属性
    h.m_Id = 5;
    h.m_Hp = 100;
    h.addHp(100);
    cout << "Id 为" << h.m_Id << "的英雄,血量是" << h.m_Hp << endl;
    h.subHp(100);
    cout << "Id 为" << h.m_Id << "的英雄,血量是" << h.m_Hp << endl;

    return 0;
}
访问权限
#include <iostream>
using namespace std;

/*
访问权限:
公共权限    public      类内可以访问,类外也可以访问
保护权限    protected   类内可以访问,类外不可以访问  子类可以访问
私有权限    private     类内可以访问,类外不可以访问  子类不可以访问

B -> A

A 父类、基类     名字、房子、支付密码
B 子类、派生类    公有、保护、私有
*/

class People {
    // 公有权限
public:
    int m_Id;
    // 保护权限
protected:
    int m_HouseId;
    // 私有权限
private:
    int m_PayPass;

public:
    void work() {
        // 所有成员变量,类内均可访问
        m_Id = 1;
        m_HouseId = 2;
        m_PayPass = 1314;
    }
private:
    void work1() {
        // 所有成员变量,类内均可访问
        m_Id = 1;
        m_HouseId = 2;
        m_PayPass = 1314;
    }
};

class Son : public People {
    void func() {
        m_Id = 1;
        m_HouseId = 4;      // 保护成员,子类可以访问
        //m_PayPass = 123;  // 私有成员,子类无法访问
    }
};

int main() {
    // 实例化
    People p;
    p.m_Id = 1;       // 公有成员,类外可以访问
    //p.m_HouseId = 5;  // 保护成员,类外不可以访问
    //p.m_PayPass = 10; // 私有成员,类外不可以访问
    p.work();
    //p.work1();        // 私有成员函数,类外不可以访问

    return 0;
}
class和struct
#include <iostream>
using namespace std;

/*
struct 和 class 的区别

struct 的权限默认是公共的
class  的权限默认是私有的
*/

class C {
    int m_a;
};

struct S { // C++中的struct是可以定义成员函数的,C语言中的struct不行
    int m_a;
    void func() {
        m_a = 666;
    }
};

int main() {
    C c;
    S s;
    //c.m_a;     // 私有的
    s.m_a = 4; // 公有的
    s.func();
    cout << s.m_a << endl; // 666

    return 0;
}
属性私有化
#include <iostream>
#include <string>
using namespace std;

// 接口、方法、函数 是同一个概念
// 成员属性私有化好处:
// 1、可以控制读写权限
// 2、可以检测数据的有效性

class Hero {
public:
    void SetName(string name) {
        m_Name = name;
    }
    string GetName() {
        return m_Name;
    }
    int GetSkillCount() {
        return m_SkillCount;
    }
    void SetSpeed(int s) {
        if (s < 100 || s > 500) {
            cout << "速度设置不合法" << endl;
            return;
        }
        m_Speed = s;
    }
private:
    string m_Name;          // 可读,可写
    int m_SkillCount = 4;   // 只读
    int m_Speed;            // 只写
};
int main() {
    Hero h;
    /*
        h.m_Name = "123";
        h.m_SkillCount = 4;
        h.m_Speed = 10;
    */
    h.SetName("剑圣");
    cout << "英雄的名字叫:" << h.GetName() << endl;
    cout << "英雄的技能树是:" << h.GetSkillCount() << endl;
    h.SetSpeed(666);

    return 0;
}
对象特性
构造函数
对对象进行初始化。
如果程序员没有主动实现构造函数,编译器就会提供默认的构造函数,里面没有任何实现,是个空实现。
#include <iostream>
#include <string>
using namespace std;

/*
构造函数需要注意的点:

1、函数名称和类名保持一致
2、返回值类型 不需要写
3、构造函数可以有参数
*/
class Hero {
public:
    // 默认构造函数
    Hero() {
        m_Name = "";
        m_SkillCount = 4;
        m_Speed = 100;
        cout << "默认构造函数:Hero 构造完毕" << endl;
    }
    // 有参构造函数1
    Hero(string name) {
        m_Name = name;
        m_SkillCount = 4;
        m_Speed = 100;
        cout << "有参构造函数1:Hero 构造完毕" << endl;
    }
    // 有参构造函数2
    Hero(string name, int skillCount) {
        m_Name = name;
        m_SkillCount = skillCount;
        m_Speed = 100;
        cout << "有参构造函数2:Hero 构造完毕" << endl;
    }
private:
    string m_Name;
    int m_SkillCount;
    int m_Speed;
};
int main() {
    Hero h1;         // 调用默认的构造函数
    Hero h2("剑圣"); // 调用有参构造函数
    Hero h3();       // 这是个函数声明。int main(); 没有调用任何构造函数。这个并不是对象的实例化过程
    Hero h4{};       // 无参,调用默认的构造函数
    Hero h5 = Hero("剑圣"); // 调用有参构造函数.
    Hero h6("猴子", 4); // 调用有参构造函数

    return 0;
}
执行结果
默认构造函数:Hero 构造完毕
有参构造函数1:Hero 构造完毕
默认构造函数:Hero 构造完毕
有参构造函数1:Hero 构造完毕
有参构造函数2:Hero 构造完毕
析构函数
给对象进行反初始化。数据清理。
#include <iostream>
using namespace std;

/*
析构函数注意点:

1、函数名称号类名一致,并在最前面加上一个 ~ 波浪号
2、函数返回值不需要写
3、不能有参数

*/
class Hero {
public:
    // 构造函数
    Hero() {
        cout << "Hero 默认构造函数调用完毕!" << endl;
    }
    // 析构函数,在构造函数前加个~波浪号
    ~Hero() { // 析构函数中没有参数
        cout << "Hero 析构函数调用完毕!" << endl;
    }
};

void test() {
    Hero h;
}
int main() {
    test(); // 作用域调用完毕
    Hero h;
    int a;
    cin >> a;
    return 0;
}
执行结果
Hero 默认构造函数调用完毕!
Hero 析构函数调用完毕!
Hero 默认构造函数调用完毕!
6
Hero 析构函数调用完毕!
拷贝构造函数
拷贝构造函数也是一种构造函数。目的是用一种对象构造出另一个对象。
#include <iostream>
using namespace std;

/*
拷贝构造函数定义
类名(const 类名& 变量名){}

引用的目的是避免在调用时传参传进来时多一层拷贝
const目的是让传进来的参数不会被改变
*/
class Hero {
public:
    // 默认构造函数
    Hero() {
        m_Hp = 100;
        cout << "Hero 默认构造函数调用完毕" << endl;
    }
    // 有参构造函数
    Hero(int hp) {
        m_Hp = hp;
        cout << "Hero 有参构造函数调用完毕" << endl;
    }
    // 析构函数
    ~Hero() {
        cout << "Hero 析构函数调用完毕" << endl;
    }
    // 拷贝构造函数
    Hero(const Hero& h) {
        //h.m_Hp = 4; // 报错
        m_Hp = h.m_Hp;
        cout << "Hero 拷贝构造函数调用完毕" << endl;
    }
private:
    int m_Hp;
};

/*
拷贝构造函数的调用时机

1、用已经创建的对象来初始化对象
2、函数的传参
3、函数的返回值
*/

// 1、用已经创建的对象来初始化对象
void func1() {
    cout << "-----------func1----------" << endl;
    Hero h1(20); // 生成实例化对象
    Hero h2(h1); // 拷贝实例化对象 用h1生成h2的对象
}

// 2、函数的传参
void test1(Hero h) {

}
void test2(Hero* h) {

}
void func2() {
    cout << "-----------func2----------" << endl;
    Hero h1;
    //test1(h1); // 会调用拷贝构造函数
    test2(&h1);  // 没用调用拷贝构造函数。因为指针代表地址,并没有生成新的对象
}

// 3、函数的返回值
// IDE关闭优化,右键文件属性,在命令行中其它选项填写 /Zc:nrvo-
Hero test3() {
    Hero h(40);
    return h;
}
void func3() {
    cout << "-----------func3----------" << endl;
    Hero h = test3();
}

int main() {
    func1();
    func2();
    func3();
    return 0;
}
执行结果
-----------func1----------
Hero 有参构造函数调用完毕
Hero 拷贝构造函数调用完毕
Hero 析构函数调用完毕
Hero 析构函数调用完毕
-----------func2----------
Hero 默认构造函数调用完毕
Hero 析构函数调用完毕
-----------func3----------
Hero 有参构造函数调用完毕
Hero 拷贝构造函数调用完毕
Hero 析构函数调用完毕
Hero 析构函数调用完毕
初始化列表
#include <iostream>
#include <string>
using namespace std;

/*
初始化列表的语法

构造函数(传参1, 传参2): 成员变量1(传参1), 成员变量2(传参2) {}

*/
class Hero {
public:
    /*Hero(string name, int hp) {
        m_Name = name;
        m_Hp = hp;
    }*/
    Hero(string name, int hp, int speed) : m_Name(name), m_Hp(hp), m_Speed(speed) {
    }

    void Print() {
        cout << "英雄:" << m_Name << "的血量是" << m_Hp << ",速度是" << m_Speed << endl;
    }

private:
    string m_Name;
    int m_Hp;
    int m_Speed;
};
int main() {
    Hero h("剑圣", 100, 10);
    h.Print();

    return 0;
}
静态成员变量
在声明成员变量前,最前面加上 static.
#include <iostream>
#include <string>
using namespace std;

/*
静态成员变量特点:

1、所有的对象共享同一份数据
2、编译阶段分配内存
3、需要在类中进行声明,在类外进行初始化
*/
class Hero {
public:
    Hero() {
        m_Name = "英雄";
        m_Hp = 100;
    }

    ~Hero() {

    }

    // 3.1 声明
    static int m_HeroCount; // 类中声明静态成员变量
private:
    string m_Name;
    int m_Hp;
};

// 3.2 初始化
int Hero::m_HeroCount = 100; // 类外,静态变量需要初始化。作用域在Hero中,类名::变量

int main() {
    Hero h;
    cout << h.m_HeroCount << endl; // 100
    h.m_HeroCount = 101;
    cout << Hero::m_HeroCount << endl; // 101

    cout << &(h.m_HeroCount) << endl;    // 地址是一样的,说明是同一变量
    cout << &(Hero::m_HeroCount) << endl;
    return 0;
}
静态成员函数
也是所有成员对象共享一个函数,并且静态成员函数只能用到静态成员变量。
#include <iostream>
#include <string>
using namespace std;

/*
静态成员函数特点:
1、所有成员共享函数
2、静态成员函数只能使用静态成员变量,无法使用普通成员变量
*/

class Hero {
public:
    Hero() {
        m_Name = "英雄";
        m_Hp = 100;
    }
    ~Hero() {

    }

    static int m_HeroCount;

    static int GetHeroCount() {
        //m_Hp += 1; // 报错。只能操作静态成员变量
        return m_HeroCount;
    }
private:
    string m_Name;
    int m_Hp;

    static int GetHeroCount1() {
        //m_Hp += 1; // 报错。只能操作静态成员变量
        return m_HeroCount;
    }

};

int Hero::m_HeroCount = 100;

int main() {
    Hero h;
    cout << h.GetHeroCount() << endl; // 100
    cout << Hero::GetHeroCount() << endl; // 100
    //cout << h.GetHeroCount1() << endl; // 类外访问不到私有权限的静态成员函数

    return 0;
}
this指针
#include <iostream>
using namespace std;

/*
this指针
1、解决命名冲突。当构造函数构造时,传的变量与类中的成员变量一样的情况引用this指针
2、*this就可以获取到这个对象本身

this  &h
*this *(&h) == h
*/

class Hero {
public:
    Hero(int hp) {
        //hp = hp; // 当前形参和成员变量一致时,成员变量就被隐藏掉了。形参把它覆盖了
        this->hp = hp;
        cout << this << endl;
        cout << (*this).hp << endl;
    }
    int hp;
};

int main() {
    Hero h(100);
    cout << h.hp << endl;
    cout << &h << endl;
    cout << (*(&h)).hp << endl; //

    return 0;
}
const修饰成员函数
在函数参数列表后面加上关键字const。不能修改成员属性的值。
#include <iostream>
#include <vector>  // STL 是C++中的标准模板库. 如其中的函数 bool empty() cons
using namespace std;

// 常函数
// 常函数无法修改成员变量的值
class Hero {
public:
    Hero():m_Hp(0) {} // m_Hp初始化为0
    int getHp() const {
        // m_Hp = m_Hp + 1;
        return m_Hp;
    }
    void setHp(int hp) {
        m_Hp = hp;
    }
private:
    int m_Hp;
};
int main() {
    const Hero h;
    //h.setHp(100); // 报错。 对于常量对象, 只能调用常函数
    h.getHp();

    return 0;
}
mutable关键字
#include <iostream>
using namespace std;

// mutable 和 const 是相对的
// 希望在常函数中修改成员变量的值,就会用到mutable

class Hero {
public:
    Hero() :m_Hp(0), m_getHpCounter(0){}

    int getHp() const {
        m_getHpCounter++;
        return m_Hp;
    }

    void printCounter() const {
        cout << "Counter: " << m_getHpCounter << endl;
    }
private:
    int m_Hp;
    mutable int m_getHpCounter;
};
int main() {
    Hero h;
    h.getHp(), h.getHp(), h.getHp(), h.getHp(), h.getHp(), h.getHp();
    h.printCounter();

    return 0;
}
友元
友元的目的是,让一个函数或一个类能够访问另一个类的私有成员。
全局函数作为友元
#include <iostream>
#include <string>
using namespace std;

/*
友元的目的

让一个类或者函数
能够访问另一个类的私有成员

友元的关键字:friend

三种友元
1、全局函数作为友元
2、类作为友元
3、成员函数作为友元
*/

//1、全局函数作为友元
class People {
    friend void friendVisit(People* p);
public:
    People() {
        m_House = "别墅";
        m_Car = "跑车";
    }
public:
    string m_House;

private:
    string m_Car;
};

void friendVisit(People* p) {
    cout << "好朋友来访问你的" << p->m_House << endl;
    cout << "好朋友来访问你的" << p->m_Car << endl;
}

int main() {
    People p;
    friendVisit(&p);

    return 0;
}
类作为友元
#include <iostream>
using namespace std;

// 类作为友元
// 让一个类去访问另一个类的私有成员
class People; // 声明。方便PeopleFriend提前调用

class PeopleFriend {
public:
    PeopleFriend() {

    }

    void visit(People* p); // 函数声明
};

class People {
    friend class PeopleFriend;
public:
    People() {
        m_House = "别墅";
        m_Car = "跑车";
    }
public:
    string m_House;
private:
    string m_Car;
};

// 函数定义,指定作用域PeopleFriend
void PeopleFriend::visit(People* p) {
    cout << "好朋友来访问你的" << p->m_House << endl;
    cout << "好朋友来访问你的" << p->m_Car << endl;
}

int main() {
    People p;
    PeopleFriend pf;
    pf.visit(&p);

    return 0;
}
成员函数作为友元
#include <iostream>
#include <string>
using namespace std;

// 成员函数作为友元
// PeopleFriend 的某个函数能访问 Peope 的私有成员变量

class People;

class PeopleFriend {
public:
    PeopleFriend() {}

    void visitAll(People* p);
    void visitPub(People* p);
};

class People {
    //friend class PeopleFriend;
    friend void PeopleFriend::visitAll(People* p);
public:  // 表示这是一装饰,无论如何都能获取到
    People() {
        m_House = "别墅";
        m_Car = "跑车";
    }
public:
    string m_House;
private:
    string m_Car;
};

void PeopleFriend::visitAll(People* p) {
    cout << "好朋友访问了你的" << p->m_House << endl;
    cout << "好朋友访问了你的" << p->m_Car << endl;

}
void PeopleFriend::visitPub(People* p) {
    cout << "好朋友访问了你的" << p->m_House << endl;
    //cout << "好朋友访问了你的" << p->m_Car << endl; // 报错,没指定这个函数为类的友元
}

int main() {
    People p;
    PeopleFriend pf;
    pf.visitAll(&p);
    pf.visitPub(&p);

    return 0;
}
友元定义时类的声明顺序误区
- PeopleFriend 要放在People之前,否则在People定义友元时,是不知道PeopleFriend有visitAll这个友元函数的。
运算符重载
运算符重载概念
运算符重载就是对已有的运算符重新定义,并且对不同的数据结构做不同的处理。
#include <iostream>
#include <string> // string 自带加法运算符
using namespace std;

/*
+
4 + 5 = 9

class A {};

A a;
A b;
a + b;
*/
int main() {
    // 1、加法运算符
    int a = 520;
    int b = 1314;
    cout << a + b << endl;

    // 2、字符串拼接
    string c = "520";
    string d = "1314";
    cout << c + d << endl; // 这里的加号用到了运算符重载技术

    return 0;
}
执行结果
1834
5201314
加号重载
#include <iostream>
using namespace std;

/*
+
*/
// 复数类
class Complex {
    friend Complex operator+(Complex& a, Complex& b);
    friend Complex operator-(Complex& a, Complex& b);
public:
    Complex() :real(0), image(0) {

    }
    Complex(int real, int image) {
        this->real = real;
        this->image = image;
    }

    /* 成员函数可以实现运算符重载
    //Complex add(Complex& other) {
    Complex operator+(Complex& other) {
        Complex ret;
        ret.real = this->real + other.real;
        ret.image = this->image + other.image;
        return ret;
    }
    */

    // a + bi
    void Print() {
        cout << real << "+" << image << 'i' << endl;
    }
private:
    int real;
    int image;
};

// 全局函数同样可以实现运算符重载
Complex operator+(Complex& a, Complex& b) {
    Complex ret;
    ret.real = a.real + b.real;
    ret.image = a.image + b.image;
    return ret;
}
Complex operator-(Complex& a, Complex& b) {
    Complex ret;
    ret.real = a.real - b.real;
    ret.image = a.image - b.image;
    return ret;
}

int main() {
    Complex a(10, 20);
    Complex b(5, 8);
    //Complex c = a.add(b);
    Complex c = a + b;
    Complex d = a - b;
    c.Print(); // 15+28i
    d.Print(); // 5+12i

    return 0;
}
左移重载
左移重载
#include <iostream>
using namespace std;

/*
<<

Complex c;
cout.operator<<(c) // 要进行输出的话,一直要调用cout左移c,即cout << c。
// operator<<是cout的成员函数。但我们希望是Complex的成员函数

// 成员函数重载
c.operator<<(cout) // 会变成 c << cout,这不是我们想要的,希望是cout << c
// 所以要把它从成员函数中抽出变成全局函数
*/
// 复数类
class Complex {
    friend Complex operator+(Complex& a, Complex& b);
    friend ostream& operator<<(ostream& cout, Complex a);
public:
    Complex() :real(0), image(0) {

    }
    Complex(int real, int image) {
        this->real = real;
        this->image = image;
    }

private:
    int real;
    int image;
};

Complex operator+(Complex& a, Complex& b) {
    Complex ret;
    ret.real = a.real + b.real;
    ret.image = a.image + b.image;
    return ret;
}
/*
void operator<<(ostream& cout, Complex a) {
    cout << a.real << '+' << a.image << 'i' << endl;
}
*/
// cout 是 std::ostream std::count
ostream& operator<<(ostream& cout, Complex a) {
    cout << a.real << '+' << a.image << 'i' << endl;
    return cout;
}
int main() {
    Complex a(10, 20);
    Complex b(5, 8);

    Complex c = a + b;
    cout << c << endl; // (cout << c) 得到的值再左移 endl;
    return 0;
}
左移重载补充
左移对象的重载主要是为了实现对象的输出。
cout是个ostream类型,如果不加引用就会调用拷贝构造函数
ostream& operator<<(ostream& cout, Complex a) {
    cout << a.real << '+' << a.image << 'i' << endl;
    return cout;
}
ostream源码中有个拷贝构造函数
_EXPORT_STD using ostream       = basic_ostream<char, char_traits<char>>;

class basic_ostream : virtual public basic_ios<_Elem, _Traits> { // control insertions into a stream buffer
  ...
public:
  __CLR_OR_THIS_CALL basic_ostream(const basic_ostream&)            = delete; // 无法调用拷贝构造函数。有delete关键字修饰后,任何地方都无法调用这个函数
  // 目的是为了全局只有一个 cout
  basic_ostream& __CLR_OR_THIS_CALL operator=(const basic_ostream&) = delete;
  ...
ostream加了引用就不会调用拷贝构造函数了。
但既然不想被外部调用,为什么不放私有属性里?原因是即不想外部调用也不想内部调用。
cout 必须加上引用
递增重载
递增重载
#include <iostream>
using namespace std;

/*
++

前置++
后置++
*/

class Complex {
    friend ostream& operator<<(ostream& c, Complex a);
public:
    Complex():real(0), image(0) {}
    Complex(int real, int image) {
        this->real = real;
        this->image = image;
    }

    // 前置++返回这个对象的引用
    Complex& operator++() {
        this->real += 1;
        return *this; // 返回自己
    }

    // 后置++的额外参数类型必须是int,返回原值
    Complex operator++(int) {
        Complex c = *this;
        this->real += 1;
        return c;
    }

private:
    int real;
    int image;
};

ostream& operator<<(ostream& c, Complex a) {
    c << a.real << '+' << a.image << 'i';
    return c;
}
int main() {
    int x = 1;
    cout << ++(++x) << endl; // 3
    cout << x << endl; // 3

    Complex a(10, 10);
    cout << a << endl; // 10+10i
    ++a;
    cout << a << endl; // 11+10i
    cout << ++a << endl; // 12+10i
    cout << ++(++a) << endl; // 14+10i
    cout << a << endl; // 14+10i

    cout << a++ << endl; // 14+10i
    cout << a << endl; // 15+10i

    cout << ((a++)++)++ << endl; // 14+10i
    cout << a << endl; // 15+10i

    int b = 5;
    // cout << ((b++)++)++ << endl; // 不能这么调用
    cout << b << endl; // 15+10i

    return 0;
}
递增重载补充
非常量引用初始值必须是左值
#include <iostream>
using namespace std;

/*
++

前置++
后置++
*/

class Complex {
    friend ostream& operator<<(ostream& c, const Complex& a);
public:
    Complex():real(0), image(0) {}
    Complex(int real, int image) {
        this->real = real;
        this->image = image;
    }

    // 前置++返回这个对象的引用
    Complex& operator++() {
        this->real += 1;
        return *this; // 返回自己
    }

    // 后置++的额外参数类型必须是int,返回原值
    Complex operator++(int) {
        Complex c = *this;
        this->real += 1;
        return c;
    }

private:
    int real;
    int image;
};

ostream& operator<<(ostream& c, const Complex& a) {
    c << a.real << '+' << a.image << 'i';
    return c;
}

class A {

};
A func1() {  // 模拟Complex operator++
    return A();
}

//void func2(A& a) { // 模拟 ostream& operator<<(ostream& c, Complex& a)
void func2(const A& a) {  // 改为常量引用
}

int main() {
    int x = 1;
    cout << ++(++x) << endl; // 3
    cout << x << endl; // 3

    Complex a(10, 10);
    cout << a << endl; // 10+10i
    ++a;
    cout << a << endl; // 11+10i
    cout << ++a << endl; // 12+10i
    cout << ++(++a) << endl; // 14+10i
    cout << a << endl; // 14+10i

    cout << a++ << endl; // 14+10i
    cout << a << endl; // 15+10i

    cout << ((a++)++)++ << endl; // 14+10i
    cout << a << endl; // 15+10i

    //func2(func1()); // 报错。非常量引用的初始值必须为左值

    int b = 5;
    // cout << ((b++)++)++ << endl; // 不能这么调用
    cout << b << endl; // 15+10i

    return 0;
}
赋值重载
#include <iostream>
using namespace std;

class Hero {
public:
    Hero() :m_Data(NULL) {}
    Hero(int data) {
        m_Data = new int;
        *m_Data = data;
    }
    // double free
    ~Hero() {
        if (m_Data) {
            delete m_Data;
            m_Data = NULL;
        }
    }
    int* m_Data;
};
int main() {
    Hero h1(1);
    Hero h2(2);
    cout << h1.m_Data << endl;
    cout << h2.m_Data << endl;
    h1 = h2; // h1中的m_Data被覆盖掉了。 经典问题:内存泄漏
    cout << h1.m_Data << endl;
    cout << h2.m_Data << endl;

    return 0;
}
赋值重载
#include <iostream>
using namespace std;

class Hero {
public:
    Hero() :m_Data(NULL) {}
    Hero(int data) {
        m_Data = new int;
        *m_Data = data;
    }
    // double free
    ~Hero() {
        if (m_Data) {
            delete m_Data;
            m_Data = NULL;
        }
    }

    Hero& operator=(Hero& h) {
        if (m_Data) {
            delete m_Data;
            m_Data = NULL;
        }
        m_Data = new int;
        *m_Data = *h.m_Data;
        return *this;
    }
    int* m_Data;
};
int main() {
    Hero h1(1);
    Hero h2(2);
    Hero h3(3);

    cout << h1.m_Data << endl;
    cout << h2.m_Data << endl;
    h1 = h2;
    cout << h1.m_Data << endl;
    cout << h2.m_Data << endl;

    h3 = (h2 = h3);
    return 0;
}
关系运算重载
#include <iostream>
using namespace std;

class Point {
public:
    Point(int x, int y) :m_x(x), m_y(y) {}

    bool operator==(const Point& other) const { // 常函数
        return m_x == other.m_x && m_y == other.m_y;
    }

    bool operator<(const Point& other) const { // 常函数
        int d = m_x * m_x + m_y * m_y; // 自己到原点的距离
        int otherd = other.m_x * other.m_x + other.m_y * other.m_y;
        return d < otherd;
    }
    bool operator>(const Point& other) const {
        if (*this == other) {
            return false;
        }
        if (*this < other) {
            return false;
        }
        return true;
    }
    // 其它关系运算符也是一样的,略
private:
    int m_x, m_y;
};
int main() {
    Point a(1, 6);
    Point b(2, 5);

    // 如果类没有定义判断关系,== 是不知道的,需要用操作符重载
    if (a == b) {
        cout << "a 和 b 相等" << endl;
    }
    if (a < b) {
        cout << "a 比 b 更加接近原点" << endl;
    }
    else if (a > b) {
        cout << "b 比 a 更加接近原点" << endl;

    }

    return 0;
}
函数调用重载
类当函数调用,并且可以存储状态信息。
#include <iostream>
using namespace std;

// ()
// add()  构建一个对象,这个对象可以当函数用

class AddFunctor {
public:
    AddFunctor() {
        m_acc = 0;
    }
    int operator()(int a, int b) {
        m_acc++;
        return a + b + m_acc;
    }
private:
    int m_acc;
};

int Add(int a, int b) {
    return a + b;
}

int main() {
    AddFunctor add;
    cout << add(5, 6) << endl; // 12
    cout << add(5, 6) << endl; // 13
    cout << add(5, 6) << endl; // 14

    cout << Add(5, 6) << endl; // 普通的函数是不存储状态信息的
    cout << Add(5, 6) << endl; // 11
    cout << Add(5, 6) << endl; // 11

    return 0;
}
继承
继承的语法
普通的类
#include <iostream>
using namespace std;

/*
*       动物
*      /    \
*    猫      狗
*
*/

class Cat {
public:
    void eat() {
        cout << "吃" << endl;
    }
    void sayHi() {
        cout << "喵~" << endl;
    }
};

class Dog {
public:
    void eat() {
        cout << "吃" << endl;
    }
    void sayHi() {
        cout << "汪汪汪~" << endl;
    }
};
int main() {
    Cat c;
    Dog d;

    c.eat();
    d.eat();

    c.sayHi();
    d.sayHi();

    return 0;
}
继承
#include <iostream>
using namespace std;

/*
*       动物
*      /    \
*    猫      狗
*
* 继承的语法
* class 子类 : 继承方式 父类 {}
* 子类 又叫 派生类
* 父类 又叫 基类
*/

// 抽象成一个动物类,有共性部分。省掉冗余代码
class Animal {
public:
    void eat() {
        cout << "吃" << endl;
    }
};

class Cat : public Animal {
public:
    void sayHi() {
        cout << "喵~" << endl;
    }
};

class Dog : public Animal {
public:
    void sayHi() {
        cout << "汪汪汪~" << endl;
    }
};
int main() {
    Cat c;
    Dog d;

    c.eat();
    d.eat();

    c.sayHi();
    d.sayHi();

    return 0;
}
继承方式
访问权限
| 子类继承方式 | 父类访问权限 | 父类 | 父类 |
| public | protected | private | |
| public | public | protected | 无法访问 |
| protected | protected | protected | 无法访问 |
| private | private | private | 无法访问 |
#include <iostream>
using namespace std;

/*
class 子类名 : 继承方式 父类名 {};

继承方式:
公共 public
保护 protected
私有 private

继承权限有3种、访问权限有3种
3 * 3 = 9

             |    public     |     protected      |   private
  public     |    public     |     protected      |   无法访问
  protected  |   protected   |     protected      |   无法访问
  private    |    private    |      private       |   无法访问

public:   类内可以访问,类外也可以访问
protected:  类内可以访问,类外不可访问,且子类可以访问
private:    类内可以访问,类外不可访问,且子类不可访问
*/

class Animal {
public:
    int m_pub;
protected:
    int m_pro;
private:
    int m_pri;
};

class Cat : public Animal {
public:
    Cat() {
        m_pub = 1;
        m_pro = 2;
        //m_pri = 3; // 父类私有成员,子类公有继承,无法访问
    }
};

class BossCat : public Cat {
public:
    BossCat() {
        m_pro = 2; // 父类Cat中不是私有
    }
};

void testCat() {
    Cat c;
    c.m_pub = 1;
    //c.m_pro = 2; // 要么是私有,要么是保护成员
}

class Dog : protected Animal {
public:
    Dog() {
        m_pub = 1;
        m_pro = 2;
        //m_pri = 3; // 父类私有成员,子类保护继承,无法访问
    }
};

void testDog() {
    Dog d;
    //d.m_pub = 1;  // 要么是保护,要么是私有
    //c.m_pro = 2;  // 要么是保护,要么是私有
}

class PolicDog : public Dog {
public:
    PolicDog() {
        m_pub = 1; // 这个变量,在父类中Dog中一定不是私有成员
        m_pro = 2; // 这个变量,在父类中Dog中一定不是私有成员
    }
};

void testDog() {
    Dog d;
    // d.m_pub = 1;   // 要么是保护,要么是私有
    // d.m_pro = 2;   // 要么是保护,要么是私有
}

class Pig : private Animal {
public:
    Pig() {
        m_pub = 1;
        m_pro = 2;
        // m_pri = 3;   // 父类私有成员,子类私有继承,无法访问
    }
};

class WildPig : public Pig {
public:
    WildPig() {
        // m_pub = 1;   // 该变量在父类 Pig 中是私有的
        // m_pro = 2;   // 该变量在父类 Pig 中是私有的
    }
};

void testPig() {
    Pig p;
    // p.m_pub = 1;     // 要么是保护,要么是私有
    // p.m_pro = 2;     // 要么是保护,要么是私有
}

int main() {

    return 0;
}
构造和析构顺序
#include <iostream>
using namespace std;

/*
继承中,构造链里,先先构造的后析构

继承 d -> c -> b -> a

构造顺序为 a b c d 析构顺序为 d c b a
*/
class Animal {
public:
    Animal() {
        cout << "Animal 构造" << endl;
    }
    ~Animal() {
        cout << "Animal 析构" << endl;
    }
};

class Cat : public Animal {
public:
    Cat() {
        cout << "Cat 构造" << endl;
    }
    ~Cat() {
        cout << "Cat 析构" << endl;
    }
};

class BossCat : public Cat {
public:
    BossCat() {
        cout << "BossCat 构造" << endl;
    }
    ~BossCat() {
        cout << "BossCat 析构" << endl;
    }
};

void test() {
    //Animal a;
    //Cat c;
    BossCat bc;
}
int main() {
    test();

    return 0;
}
执行结果
Animal 构造
Cat 构造
BossCat 构造
BossCat 析构
Cat 析构
Animal 析构
同名属性访问
同名属性,父类和子类都有一个相同的变量。
#include <iostream>
using namespace std;

class Animal {
public:
    Animal() {
        m_Data = 17981;
    }
    int m_Data;
};

class Cat : public Animal {
public:
    Cat() {
        m_Data = 29872;
    }
    int m_Data;
};

void test() {
    // 当子类继承父类,并且有同一个变量名时,并不会进行覆盖,需要用一个作用域进行访问就好了。
    Cat c;
    cout << c.m_Data << endl;
    cout << c.Animal::m_Data << endl;

    cout << &(c.m_Data) << endl;
    cout << &(c.Animal::m_Data) << endl;
}

int main() {
    test();

    return 0;
}
同名函数访问
同名函数,父类和子类有一个名字相同的函数。那么子类会不会覆盖掉父类函数?
#include <iostream>
using namespace std;

class Animal {
public:
    Animal() {

    }
    void eat() {
        cout << "动物吃东西" << endl;
    }
};

class Cat : public Animal {
public:
    Cat() {

    }
    void eat() {
        Animal::eat(); // 子类中调父类函数
        cout << "猫吃东西" << endl;
    }
};

int main() {
    Cat c;
    c.eat();
    //c.Animal::eat(); // 可以调父类函数

    return 0;
}
执行结果
动物吃东西
猫吃东西
多继承
多继承,子类有一个类,它可以继承多个父类。
#include <iostream>
using namespace std;

class BaseA {
public:
    int m_A;
    int m_Base;

    BaseA():m_A(0), m_Base(520) {}
};

class BaseB {
public:
    int m_B;
    int m_Base;

    BaseB() :m_B(0), m_Base(1314) {}
};

class BaseC {
public:
    int m_C;

    BaseC() :m_C(0) {}
};

class Son : public BaseA, public BaseB, public BaseC {

};
int main() {
    Son s;
    s.m_A = 1;
    s.m_B = 2;
    s.m_C = 3;

    //s.m_Base = 8; // 报错 不明确,父类A和父类B有同名变量
    s.BaseA::m_Base = 8;
    s.BaseB::m_Base = 9;
    cout << &s.BaseA::m_Base << endl; // 不同的地址
    cout << &s.BaseB::m_Base << endl;
    cout << sizeof(s) << endl; // 20 Son继承了5个int 5*4=20

    return 0;
}
多态
多态分为:静态多态、动态多态
静态多态主要是函数重载和运算符重载,之前已了解过。
动态多态主要是利用派生类和虚函数来实现运行时多态。
所有的东西统一通过代码来理解,概念不用去记它。
多态的语法
#include <iostream>
using namespace std;

/*
多态实现:子类重写了父类的虚函数
*/
class Animal {
public:
    // 虚函数 关键字virtual
    virtual void eat() {
        cout << "动物在吃东西" << endl;
    }
};

class Cat : public Animal {
public:
    void eat() {
        cout << "猫在吃东西" << endl;
    }
};

class Pig : public Animal {
public:
    void eat() {
        cout << "猪在吃东西" << endl;
    }
};

// 调用链 main -> test -> eat -> Animal::eat
// 函数传参是个动物,但是传入不同的动物会产生不同的行为,这就叫多态
void eat(Animal& a) {
    a.eat();
}

void test() {
    Cat c;
    Pig p;
    eat(c);
    eat(p);
}

int main() {
    test();

    return 0;
}
虚函数
多态原理:
- 调用子类对象的虚函数时,会调用到子类自己的函数。
- 一旦有虚函数时,会生成虚函数指针,它保存了这个类上所有的虚函数的地址。并且在子类继承时会覆盖掉虚函数。
虚函数:
#include <iostream>
using namespace std;

/*
多态实现:子类重写了父类的虚函数
*/
class Animal {
public:
    // 虚函数 关键字virtual
    virtual void eat() {
        cout << "动物在吃东西" << endl;
    }
};

class Cat : public Animal {
public:
    void eat() {
        cout << "猫在吃东西" << endl;
    }
};

class Pig : public Animal {
public:
    void eat() {
        cout << "猪在吃东西" << endl;
    }
};

// 调用链 main -> test -> eat -> Animal::eat
// 函数传参是个动物,但是传入不同的动物会产生不同的行为,这就叫多态
void eat(Animal& a) {
    a.eat();
}

void test() {
    Cat c;
    Pig p;
    eat(c);
    eat(p);
}

int main() {
    test();

    return 0;
}
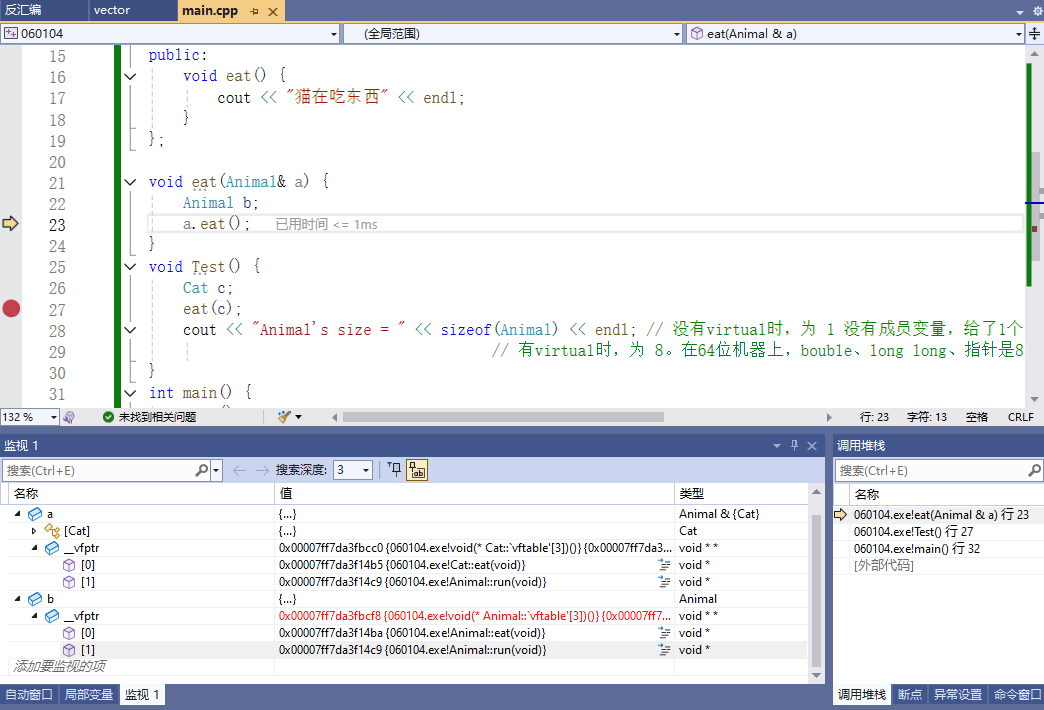
调试:
- eat(c) 处打断点,F5调试,F11进入, F10
- 监视中 输入a 和 c,观察
纯虚函数和抽象类
有时候在写代码时,父类中的函数有可能没有任何实现,都需要子类实现(重写),这就是纯虚函数的目的。
#include <iostream>
using namespace std;

class Animal { // 只要有纯虚函数的类,叫抽象类。抽象类无法实例化对象,子类必须重写这个函数。
public:
    virtual void eat() = 0; // 纯虚函数
};

class Cat : public Animal {
public:
    void eat() {
        cout << "猫在吃东西" << endl;
    }
};

int main() {
    Cat c;
    c.eat();

    return 0;
}
虚析构和纯虚析构
虚析构主要解决内存泄漏问题。
比如,有个父类的指针指向派生类对象,对它进行销毁时,如果父类函数不是virtual就会掉用不到子类的析构函数,从而导致内存泄漏。
#include <iostream>
using namespace std;

class BaseA {
public:
    BaseA() {}
    ~BaseA() {
        cout << "BaseA 销毁了" << endl;
    }
};

class SonA : public BaseA {
public:
    SonA() : m_Value(NULL) {
        m_Value = new int(10);
    }
    ~SonA() {
        cout << "SonA 销毁了" << endl;
        delete m_Value;
    }

    int* m_Value;
};

class BaseB {
public:
    BaseB() {}
    /*
    virtual ~BaseB() { // 虚析构
        cout << "BaseB 销毁了" << endl;
    }
    */
    virtual ~BaseB() = 0; // 纯虚析构。需要在外部实现一下
};

BaseB::~BaseB() {
    cout << "BaseB 销毁了" << endl;
}

class SonB : public BaseB {
public:
    SonB() : m_Value(NULL) {
        m_Value = new int(10);
    }
    ~SonB() {
        cout << "SonB 销毁了" << endl;
        delete m_Value;
    }

    int* m_Value;
};

int main() {
    // 在堆上分配一个SonA对象,指向基类的指针
    BaseA* a = new SonA();
    delete a;  // 执行结果 BaseA 销毁了 。 但是SonA堆中内存m_Value new了但并没有被销毁,会导致内存泄漏
    // 加上virtual就可以了

    BaseB* b = new SonB();
    delete b;

    //BaseB c; // 抽象类,不能实例化

    return 0;
}
执行结果
BaseA 销毁了
SonB 销毁了
BaseB 销毁了
项目-C++游戏开发-扫雷
扫雷-面向对象编程
- 资源 mine.png
- 常量 const.h
- 格子 Grid.h, Grid.cpp
- 地图 Map.h, Map.cpp
- 主函数 man.cpp
预计 100 行左右的代码,实际上可以更短,但是为了让代码相对较清晰,有些代码不能省,那我们现在开始。
环境安装
visual studio 2022 下载安装 https://visualstudio.microsoft.com/zh-hans
环境配置
首先要下载 SFML:https://www.sfml-dev.org/download/sfml/2.6.1/, Visual C++ 17(2022) 解压到本地放代码的文件夹。如D:\tmp\game\SFML-2.6.1
然后创建一个项目,项目创建完以后,在 main.cpp 中敲入第一句代码,Graphics.hpp 这个头文件通常包含了与图形绘制、窗口管理 等相关的函数声明 以及 类的定义。通过包含这个头文件,程序就能够使用 SFML 库提供的图形处理功能,具体哪些功能呢?比如 创建窗口、绘制图形、处理输入 等等操作。
minesweeper/main.cpp
#include <SFML/Graphics.hpp>
这时候我们发现,无法打开这个文件。因为需要进行简单的配置
- 点击项目,右键属性,选择这里的 C/C++,选择【附加包含目录】,选择 SFML 的 include 目录,点击确定。
- D:\tmp\game\SFML-2.6.1\include
- 然后点击 链接器 -> 常规 -> 附加库目录,选择 SFML 的 lib 目录:
- D:\tmp\game\SFML-2.6.1\lib
- 再点击 链接器 ->输入,选择右边的【附加依赖项】,把这些内容拷贝进去:
(这里需要注意,对于 sfml-xxx-d.lib 是适用于 debug 模式的,sfml-xxx.lib 是适用于 release 模式的)
sfml-graphics-d.lib
sfml-window-d.lib
sfml-system-d.lib
sfml-audio-d.lib
opengl32.lib
freetype.lib
winmm.lib
gdi32.lib
最后点击应用,就配置完毕了。
然后再把 SFML-2.6.1\bin 目录下的 动态链接库文件 dll 都拷贝到项目目录下,即与main.cpp同级目录。
然后我们写个 main 函数来测试一下。
#include <SFML/Graphics.hpp>

int main() {
    sf::RenderWindow app(sf::VideoMode(816, 576), "MineSweeper");
    while (app.isOpen()) {

    }
    return 0;
}
这样一来,就可以显示一个基本的窗口了,接下来我们来解释解释这些代码的含义。
基础框架
命名空间
sf 是这个库的命名空间,基本上所有的接口都是从这里取的,利用两个冒号来获取相应的函数或者类,如果不想写这段前缀呢,我们可以和 std 一样,在代码前面写上这么一句话:
using namespace sf;
这样一来,这些前缀就都可以去掉了。
窗口创建
RenderWindow win(VideoMode(816, 576), "MineSweeper");
这段代码,就是实例化了一个窗口对象,RenderWindow 是一个类,win 是一个对象名,这一段就是有参构造函数的传参,我们可以 F12 进去看它的定义。
这里的 VideoMode 也是一个类,这两个参数是 VideoMode 构造函数的传参,分别代表了窗口的宽高。
字符集
VideoMode 中构造函数的第二个传参,是一个字符串,代表了窗口的标题,然后我们实现一个 while 循环。
while (win.isOpen()) {

}
并且循环条件是 win.isOpen() 为 True ,这个函数的含义就是当窗口 win 被打开的时候就返回真,那么一旦关闭,就会返回假,这时候程序就会结束掉,我们来运行一下。
我们看到窗口左上角有个标题,这时候我希望这个标题是中文的,可以改下这个字符串。
这时候就会发现,标题变成了乱码
为什么呢?我们来看下这个字符串的类型,是一个字符数组,它最初是为了处理英文字符而设计的,只能表示基本的 ASCII 字符集(一个字节表示一个字符)。而中文字符,通常需要多个字节来表示,不同的中文编码方式(如 GBK、UTF-8 等)占用的字节数可能不同。
所以如果使用char类型来存储中文字符时,如果编码方式不匹配,就容易出现乱码。例如,在某些编码方式下,一个中文字符可能占用 2 个或更多字节,如果按照单个字节来读取或处理,就会导致字符的不完整或错误解释。
这时候我们只需要在前面加上一个 L,再把鼠标移动上去,就会发现,它的类型变成了 wchar_t,这个叫宽字符,它一般占用 2 个或者以上字节。使用wchar_t可以处理包含中文字符的情况。
#include <SFML/Graphics.hpp>
using namespace sf;

int main() {
    RenderWindow app(VideoMode(816, 576), L"扫雷");
    while (app.isOpen()) {

    }
    return 0;
}
运行一下, 这样就没问题了。
关闭事件
这时候,当我们点击窗口的时候,会出现卡顿,并且未响应,这个原因是什么呢?
- 因为我们没有处理事件,首先定义一个事件的类,然后调用 pollEvent 这个接口,就可以获取到事件队列里的最先来的那个事件,包括 鼠标事件、键盘事件 等等。
那么再学完数据结构以后,你就能理解队列的概念了,就是一种先进先出的数据结构。
可以通过获取事件的类型 type ,知道这是一个什么样的事件,比如 Event::Closed 代表窗口关闭事件,也就是你点了右上角的关闭按钮。当然,F12进去以后,可以看到更多事件的定义。
可以在控制台里输出一句话,来印证我们的观点,调用 win.close() 以后,win 的 isOpen 接口就会返回假,这样程序也就结束了。运行一下。
#include <SFML/Graphics.hpp>
#include <iostream>
using namespace sf;

int main() {
    RenderWindow win(VideoMode(816, 576), L"扫雷");

    while (win.isOpen()) {
        Event e;
        while (win.pollEvent(e)) {
            if (e.type == Event::Closed) {
                std::cout << "按下关闭按钮" << std::endl;
                win.close();
            }
        }
    }
    return 0;
}
资源加载

接下来我们准备好这么一张图片,如果不会画图,可以直接用我的这张图,用画图工具打开以后,大概是宽为 1152,高为 96 的图片,每个小格子的大小是 96 x 96。
怎么把这张图片上的某一个格子,在屏幕上显示出来,就是我们这堂课要讲的内容了。
纹理对象
首先我们创建一个纹理对象,并且把这张图加载到内存中,纹理是游戏开发中一个比较重要的概念,可以理解成贴图, 2D游戏中,不同的对象,让人能够产生不同的视觉效果,就是利用不同的纹理实现的。
mine.png图片文件放到项目目录下。
Texture t;
t.loadFromFile("mine.png");
精灵
然后我们再实例化一个精灵,并且把刚才准备好的纹理对象,作为初始化参数,传给它。精灵可以这么去理解,我拿到一个纹理的某一个矩形区域,然后可以对它进行平移、缩放、旋转 等等变换,然后绘制到屏幕上的这么一个东西,我们叫它精灵。
Sprite s(t);
比如我可以这样:
在原先这张纹理贴图上,(96, 0) 的坐标上,取出一个 (96, 96) 的矩形,并且设置坐标为 (16, 16),然后把它的缩放值设置为原来的 1/2 ,这样就变成了一个 48 x 48 的矩形,然后调用 draw 接口绘制到 win 对象上面去,这时候其实屏幕上还没有东西,直到调用 display 以后,才会真正把它绘制到窗口上。
可以这么去理解,draw 调用完,实际上还没有真正的绘制到窗口上,只是把要画的内容,画到了一张画布上面,display 调用完,才会最终把这张画布的内容,一次性绘制到你的窗口上。
s.setTextureRect(IntRect(96, 0, 96, 96));
s.setPosition(16, 16);
s.setScale(Vector2f(0.5, 0.5));
win.draw(s);
win.display();
接下来我们来写这么一段话:
int r = rand() % 12;
s.setTextureRect(IntRect(96 * r, 0, 96, 96));
随机一个 0 到 11 的数字,然后让它乘上 96 ,去改变这个纹理矩形左上角的 x 坐标,来看看效果,你会发现每一帧,都在改变图片,而实际上 0 到 11 就代表了扫雷这个游戏中,每个会用到的格子。
整体代码 main.cpp
#include <SFML/Graphics.hpp>
#include <iostream>
using namespace sf;

int main() {
    RenderWindow win(VideoMode(816, 576), L"扫雷");
    Texture t;
    t.loadFromFile("mine.png");
    Sprite s(t);

    int r = rand() % 12;
    s.setTextureRect(IntRect(96 * r, 0, 96, 96));
    s.setPosition(16, 16);
    s.setScale(Vector2f(0.5, 0.5));
    win.draw(s);
    win.display();

    while (win.isOpen()) {
        Event e;
        while (win.pollEvent(e)) {
            if (e.type == Event::Closed) {
                std::cout << "按下关闭按钮" << std::endl;
                win.close();
            }
        }
    }
    return 0;
}
初始地图
定义一个 showGrid 的二维数组,是一个 15 列 x 10 行 的地图,代表实际显示出来的地图元素,一开始都为 10, 10 就是这个图片,代表的是一个未知的元素。
int showGrid[16][11];
for (int i = 1; i <= 15; ++i) {
    for (int j = 1; j <= 10; ++j) {
        showGrid[i][j] = 10;
    }
}
然后在绘制的时候,遍历每一个地图元素,处理精灵的纹理、位置以及缩放,并且绘制到 win 这个对象上。
for (int i = 1; i <= 15; ++i) {
    for (int j = 1; j <= 10; ++j) {
        s.setTextureRect(IntRect(96 * showGrid[i][j], 0, 96, 96));
        s.setPosition(i * 48, j * 48);
        s.setScale(Vector2f(0.5, 0.5));
        win.draw(s);
    }
}
最终一次性展现到窗口上,运行。这样我们就得到了一张初始的地图。
整体代码 main.cpp
#include <SFML/Graphics.hpp>
#include <iostream>
using namespace sf;

int main() {
    RenderWindow win(VideoMode(816, 576), L"扫雷");
    Texture t;
    t.loadFromFile("mine.png");
    Sprite s(t);

    int r = rand() % 12;
    s.setTextureRect(IntRect(96 * r, 0, 96, 96));
    s.setPosition(16, 16);
    s.setScale(Vector2f(0.5, 0.5));
    win.draw(s);
    win.display();

    int showGrid[16][11];
    for (int i = 1; i <= 15; ++i) {
        for (int j = 1; j <= 10; ++j) {
            showGrid[i][j] = 10;
        }
    }
    for (int i = 1; i <= 15; ++i) {
        for (int j = 1; j <= 10; ++j) {
            s.setTextureRect(IntRect(96 * showGrid[i][j], 0, 96, 96));
            s.setPosition(i * 48, j * 48);
            s.setScale(Vector2f(0.5, 0.5));
            win.draw(s);
        }
    }
    win.display();

    while (win.isOpen()) {
        Event e;
        while (win.pollEvent(e)) {
            if (e.type == Event::Closed) {
                std::cout << "按下关闭按钮" << std::endl;
                win.close();
            }
        }
    }
    return 0;
}
常量定义
这个时候我们发现,有太多数字了,这个我们叫它们 magic number,很难看,而且维护起来极其麻烦,所以我们想办法把数字变成常量。
首先引入第一个常量:
const int ORI_GRID_SIZE = 96;
它代表了在这张图片中,每个格子的像素大小,是 96。
const int GRID_SIZE = 48;
而 GRID_SIZE 呢,则代表显示到窗口的时候,每个格子实际的像素大小。
然后定义 MAP_COL 和 MAP_ROW ,分别代表这个扫雷地图,有多少列多少行:
const int MAP_COL = 15;
const int MAP_ROW = 10;
然后把之前 15 和 10 的地方,都替换掉(注意下面有个 10 是不能替换,因为含义不同):
int showGrid[MAP_COL+1][MAP_ROW+1];
for (int i = 1; i <= MAP_COL; ++i) {
    for (int j = 1; j <= MAP_ROW; ++j) {
        showGrid[i][j] = 10;      // 这个10可不是 MAP_ROW
    }
}
遍历每个格子,进行渲染:
s.setScale(Vector2f(GRID_SIZE * 1.0 / ORI_GRID_SIZE, GRID_SIZE * 1.0 / ORI_GRID_SIZE));
for (int i = 1; i <= MAP_COL; ++i) {
    for (int j = 1; j <= MAP_ROW; ++j) {
        s.setTextureRect(IntRect(ORI_GRID_SIZE * showGrid[i][j], 0, ORI_GRID_SIZE, ORI_GRID_SIZE));
        s.setPosition(i * GRID_SIZE, j * GRID_SIZE);
        win.draw(s);
    }
}
而对于整个窗口大小,可以是 格子数 乘上 (列数 + 2),左边加一列格子,右边加一列格子,上下也是一样的,所以窗口大小可以定义成这样的常量:
const int WIN_W = GRID_SIZE * (1 + MAP_COL + 1);
const int WIN_H = GRID_SIZE * (1 + MAP_ROW + 1);
最后,showGrid 里面还有一个 10,这个我们可以用枚举来实现:
enum GridType {
    GT_EMPTY = 0,
    GT_COUNT_1 = 1,
    GT_COUNT_2 = 2,
    GT_COUNT_3 = 3,
    GT_COUNT_4 = 4,
    GT_COUNT_5 = 5,
    GT_COUNT_6 = 6,
    GT_COUNT_7 = 7,
    GT_COUNT_8 = 8,
    GT_BOMB = 9,
    GT_HIDE = 10,
    GT_FLAG = 11
};
这样一来,代码就好看很多了。
整体代码main.cpp
#include <SFML/Graphics.hpp>
#include <iostream>
using namespace sf;

const int ORI_GRID_SIZE = 96;
const int GRID_SIZE = 48;
const int MAP_COL = 15;
const int MAP_ROW = 10;
const int WIN_W = GRID_SIZE * (1 + MAP_COL + 1);
const int WIN_H = GRID_SIZE * (1 + MAP_ROW + 1);
enum GridType {
    GT_EMPTY = 0,
    GT_COUNT_1 = 1,
    GT_COUNT_2 = 2,
    GT_COUNT_3 = 3,
    GT_COUNT_4 = 4,
    GT_COUNT_5 = 5,
    GT_COUNT_6 = 6,
    GT_COUNT_7 = 7,
    GT_COUNT_8 = 8,
    GT_BOMB = 9,
    GT_HIDE = 10,
    GT_FLAG = 11
};

int main() {
    RenderWindow win(VideoMode(WIN_W, WIN_H), L"扫雷");
    Texture t;
    t.loadFromFile("mine.png");
    Sprite s(t);

    /*
    int r = rand() % 12;
    s.setTextureRect(IntRect(96 * r, 0, 96, 96));
    s.setPosition(16, 16);
    s.setScale(Vector2f(0.5, 0.5));
    win.draw(s);
    win.display();
    */

    int showGrid[MAP_COL+1][MAP_ROW+1];
    for (int i = 1; i <= MAP_COL; ++i) {
        for (int j = 1; j <= MAP_ROW; ++j) {
            showGrid[i][j] = GridType::GT_HIDE;
        }
    }
    s.setScale(Vector2f(GRID_SIZE * 1.0 / ORI_GRID_SIZE, GRID_SIZE * 1.0 / ORI_GRID_SIZE));
    for (int i = 1; i <= MAP_COL; ++i) {
        for (int j = 1; j <= MAP_ROW; ++j) {
            s.setTextureRect(IntRect(ORI_GRID_SIZE * showGrid[i][j], 0, ORI_GRID_SIZE, ORI_GRID_SIZE));
            s.setPosition(i * GRID_SIZE, j * GRID_SIZE);
            win.draw(s);
        }
    }
    win.display();

    while (win.isOpen()) {
        Event e;
        while (win.pollEvent(e)) {
            if (e.type == Event::Closed) {
                std::cout << "按下关闭按钮" << std::endl;
                win.close();
            }
        }
    }
    return 0;
}
地图随机
showGrid 代表的是显示出来的格子类型,所以再定义一个 grid,代表真实的格子类型,并且利用随机函数,1/6 的概率是炸弹,5/6的概率是空。
GridType grid[MAP_COL + 1][MAP_ROW + 1];
GridType showGrid[MAP_COL+1][MAP_ROW+1];
for (int i = 1; i <= MAP_COL; ++i) {
    for (int j = 1; j <= MAP_ROW; ++j) {
        showGrid[i][j] = GridType::GT_HIDE;
        if (rand() % 6 == 0) {
            grid[i][j] = GridType::GT_BOMB;
        }
        else {
            grid[i][j] = GridType::GT_EMPTY;
        }
    }
}
定义周围的八个方向
const int DIR[8][2] = {
    {-1, -1}, {-1, 0}, {-1, 1},
    {0, -1}, {0, 1},
    {1, -1}, {1, 0}, {1, 1},
};
并且统计每个非炸弹的格子的周围八个方向,进行计数,从而改变当前格子的类型
for (int i = 1; i <= MAP_COL; ++i) {
    for (int j = 1; j <= MAP_ROW; ++j) {
        if (grid[i][j] == GridType::GT_EMPTY) {
            int cnt = 0;
            for (int k = 0; k < 8; ++k) {
                int ti = i + DIR[k][0];
                int tj = j + DIR[k][1];
                if (grid[ti][tj] == GridType::GT_BOMB) {
                    ++cnt;
                }
            }
            grid[i][j] = (GridType)cnt;
        }
    }
}
然后只需要在显示之前,把所有的实际格子内容,赋值给对应的显示格子,就相当于摊牌了。运行一下看看效果。
showGrid[i][j] = grid[i][j];
整个代码main.cpp
#include <SFML/Graphics.hpp>
#include <iostream>
using namespace sf;

const int DIR[8][2] = {
    {-1,-1},{-1,0},{-1,1},
    {0,-1},{0,1},
    {1,-1},{1,0},{1,1},
};
const int ORI_GRID_SIZE = 96;
const int GRID_SIZE = 48;
const int MAP_COL = 15;
const int MAP_ROW = 10;
const int WIN_W = GRID_SIZE * (1 + MAP_COL + 1);
const int WIN_H = GRID_SIZE * (1 + MAP_ROW + 1);
enum GridType {
    GT_EMPTY = 0,
    GT_COUNT_1 = 1,
    GT_COUNT_2 = 2,
    GT_COUNT_3 = 3,
    GT_COUNT_4 = 4,
    GT_COUNT_5 = 5,
    GT_COUNT_6 = 6,
    GT_COUNT_7 = 7,
    GT_COUNT_8 = 8,
    GT_BOMB = 9,
    GT_HIDE = 10,
    GT_FLAG = 11
};

int main() {
    RenderWindow win(VideoMode(WIN_W, WIN_H), L"扫雷");
    Texture t;
    t.loadFromFile("mine.png");
    Sprite s(t);

    /*
    int r = rand() % 12;
    s.setTextureRect(IntRect(96 * r, 0, 96, 96));
    s.setPosition(16, 16);
    s.setScale(Vector2f(0.5, 0.5));
    win.draw(s);
    win.display();
    */

    GridType showGrid[MAP_COL + 1][MAP_ROW + 1]; // 显示出来的格子类型
    GridType grid[MAP_COL + 1][MAP_ROW + 1]; // 真实的格子类型
    for (int i = 1; i <= MAP_COL; ++i) {
        for (int j = 1; j <= MAP_ROW; ++j) {
            showGrid[i][j] = GridType::GT_HIDE;
            if (rand() % 6 == 0) {
                grid[i][j] = GridType::GT_BOMB;
            }
            else {
                grid[i][j] = GridType::GT_EMPTY;
            }
        }
    }
    // 统计每个非炸弹的格子的周围八个方向,进行计数,从而改变当前格子的类型
    for (int i = 1; i <= MAP_COL; ++i) {
        for (int j = 1; j <= MAP_ROW; ++j) {
            if (grid[i][j] == GridType::GT_EMPTY) {
                int cnt = 0;
                for (int k = 0; k < 8; ++k) {
                    int ti = i + DIR[k][0];
                    int tj = j + DIR[k][1];
                    if (grid[ti][tj] == GridType::GT_BOMB) {
                        ++cnt;
                    }
                }
                grid[i][j] = (GridType)cnt;
            }
            showGrid[i][j] = grid[i][j];
        }
    }

    s.setScale(Vector2f(GRID_SIZE * 1.0 / ORI_GRID_SIZE, GRID_SIZE * 1.0 / ORI_GRID_SIZE));
    for (int i = 1; i <= MAP_COL; ++i) {
        for (int j = 1; j <= MAP_ROW; ++j) {
            s.setTextureRect(IntRect(ORI_GRID_SIZE * showGrid[i][j], 0, ORI_GRID_SIZE, ORI_GRID_SIZE));
            s.setPosition(i * GRID_SIZE, j * GRID_SIZE);
            win.draw(s);
        }
    }
    win.display();

    while (win.isOpen()) {
        Event e;
        while (win.pollEvent(e)) {
            if (e.type == Event::Closed) {
                std::cout << "按下关闭按钮" << std::endl;
                win.close();
            }
        }
    }
    return 0;
}
点击排雷
获取鼠标点击到的格子位置
Vector2i pos = Mouse::getPosition(win);
int x = pos.x / GRID_SIZE;
int y = pos.y / GRID_SIZE;
并且处理鼠标左键 和 鼠标右键 的 按下事件
if (e.type == Event::MouseButtonPressed) {
    if (e.key.code == Mouse::Left) {
        showGrid[x][y] = grid[x][y];
    }
    else if (e.key.code == Mouse::Right) {
        showGrid[x][y] = GridType::GT_FLAG;
    }
}
最后,如果当前的格子被确认是雷,那么所有格子都公开,游戏结束:
if( showGrid[x][y] == GridType::GT_BOMB)
    showGrid[i][j] = grid[i][j];
整个代码main.cpp
#include <SFML/Graphics.hpp>
#include <iostream>
using namespace sf;

const int DIR[8][2] = {
    {-1,-1},{-1,0},{-1,1},
    {0,-1},{0,1},
    {1,-1},{1,0},{1,1},
};
const int ORI_GRID_SIZE = 96;
const int GRID_SIZE = 48;
const int MAP_COL = 15;
const int MAP_ROW = 10;
const int WIN_W = GRID_SIZE * (1 + MAP_COL + 1);
const int WIN_H = GRID_SIZE * (1 + MAP_ROW + 1);
enum GridType {
    GT_EMPTY = 0,
    GT_COUNT_1 = 1,
    GT_COUNT_2 = 2,
    GT_COUNT_3 = 3,
    GT_COUNT_4 = 4,
    GT_COUNT_5 = 5,
    GT_COUNT_6 = 6,
    GT_COUNT_7 = 7,
    GT_COUNT_8 = 8,
    GT_BOMB = 9,
    GT_HIDE = 10,
    GT_FLAG = 11
};

int main() {
    RenderWindow win(VideoMode(WIN_W, WIN_H), L"扫雷");
    Texture t;
    t.loadFromFile("mine.png");
    Sprite s(t);

    GridType showGrid[MAP_COL + 1][MAP_ROW + 1]; // 显示出来的格子类型
    GridType grid[MAP_COL + 1][MAP_ROW + 1]; // 真实的格子类型
    for (int i = 1; i <= MAP_COL; ++i) {
        for (int j = 1; j <= MAP_ROW; ++j) {
            showGrid[i][j] = GridType::GT_HIDE;
            if (rand() % 6 == 0) { // 1/6 的概率是炸弹,5/6的概率是空。
                grid[i][j] = GridType::GT_BOMB;
            }
            else {
                grid[i][j] = GridType::GT_EMPTY;
            }
        }
    }
    // 统计每个非炸弹的格子的周围八个方向,进行计数,从而改变当前格子的类型
    for (int i = 1; i <= MAP_COL; ++i) {
        for (int j = 1; j <= MAP_ROW; ++j) {
            if (grid[i][j] == GridType::GT_EMPTY) {
                int cnt = 0;
                for (int k = 0; k < 8; ++k) {
                    int ti = i + DIR[k][0];
                    int tj = j + DIR[k][1];
                    if (grid[ti][tj] == GridType::GT_BOMB) {
                        ++cnt;
                    }
                }
                grid[i][j] = (GridType)cnt;
            }
        }
    }

    while (win.isOpen()) {
        Event e;
        // 获取鼠标点击到的格子位置
        Vector2i pos = Mouse::getPosition(win);
        int x = pos.x / GRID_SIZE;
        int y = pos.y / GRID_SIZE;

        while (win.pollEvent(e)) {
            if (e.type == Event::Closed) {
                std::cout << "按下关闭按钮" << std::endl;
                win.close();
            }

            // 处理鼠标左键 和 鼠标右键 的 按下事件
            if (e.type == Event::MouseButtonPressed) {
                if (e.key.code == Mouse::Left) {
                    showGrid[x][y] = grid[x][y];
                }
                else if (e.key.code == Mouse::Right) {
                    showGrid[x][y] = GridType::GT_FLAG;
                }
            }
        }
        // 绘图
        s.setScale(Vector2f(GRID_SIZE * 1.0 / ORI_GRID_SIZE, GRID_SIZE * 1.0 / ORI_GRID_SIZE));
        for (int i = 1; i <= MAP_COL; ++i) {
            for (int j = 1; j <= MAP_ROW; ++j) {
                if (showGrid[x][y] == GridType::GT_BOMB) // 如果当前的格子被确认是雷,那么所有格子都公开
                    showGrid[i][j] = grid[i][j];
                //showGrid[i][j] = grid[i][j];

                s.setTextureRect(IntRect(ORI_GRID_SIZE * showGrid[i][j], 0, ORI_GRID_SIZE, ORI_GRID_SIZE));
                s.setPosition(i * GRID_SIZE, j * GRID_SIZE);
                win.draw(s);
            }
        }
        win.display();
    }
    return 0;
}
格子类化
接下来我们采用面向对象的思想,来改造下这个代码,首先是一个格子,目前用了两个数据来存储,一个是实际的格子类型,一个是显示的格子类型,我现在可以把它封装到一个类里面,定义两个私有成员变量。
分别用 m_realGridType 和 m_showGridType 来表示。
然后实现它们的 set 和 get 成员函数。并且把相关代码也进行替换。
class Grid {
public:
    Grid() {
        m_realGridType = GridType::GT_EMPTY;
        m_showGridType = GridType::GT_EMPTY;
    }
    void SetRealGridType(GridType realGType) {
        m_realGridType = realGType;
    }
    void SetShowGridType(GridType realGType) {
        m_showGridType = realGType;
    }
    GridType GetShowGridType() {
        return m_showGridType;
    }
    void ShowGrid() {
        m_showGridType = m_realGridType;
    }
    bool IsEmpty() const {
        return m_realGridType == GridType::GT_EMPTY;
    }
    bool IsRealBomb() const {
        return m_realGridType == GridType::GT_BOMB;
    }
    bool IsShowBomb() const {
        return m_showGridType == GridType::GT_BOMB;
    }
private:
    GridType m_realGridType;
    GridType m_showGridType;
};
改造下初始化地图的代码:
Grid grid[MAP_COL + 1][MAP_ROW + 1];
for (int i = 1; i <= MAP_COL; ++i) {
    for (int j = 1; j <= MAP_ROW; ++j) {
        grid[i][j].SetShowGridType(GridType::GT_HIDE);
        if (rand() % 6 == 0) {
            grid[i][j].SetRealGridType(GridType::GT_BOMB);
        }
        else {
            grid[i][j].SetRealGridType(GridType::GT_EMPTY);
        }
    }
}
for (int i = 1; i <= MAP_COL; ++i) {
    for (int j = 1; j <= MAP_ROW; ++j) {
        if (grid[i][j].IsEmpty()) {
            int cnt = 0;
            for (int k = 0; k < 8; ++k) {
                int ti = i + DIR[k][0];
                int tj = j + DIR[k][1];
                if (grid[ti][tj].IsRealBomb()) {
                    ++cnt;
                }
            }
            if (cnt > 0) {
                grid[i][j].SetRealGridType((GridType)cnt);
            }
        }
    }
}
改造下鼠标按键的代码:
if (e.key.code == Mouse::Left) {
    grid[x][y].ShowGrid();
}
else if (e.key.code == Mouse::Right) {
    grid[x][y].SetShowGridType(GridType::GT_FLAG);
}
改造下渲染的代码:
if( grid[x][y].IsShowBomb())
    grid[i][j].ShowGrid();
s.setTextureRect(IntRect(ORI_GRID_SIZE * grid[i][j].GetShowGridType(), 0, ORI_GRID_SIZE, ORI_GRID_SIZE));
整个代码main.cpp
#include <SFML/Graphics.hpp>
#include <iostream>
using namespace sf;

const int DIR[8][2] = {
    {-1,-1},{-1,0},{-1,1},
    {0,-1},{0,1},
    {1,-1},{1,0},{1,1},
};
const int ORI_GRID_SIZE = 96;
const int GRID_SIZE = 48;
const int MAP_COL = 15;
const int MAP_ROW = 10;
const int WIN_W = GRID_SIZE * (1 + MAP_COL + 1);
const int WIN_H = GRID_SIZE * (1 + MAP_ROW + 1);
enum GridType {
    GT_EMPTY = 0,
    GT_COUNT_1 = 1,
    GT_COUNT_2 = 2,
    GT_COUNT_3 = 3,
    GT_COUNT_4 = 4,
    GT_COUNT_5 = 5,
    GT_COUNT_6 = 6,
    GT_COUNT_7 = 7,
    GT_COUNT_8 = 8,
    GT_BOMB = 9,
    GT_HIDE = 10,
    GT_FLAG = 11
};

class Grid {
public:
    Grid() {
        m_realGridType = GridType::GT_EMPTY;
        m_showGridType = GridType::GT_EMPTY;
    }
    void SetRealGridType(GridType realGType) {
        m_realGridType = realGType;
    }
    void SetShowGridType(GridType showGType) {
        m_showGridType = showGType;
    }
    GridType GetShowGridType() {
        return m_showGridType;
    }
    void ShowGrid() {
        m_showGridType = m_realGridType;
    }
    bool IsEmpty() const {
        return m_realGridType == GridType::GT_EMPTY;
    }
    bool IsRealBomb() const {
        return m_realGridType == GridType::GT_BOMB;
    }
    bool IsShowBomb() const {
        return m_realGridType == GridType::GT_BOMB;
    }
private:
    GridType m_realGridType;
    GridType m_showGridType;
};

int main() {
    RenderWindow win(VideoMode(WIN_W, WIN_H), L"扫雷");
    Texture t;
    t.loadFromFile("mine.png");
    Sprite s(t);

    Grid grid[MAP_COL + 1][MAP_ROW + 1];
    for (int i = 1; i <= MAP_COL; ++i) {
        for (int j = 1; j <= MAP_ROW; ++j) {
            grid[i][j].SetShowGridType(GridType::GT_HIDE);
            if (rand() % 6 == 0) { // 1/6 的概率是炸弹,5/6的概率是空。
                grid[i][j].SetRealGridType(GridType::GT_BOMB);
            }
            else {
                grid[i][j].SetRealGridType(GridType::GT_EMPTY);
            }
        }
    }
    // 统计每个非炸弹的格子的周围八个方向,进行计数,从而改变当前格子的类型
    for (int i = 1; i <= MAP_COL; ++i) {
        for (int j = 1; j <= MAP_ROW; ++j) {
            if (grid[i][j].IsEmpty()) {
                int cnt = 0;
                for (int k = 0; k < 8; ++k) {
                    int ti = i + DIR[k][0];
                    int tj = j + DIR[k][1];
                    if (grid[ti][tj].IsRealBomb()) {
                        ++cnt;
                    }
                }
                if (cnt > 0) {
                    grid[i][j].SetRealGridType((GridType)cnt);
                }
            }
        }
    }

    while (win.isOpen()) {
        Event e;
        // 获取鼠标点击到的格子位置
        Vector2i pos = Mouse::getPosition(win);
        int x = pos.x / GRID_SIZE;
        int y = pos.y / GRID_SIZE;

        while (win.pollEvent(e)) {
            if (e.type == Event::Closed) {
                std::cout << "按下关闭按钮" << std::endl;
                win.close();
            }

            // 处理鼠标左键 和 鼠标右键 的 按下事件
            if (e.type == Event::MouseButtonPressed) {
                if (e.key.code == Mouse::Left) {
                    grid[x][y].ShowGrid();
                }
                else if (e.key.code == Mouse::Right) {
                    grid[x][y].SetShowGridType(GridType::GT_FLAG);
                }
            }
        }
        // 绘图
        s.setScale(Vector2f(GRID_SIZE * 1.0 / ORI_GRID_SIZE, GRID_SIZE * 1.0 / ORI_GRID_SIZE));
        for (int i = 1; i <= MAP_COL; ++i) {
            for (int j = 1; j <= MAP_ROW; ++j) {
                if (grid[x][y].IsShowBomb()) // 如果当前的格子被确认是雷,那么所有格子都公开
                    grid[i][j].ShowGrid();

                s.setTextureRect(IntRect(ORI_GRID_SIZE * grid[i][j].GetShowGridType(), 0, ORI_GRID_SIZE, ORI_GRID_SIZE));
                s.setPosition(i * GRID_SIZE, j * GRID_SIZE);
                win.draw(s);
            }
        }
        win.display();
    }
    return 0;
}
地图类化
除了把格子用类来实现,整个地图也可以用类来实现。
class Map {
public:
    void init() {
        for (int i = 1; i <= MAP_COL; ++i) {
            for (int j = 1; j <= MAP_ROW; ++j) {
                grid[i][j].SetShowGridType(GridType::GT_HIDE);
                if (rand() % 6 == 0) {
                    grid[i][j].SetRealGridType(GridType::GT_BOMB);
                }
                else {
                    grid[i][j].SetRealGridType(GridType::GT_EMPTY);
                }
            }
        }
        for (int i = 1; i <= MAP_COL; ++i) {
            for (int j = 1; j <= MAP_ROW; ++j) {
                if (grid[i][j].IsEmpty()) {
                    int cnt = 0;
                    for (int k = 0; k < 8; ++k) {
                        int ti = i + DIR[k][0];
                        int tj = j + DIR[k][1];
                        if (grid[ti][tj].IsRealBomb()) {
                            ++cnt;
                        }
                    }
                    if (cnt > 0) {
                        grid[i][j].SetRealGridType((GridType)cnt);
                    }
                }
            }
        }
    }

    void handleMouseEvent(Event& e, int x, int y) {
        if (e.type == Event::MouseButtonPressed) {
            if (e.key.code == Mouse::Left) {
                grid[x][y].ShowGrid();
            }
            else if (e.key.code == Mouse::Right) {
                grid[x][y].SetShowGridType(GridType::GT_FLAG);
            }
        }
    }

    void draw(RenderWindow& win, Sprite& s, int x, int y) {
        s.setScale(Vector2f(GRID_SIZE * 1.0 / ORI_GRID_SIZE, GRID_SIZE * 1.0 / ORI_GRID_SIZE));
        for (int i = 1; i <= MAP_COL; ++i) {
            for (int j = 1; j <= MAP_ROW; ++j) {
                if (grid[x][y].IsShowBomb())
                    grid[i][j].ShowGrid();
                s.setTextureRect(IntRect(ORI_GRID_SIZE * grid[i][j].GetShowGridType(), 0, ORI_GRID_SIZE, ORI_GRID_SIZE));
                s.setPosition(i * GRID_SIZE, j * GRID_SIZE);
                win.draw(s);
            }
        }
    }

private:
    Grid grid[MAP_COL + 1][MAP_ROW + 1];
};
这样实际游戏,调用的代码就可以很短了,所有的逻辑都封装到地图类里去了。
int main() {
    RenderWindow win(VideoMode(WIN_W, WIN_H), L"扫雷");
    Texture t;
    t.loadFromFile("mine.png");
    Sprite s(t);
    Map mp;
    mp.init();
    while (win.isOpen()) {
        Vector2i pos = Mouse::getPosition(win);
        int x = pos.x / GRID_SIZE;
        int y = pos.y / GRID_SIZE;
        Event e;
        while (win.pollEvent(e)) {
            if (e.type == Event::Closed) {
                std::cout << "按下关闭按钮" << std::endl;
                win.close();
            }
            mp.handleMouseEvent(e, x, y);
        }
        mp.draw(win, s, x, y);
        win.display();
    }
    return 0;
}
整个代码main.cpp
#include <SFML/Graphics.hpp>
#include <iostream>
using namespace sf;

const int DIR[8][2] = {
    {-1,-1},{-1,0},{-1,1},
    {0,-1},{0,1},
    {1,-1},{1,0},{1,1},
};
const int ORI_GRID_SIZE = 96;
const int GRID_SIZE = 48;
const int MAP_COL = 15;
const int MAP_ROW = 10;
const int WIN_W = GRID_SIZE * (1 + MAP_COL + 1);
const int WIN_H = GRID_SIZE * (1 + MAP_ROW + 1);
enum GridType {
    GT_EMPTY = 0,
    GT_COUNT_1 = 1,
    GT_COUNT_2 = 2,
    GT_COUNT_3 = 3,
    GT_COUNT_4 = 4,
    GT_COUNT_5 = 5,
    GT_COUNT_6 = 6,
    GT_COUNT_7 = 7,
    GT_COUNT_8 = 8,
    GT_BOMB = 9,
    GT_HIDE = 10,
    GT_FLAG = 11
};

class Grid {
public:
    Grid() {
        m_realGridType = GridType::GT_EMPTY;
        m_showGridType = GridType::GT_EMPTY;
    }
    void SetRealGridType(GridType realGType) {
        m_realGridType = realGType;
    }
    void SetShowGridType(GridType showGType) {
        m_showGridType = showGType;
    }
    GridType GetShowGridType() {
        return m_showGridType;
    }
    void ShowGrid() {
        m_showGridType = m_realGridType;
    }
    bool IsEmpty() const {
        return m_realGridType == GridType::GT_EMPTY;
    }
    bool IsRealBomb() const {
        return m_realGridType == GridType::GT_BOMB;
    }
    bool IsShowBomb() const {
        return m_realGridType == GridType::GT_BOMB;
    }
private:
    GridType m_realGridType;
    GridType m_showGridType;
};

class Map {
public:
    void init() {
        for (int i = 1; i <= MAP_COL; ++i) {
            for (int j = 1; j <= MAP_ROW; ++j) {
                grid[i][j].SetShowGridType(GridType::GT_HIDE);
                if (rand() % 6 == 0) { // 1/6 的概率是炸弹,5/6的概率是空。
                    grid[i][j].SetRealGridType(GridType::GT_BOMB);
                }
                else {
                    grid[i][j].SetRealGridType(GridType::GT_EMPTY);
                }
            }
        }
        // 统计每个非炸弹的格子的周围八个方向,进行计数,从而改变当前格子的类型
        for (int i = 1; i <= MAP_COL; ++i) {
            for (int j = 1; j <= MAP_ROW; ++j) {
                if (grid[i][j].IsEmpty()) {
                    int cnt = 0;
                    for (int k = 0; k < 8; ++k) {
                        int ti = i + DIR[k][0];
                        int tj = j + DIR[k][1];
                        if (grid[ti][tj].IsRealBomb()) {
                            ++cnt;
                        }
                    }
                    if (cnt > 0) {
                        grid[i][j].SetRealGridType((GridType)cnt);
                    }
                }
            }
        }
    }
    void handleMouseEvent(Event& e, int x, int y) {
        if (e.type == Event::MouseButtonPressed) {
            if (e.key.code == Mouse::Left) {
                grid[x][y].ShowGrid();
            }
            else if (e.key.code == Mouse::Right) {
                grid[x][y].SetShowGridType(GridType::GT_FLAG);
            }
        }
    }
    void draw(RenderWindow& win, Sprite& s, int x, int y) {
        s.setScale(Vector2f(GRID_SIZE * 1.0 / ORI_GRID_SIZE, GRID_SIZE * 1.0 / ORI_GRID_SIZE));
        for (int i = 1; i <= MAP_COL; ++i) {
            for (int j = 1; j <= MAP_ROW; ++j) {
                if (grid[x][y].IsShowBomb()) // 如果当前的格子被确认是雷,那么所有格子都公开
                    grid[i][j].ShowGrid();

                s.setTextureRect(IntRect(ORI_GRID_SIZE * grid[i][j].GetShowGridType(), 0, ORI_GRID_SIZE, ORI_GRID_SIZE));
                s.setPosition(i * GRID_SIZE, j * GRID_SIZE);
                win.draw(s);
            }
        }
    }
private:
    Grid grid[MAP_COL + 1][MAP_ROW + 1];
};

int main() {
    RenderWindow win(VideoMode(WIN_W, WIN_H), L"扫雷");
    Texture t;
    t.loadFromFile("mine.png");
    Sprite s(t);
    Map mp;

    mp.init();
    while (win.isOpen()) {
        Event e;
        // 获取鼠标点击到的格子位置
        Vector2i pos = Mouse::getPosition(win);
        int x = pos.x / GRID_SIZE;
        int y = pos.y / GRID_SIZE;

        while (win.pollEvent(e)) {
            if (e.type == Event::Closed) {
                std::cout << "按下关闭按钮" << std::endl;
                win.close();
            }

            // 处理鼠标左键 和 鼠标右键 的 按下事件
            mp.handleMouseEvent(e, x, y);
        }
        // 绘图
        mp.draw(win, s, x, y);
        win.display();
    }
    return 0;
}
接口优化
接下来我们来看,这个地图类对外提供的接口,只有三个了。一个是初始化,一个是处理事件,一个是渲染,并且渲染接口每次都把 窗口 和 精灵 传进去,实际上是没有必要的,因为在这个大循环里,这两个对象,是不变的。
所以这两个对象,实际上,可以作为 Map 类的成员变量,当然这里必须用指针。如果不传指针,就会通过拷贝构造函数,生成一个新的对象,这不是我们想要的,我需要它还是原来那个对象。
...
private:
    RenderWindow*    win;
    Sprite*          sprite;
    Grid             grid[MAP_COL + 1][MAP_ROW + 1];
};
然后修改 Map 类的初始化函数,如下:
void init(RenderWindow* win, Sprite* sprite) {
    this->win = win;
    this->sprite = sprite;
    ...
}


mp.init(&win, &s);
这里记住要传指针,所以把 win 和 s 的地址传进去就好了。最后修改 draw 函数(因为是指针,所以所有的 . 变成 -> 就好了):
void draw(int x, int y) {
    sprite->setScale(Vector2f(GRID_SIZE * 1.0 / ORI_GRID_SIZE, GRID_SIZE * 1.0 / ORI_GRID_SIZE));
    for (int i = 1; i <= MAP_COL; ++i) {
        for (int j = 1; j <= MAP_ROW; ++j) {
            if (grid[x][y].IsShowBomb()) {
                grid[i][j].ShowGrid();
            }
            sprite->setTextureRect(IntRect(ORI_GRID_SIZE * grid[i][j].GetShowGridType(), 0, ORI_GRID_SIZE, ORI_GRID_SIZE));
            sprite->setPosition(i * GRID_SIZE, j * GRID_SIZE);
            win->draw(*sprite);
        }
    }
}
sprite 作为 RenderWindow 的成员函数 draw 的参数,是一个对象,所以采用 * 进行解引用。
整个代码main.cpp
#include <SFML/Graphics.hpp>
#include <iostream>
using namespace sf;

const int DIR[8][2] = {
    {-1,-1},{-1,0},{-1,1},
    {0,-1},{0,1},
    {1,-1},{1,0},{1,1},
};
const int ORI_GRID_SIZE = 96;
const int GRID_SIZE = 48;
const int MAP_COL = 15;
const int MAP_ROW = 10;
const int WIN_W = GRID_SIZE * (1 + MAP_COL + 1);
const int WIN_H = GRID_SIZE * (1 + MAP_ROW + 1);
enum GridType {
    GT_EMPTY = 0,
    GT_COUNT_1 = 1,
    GT_COUNT_2 = 2,
    GT_COUNT_3 = 3,
    GT_COUNT_4 = 4,
    GT_COUNT_5 = 5,
    GT_COUNT_6 = 6,
    GT_COUNT_7 = 7,
    GT_COUNT_8 = 8,
    GT_BOMB = 9,
    GT_HIDE = 10,
    GT_FLAG = 11
};

class Grid {
public:
    Grid() {
        m_realGridType = GridType::GT_EMPTY;
        m_showGridType = GridType::GT_EMPTY;
    }
    void SetRealGridType(GridType realGType) {
        m_realGridType = realGType;
    }
    void SetShowGridType(GridType showGType) {
        m_showGridType = showGType;
    }
    GridType GetShowGridType() {
        return m_showGridType;
    }
    void ShowGrid() {
        m_showGridType = m_realGridType;
    }
    bool IsEmpty() const {
        return m_realGridType == GridType::GT_EMPTY;
    }
    bool IsRealBomb() const {
        return m_realGridType == GridType::GT_BOMB;
    }
    bool IsShowBomb() const {
        return m_realGridType == GridType::GT_BOMB;
    }
private:
    GridType m_realGridType;
    GridType m_showGridType;
};

class Map {
public:
    void init(RenderWindow* win, Sprite* sprite) {
        this->win = win;
        this->sprite = sprite;
        for (int i = 1; i <= MAP_COL; ++i) {
            for (int j = 1; j <= MAP_ROW; ++j) {
                grid[i][j].SetShowGridType(GridType::GT_HIDE);
                if (rand() % 6 == 0) { // 1/6 的概率是炸弹,5/6的概率是空。
                    grid[i][j].SetRealGridType(GridType::GT_BOMB);
                }
                else {
                    grid[i][j].SetRealGridType(GridType::GT_EMPTY);
                }
            }
        }
        // 统计每个非炸弹的格子的周围八个方向,进行计数,从而改变当前格子的类型
        for (int i = 1; i <= MAP_COL; ++i) {
            for (int j = 1; j <= MAP_ROW; ++j) {
                if (grid[i][j].IsEmpty()) {
                    int cnt = 0;
                    for (int k = 0; k < 8; ++k) {
                        int ti = i + DIR[k][0];
                        int tj = j + DIR[k][1];
                        if (grid[ti][tj].IsRealBomb()) {
                            ++cnt;
                        }
                    }
                    if (cnt > 0) {
                        grid[i][j].SetRealGridType((GridType)cnt);
                    }
                }
            }
        }
    }
    void handleMouseEvent(Event& e, int x, int y) {
        if (e.type == Event::MouseButtonPressed) {
            if (e.key.code == Mouse::Left) {
                grid[x][y].ShowGrid();
            }
            else if (e.key.code == Mouse::Right) {
                grid[x][y].SetShowGridType(GridType::GT_FLAG);
            }
        }
    }
    void draw(int x, int y) {
        sprite->setScale(Vector2f(GRID_SIZE * 1.0 / ORI_GRID_SIZE, GRID_SIZE * 1.0 / ORI_GRID_SIZE));
        for (int i = 1; i <= MAP_COL; ++i) {
            for (int j = 1; j <= MAP_ROW; ++j) {
                if (grid[x][y].IsShowBomb()) // 如果当前的格子被确认是雷,那么所有格子都公开
                    grid[i][j].ShowGrid();

                sprite->setTextureRect(IntRect(ORI_GRID_SIZE * grid[i][j].GetShowGridType(), 0, ORI_GRID_SIZE, ORI_GRID_SIZE));
                sprite->setPosition(i * GRID_SIZE, j * GRID_SIZE);
                win->draw(*sprite);
            }
        }
    }
private:
    RenderWindow* win;
    Sprite* sprite;
    Grid grid[MAP_COL + 1][MAP_ROW + 1];
};

int main() {
    RenderWindow win(VideoMode(WIN_W, WIN_H), L"扫雷");
    Texture t;
    t.loadFromFile("mine.png");
    Sprite s(t);
    Map mp;

    mp.init(&win, &s);
    while (win.isOpen()) {
        Event e;
        // 获取鼠标点击到的格子位置
        Vector2i pos = Mouse::getPosition(win);
        int x = pos.x / GRID_SIZE;
        int y = pos.y / GRID_SIZE;

        while (win.pollEvent(e)) {
            if (e.type == Event::Closed) {
                std::cout << "按下关闭按钮" << std::endl;
                win.close();
            }

            // 处理鼠标左键 和 鼠标右键 的 按下事件
            mp.handleMouseEvent(e, x, y);
        }
        // 绘图
        mp.draw(x, y);
        win.display();
    }
    return 0;
}
文件拆分
这个时候我们发现这个文件行数太多了,所以我们想办法把类拆到其它文件去。首先,先把 Grid 类的内容拆出去,新建一个 Grid.h 文件,实现如下:
#pragma once

const int DIR[8][2] = {
    {-1,-1},{-1,0},{-1,1},
    {0,-1},{0,1},
    {1,-1},{1,0},{1,1},
};
const int ORI_GRID_SIZE = 96;
const int GRID_SIZE = 48;
const int MAP_COL = 15;
const int MAP_ROW = 10;
const int WIN_W = GRID_SIZE * (1 + MAP_COL + 1);
const int WIN_H = GRID_SIZE * (1 + MAP_ROW + 1);

enum GridType {
    GT_EMPTY = 0,
    GT_COUNT_1 = 1,
    GT_COUNT_2 = 2,
    GT_COUNT_3 = 3,
    GT_COUNT_4 = 4,
    GT_COUNT_5 = 5,
    GT_COUNT_6 = 6,
    GT_COUNT_7 = 7,
    GT_COUNT_8 = 8,
    GT_BOMB = 9,
    GT_HIDE = 10,
    GT_FLAG = 11
};

class Grid {
public:
    Grid() {
        m_realGridType = GridType::GT_EMPTY;
        m_showGridType = GridType::GT_EMPTY;
    }
    void SetRealGridType(GridType realGType) {
        m_realGridType = realGType;
    }
    void SetShowGridType(GridType realGType) {
        m_showGridType = realGType;
    }
    GridType GetShowGridType() {
        return m_showGridType;
    }
    void ShowGrid() {
        m_showGridType = m_realGridType;
    }
    bool IsEmpty() const {
        return m_realGridType == GridType::GT_EMPTY;
    }
    bool IsRealBomb() const {
        return m_realGridType == GridType::GT_BOMB;
    }
    bool IsShowBomb() const {
        return m_showGridType == GridType::GT_BOMB;
    }
private:
    GridType m_realGridType;
    GridType m_showGridType;
};
然后在 main.cpp 里面,写上这么一句话:
#include "Grid.h"
这时候,我们希望 .h 文件里面不要有函数的实现,只保留声明。然后在源文件里,新建一个 Grid.cpp 文件,把函数的实现写在这个文件里。
const.h
#pragma once
const int DIR[8][2] = {
    {-1,-1},{-1,0},{-1,1},
    {0,-1},{0,1},
    {1,-1},{1,0},{1,1},
};
const int ORI_GRID_SIZE = 96;
const int GRID_SIZE = 48;
const int MAP_COL = 15;
const int MAP_ROW = 10;
const int WIN_W = GRID_SIZE * (1 + MAP_COL + 1);
const int WIN_H = GRID_SIZE * (1 + MAP_ROW + 1);

enum GridType {
    GT_EMPTY = 0,
    GT_COUNT_1 = 1,
    GT_COUNT_2 = 2,
    GT_COUNT_3 = 3,
    GT_COUNT_4 = 4,
    GT_COUNT_5 = 5,
    GT_COUNT_6 = 6,
    GT_COUNT_7 = 7,
    GT_COUNT_8 = 8,
    GT_BOMB = 9,
    GT_HIDE = 10,
    GT_FLAG = 11
};
Grid.h
#pragma once
#include “const.h”

class Grid {
public:
    Grid();
    void SetRealGridType(GridType realGType);
    void SetShowGridType(GridType realGType);
    GridType GetShowGridType();
    void ShowGrid();
    bool IsEmpty() const;
    bool IsRealBomb() const;
    bool IsShowBomb() const;
private:
    GridType m_realGridType;
    GridType m_showGridType;
};
Grid.cpp 如下:
#include "Grid.h"

Grid::Grid() {
    m_realGridType = GridType::GT_EMPTY;
    m_showGridType = GridType::GT_EMPTY;
}

void Grid::SetRealGridType(GridType realGType) {
    m_realGridType = realGType;
}
void Grid::SetShowGridType(GridType realGType) {
    m_showGridType = realGType;
}
GridType Grid::GetShowGridType() {
    return m_showGridType;
}
void Grid::ShowGrid() {
    m_showGridType = m_realGridType;
}
bool Grid::IsEmpty() const {
    return m_realGridType == GridType::GT_EMPTY;
}
bool Grid::IsRealBomb() const {
    return m_realGridType == GridType::GT_BOMB;
}
bool Grid::IsShowBomb() const {
    return m_showGridType == GridType::GT_BOMB;
}
同样,在实现一个 Map.h 和 Map.cpp。
Map.h
#pragma once

#include <SFML/Graphics.hpp>
#include "Grid.h"
using namespace sf;

class Map {
public:
    void init(RenderWindow* win, Sprite* sprite);
    void handleMouseEvent(Event& e, int x, int y);
    void draw(int x, int y);

private:
    RenderWindow* win;
    Sprite*    sprite;
    Grid      grid[MAP_COL + 1][MAP_ROW + 1];
};
Map.cpp
#include "Map.h"

void Map::init(RenderWindow* win, Sprite* sprite) {
    this->win = win;
    this->sprite = sprite;

    for (int i = 1; i <= MAP_COL; ++i) {
        for (int j = 1; j <= MAP_ROW; ++j) {
            grid[i][j].SetShowGridType(GridType::GT_HIDE);
            if (rand() % 6 == 0) {
                grid[i][j].SetRealGridType(GridType::GT_BOMB);
            }
            else {
                grid[i][j].SetRealGridType(GridType::GT_EMPTY);
            }
        }
    }
    for (int i = 1; i <= MAP_COL; ++i) {
        for (int j = 1; j <= MAP_ROW; ++j) {
            if (grid[i][j].IsEmpty()) {
                int cnt = 0;
                for (int k = 0; k < 8; ++k) {
                    int ti = i + DIR[k][0];
                    int tj = j + DIR[k][1];
                    if (grid[ti][tj].IsRealBomb()) {
                        ++cnt;
                    }
                }
                if (cnt > 0) {
                    grid[i][j].SetRealGridType((GridType)cnt);
                }
            }
        }
    }
}

void Map::handleMouseEvent(Event& e, int x, int y) {
    if (e.type == Event::MouseButtonPressed) {
        if (e.key.code == Mouse::Left) {
            grid[x][y].ShowGrid();
        }
        else if (e.key.code == Mouse::Right) {
            grid[x][y].SetShowGridType(GridType::GT_FLAG);
        }
    }
}

void Map::draw(int x, int y) {
    sprite->setScale(Vector2f(GRID_SIZE * 1.0 / ORI_GRID_SIZE, GRID_SIZE * 1.0 / ORI_GRID_SIZE));
    for (int i = 1; i <= MAP_COL; ++i) {
        for (int j = 1; j <= MAP_ROW; ++j) {
            if (grid[x][y].IsShowBomb()) {
                grid[i][j].ShowGrid();
            }
            sprite->setTextureRect(IntRect(ORI_GRID_SIZE * grid[i][j].GetShowGridType(), 0, ORI_GRID_SIZE, ORI_GRID_SIZE));
            sprite->setPosition(i * GRID_SIZE, j * GRID_SIZE);
            win->draw(*sprite);
        }
    }
}
main.cpp
#include <SFML/Graphics.hpp>
#include <iostream>
#include "Grid.h"
#include "Map.h"
using namespace sf;

int main() {
    RenderWindow win(VideoMode(WIN_W, WIN_H), L"扫雷");
    Texture t;
    t.loadFromFile("mine.png");
    Sprite s(t);
    Map mp;

    mp.init(&win, &s);
    while (win.isOpen()) {
        Event e;
        // 获取鼠标点击到的格子位置
        Vector2i pos = Mouse::getPosition(win);
        int x = pos.x / GRID_SIZE;
        int y = pos.y / GRID_SIZE;

        while (win.pollEvent(e)) {
            if (e.type == Event::Closed) {
                std::cout << "按下关闭按钮" << std::endl;
                win.close();
            }

            // 处理鼠标左键 和 鼠标右键 的 按下事件
            mp.handleMouseEvent(e, x, y);
        }
        // 绘图
        mp.draw(x, y);
        win.display();
    }
    return 0;
}
这样一来,我们的 main 函数就变得非常清晰了。所以面向对象编程,会让代码变得简单。
游戏重开
然后一个游戏结束以后,我们希望它能够重开,在 Map 中,引入一个私有成员变量 isRunning,并且引入一个 initGame 的函数,围绕 isRuning 进行逻辑修改。
一旦按到一个雷,那么 isRuning 就从 true 变成 false,然后左键按下的时候,根据 isRunning 是 true 还是 false 做不同的处理,如果为 true,则保留原先的逻辑;如果为 false,则重新初始化游戏,开始新的一局。 Map.h
#pragma once
#include <SFML/Graphics.hpp>
#include "Grid.h"
using namespace sf;

class Map {
public:
    void init(RenderWindow* win, Sprite* sprite);
    void initGame();
    void handleMouseEvent(Event& e, int x, int y);
    void draw(int x, int y);
private:
    RenderWindow* win;
    Sprite* sprite;
    Grid grid[MAP_COL + 1][MAP_ROW + 1];
    bool isRunning;
};
Map.cpp
#include "Map.h"

void Map::init(RenderWindow* win, Sprite* sprite) {
    this->win = win;
    this->sprite = sprite;
    initGame();
}

void Map::initGame() {
    this->isRunning = true;
    for (int i = 1; i <= MAP_COL; ++i) {
        for (int j = 1; j <= MAP_ROW; ++j) {
            grid[i][j].SetShowGridType(GridType::GT_HIDE);
            if (rand() % 6 == 0) { // 1/6 的概率是炸弹,5/6的概率是空。
                grid[i][j].SetRealGridType(GridType::GT_BOMB);
            }
            else {
                grid[i][j].SetRealGridType(GridType::GT_EMPTY);
            }
        }
    }
    // 统计每个非炸弹的格子的周围八个方向,进行计数,从而改变当前格子的类型
    for (int i = 1; i <= MAP_COL; ++i) {
        for (int j = 1; j <= MAP_ROW; ++j) {
            if (grid[i][j].IsEmpty()) {
                int cnt = 0;
                for (int k = 0; k < 8; ++k) {
                    int ti = i + DIR[k][0];
                    int tj = j + DIR[k][1];
                    if (grid[ti][tj].IsRealBomb()) {
                        ++cnt;
                    }
                }
                if (cnt > 0) {
                    grid[i][j].SetRealGridType((GridType)cnt);
                }
            }
        }
    }
}
void Map::handleMouseEvent(Event& e, int x, int y) {
    if (e.type == Event::MouseButtonPressed) {
        if (e.key.code == Mouse::Left) {
            if (isRunning) {
                grid[x][y].ShowGrid();
                if (grid[x][y].IsShowBomb()) {
                    isRunning = false;
                }
            }
            else {
                initGame();
            }
        }
        else if (e.key.code == Mouse::Right) {
            grid[x][y].SetShowGridType(GridType::GT_FLAG);
        }
    }
}
void Map::draw(int x, int y) {
    sprite->setScale(Vector2f(GRID_SIZE * 1.0 / ORI_GRID_SIZE, GRID_SIZE * 1.0 / ORI_GRID_SIZE));
    for (int i = 1; i <= MAP_COL; ++i) {
        for (int j = 1; j <= MAP_ROW; ++j) {
            if (!isRunning) // 如果当前的格子被确认是雷,那么所有格子都公开
                grid[i][j].ShowGrid();

            sprite->setTextureRect(IntRect(ORI_GRID_SIZE * grid[i][j].GetShowGridType(), 0, ORI_GRID_SIZE, ORI_GRID_SIZE));
            sprite->setPosition(i * GRID_SIZE, j * GRID_SIZE);
            win->draw(*sprite);
        }
    }
}