Linux: 实时错误监控-Sentry
- TAGS: Middleware
简介
sentry就扮演着一个错误收集的角色,将你的项目和sentry结合起来,无论谁在 项目使用中报错,sentry都会第一次时间通知开发者,出现了什么错误,错误出 现在哪,帮你记录错误,便于你解决问题,这就是sentry。
什么是DSN
DSN是连接客户端(项目)与sentry服务端,让两者能够通信的钥匙;每当我们在 sentry服务端创建一个新的项目,都会得到一个独一无二的DSN,也就是密钥。 在客户端初始化时会用到这个密钥,这样客户端报错,服务端就能抓到你对应 项目的错误了。
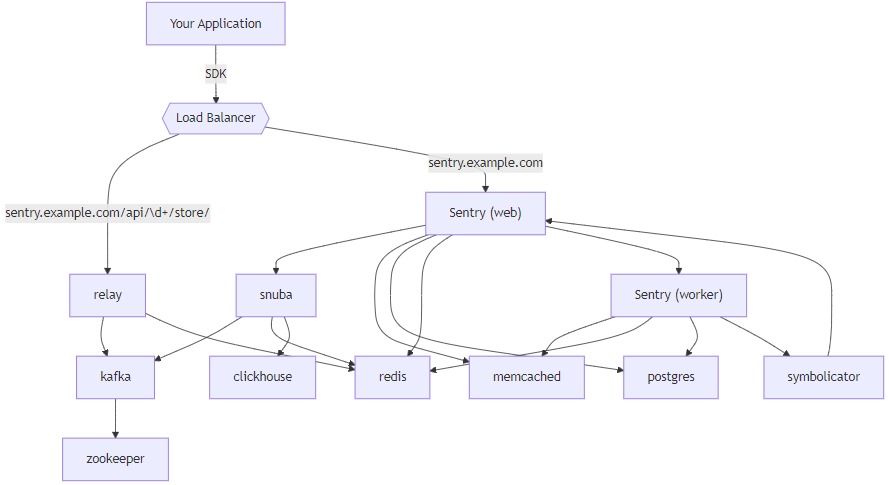
架构:https://develop.sentry.dev/application/architecture/

安装
https://github.com/sentry-kubernetes/charts/blob/develop/charts/sentry/README.md
helm pull sentry/sentry
tar xf sentry-25.10.0.tgz
cd sentry
创建sentry名称空间及自定义账号:
kubectl  create ns sentry

cat <<\EOF> sentry-custom-account.yaml
apiVersion: v1
kind: Secret
metadata:
  name: sentry-custom-account
  namespace: sentry
type: Opaque
stringData:
  admin-password: 74mJ4Z0xxx
  s3-access-key-id: AKIAU6xxx
  s3-secret-access-key: Cr4BHYkxxx
  mail-password: nAKTIxxx
EOF

kubectl  apply -f sentry-custom-account.yaml
value.yaml 修改
#管理员用户
user:
  create: true
  email: [email protected]
  #password: aa

  ## set this value to an existingSecret name to create the admin user with the password in the secret
  existingSecret: sentry-admin-password


asHook: true #首次安装为true来初始化,之后更新时改为false

#sentry-worker和sentry-web之间共享数据,使用云对象存存储s3或者efs文件存储。这里使用s3存储
#如果使用文件系统是RWO访问模式,  就把web服务的strategyType: RollingUpdate 改为的strategyType: Recreate
filestore:
  backend: s3
  s3:
    existingSecret: sentry-custom-account
    bucketName: sentry-filestore-data
  #  endpointUrl:
  #  signature_version:
    region_name: af-south-1
  #  default_acl:


#將 activeDeadlineSeconds 設定為 1000 以免 pods 還未完成工作就被以為是Error 直接將整個安裝中斷掉。
hooks:
  activeDeadlineSeconds: 1000

#邮箱
mail:
  backend: smtp
  useTls: true
  useSsl: false
  username: [email protected]
  #password: ""
  existingSecret: sentry-custom-account
  existingSecretKey: mail-password
  port: 587
  host: smtp.gmail.com
  from: [email protected]
#注意,如果使用gmail邮箱,需要开启双重认证后,找到应用专用密码,创建16位密码

symbolicator:
  enabled: true

#URL, DSN 客户端回调地址
system:
  url: "https://kubesentry.<your-domain>"

#域名
ingress:
  enabled: true
  regexPathStyle: nginx
  ingressClassName: nginx-prod
  alb:
    httpRedirect: false
  hostname: kubesentry.cici.com

#目前镜像不支持arm架构,创建amd节点组,nodeSelecor指定node
  nodeSelector: {type: adm-ops}
#vim   :%s@nodeSelector:.*@nodeSelector: {type: adm-ops}@g
amd镜像服务: clickhouse\cleanup
sentry:
  cleanup:
    nodeSelector: {type: adm-ops}

clickhouse:
  enabled: true
  clickhouse:
    nodeSelector: {type: adm-ops}

kafka:
  enabled: true
  provisioning:
    enabled: true
    nodeSelector: {type: adm-ops}
安装
helm install sentry sentry/sentry -n sentry -f ./values-new.yaml --dry-run
helm upgrade --install sentry sentry/sentry -n sentry -f ./values-new.yaml  --debug --wait
初始化数据库\创建用户
kubectl  exec -it -n sentry $(kubectl get pods  -n sentry  |grep sentry-web |awk '{print $1}') bash
sentry upgrade
sentry createuser --force-update
重启服务
for s in `kubectl -n sentry get deploy |sed '1d'|awk '{print $1}'`; do echo $s; kubectl -n sentry rollout restart deploy $s ;done
卸载
helm uninstall sentry -n sentry
kubectl delete pods -n sentry --all
kubectl delete job -n sentry --all
# 删除 pvc
kubectl delete pvc --all -n sentry
使用
- 创建团队: setting–>team
- 增加成员:
- 创建项目:new project
- 项目告警:Alert
参考: