Linux: Cloudforecast
- TAGS: Linux
CloudForecast
CloudForecast 简介
CloudForecast 的是一个系统管理员的工具或监控的框架,以监测服务器和其它资源,作为内部是使用了 Perl 和 RRDtool 加 Gearman 的分布调度支持,设计的主要目录是为了管理监控小型和大型企业中的服务器.也很合适二次开发.
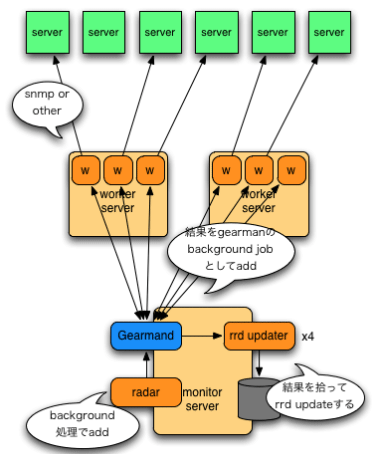
这个软件的架构如下。使用了gearman 来任务调度,所以可以无限增加监控机器.

git 的项目地址: http://github.com/kazeburo/cloudforecast
CloudForecast 安装
CloudForecast 相关依赖的安装:
在简短的介绍
安装这个软件前,需要 rrdtool 和 perl 还需要有 SNMP 的支持
# ubuntu 的安装
sudo apt-get install librrds-perl libsnmp-perl

# CentOS 的安装
sudo yum install net-snmp-perl

# rrdtool 的安装,需要使用 EPEL 的 rpm 扩展,见我另一个文章 yum 高级使用技巧
sudo yum install rrdtool-perl
CloudForecast 的安装
使用 git 下载这个项目的源码,在使用 cpanm 来安装依赖关系
$ git clone git://github.com/kazeburo/cloudforecast.git
$ cd cloudforecast
$ cpanm -l extlib --installdeps .
注:目录是本地目录,cpanm 安装到 extlib 目录,然后使用 local::lib 来加载进这个项目中的.
如果要监控 MySQL 的状态,这个模块是必须的 DBD::mysql.
配置CloudForecast
下面是配置文件,复制并编辑示例
配置文件
cp cloudforecast_sample.yaml cloudforecast.yaml
服务器列表文件
cp server_list_sample.yaml server_list.yaml
示例配置文件(cloudforecast_sample.yaml)
---
config:
# 如果您使用 gearman ,需要在这指定 germand 主机名和端口
  gearman_enable: 0
  gearman_server:
    host: localhost
    port: 7003
# RRD 的存放地址. 如果使用 / 就使用绝对路径
  data_dir: data
#如data_dir: /usr/local/cloudforecast/rra
# 监控配置文件条目
  host_config_dir: host_config

  component_config:
# SNMP 的一些设置 community 和 version 的信息
  SNMP:
    community: public   #snmp外部实用名字
    version: 2
# MySQL 监控的用户和密码
  MySQL:
    user: root
    password: ""
监控条目
[root@rabbit-hd-212216 cloudforecast]# ll  host_config/
total 16
-rw-r--r-- 1 root root 473 Nov  6  2015 basic.yaml
-rw-r--r-- 1 root root  95 Nov  6  2015 httpd8080.yaml
-rw-r--r-- 1 root root 113 Nov  6  2015 httpd.yaml
-rw-r--r-- 1 root root  75 Mar 22  2016 mysql.yaml

[root@rabbit-hd-212216 cloudforecast]# cat host_config/basic.yaml
---
# component_configはこの監視項目の設定内だけで利用されます。
# 部分的にSNMPのcommunity名が異なる場合などに利用できます
# resourceには、監視項目を追加してきます。実際の監視内容は、CloudForecast::Data::Foo で定義
# されています。「:」で区切った値はオプションとして定義モジュールに渡されます
component_config:
resources:
  - traffic:eth0
  - traffic:eth1
  - basic

[root@rabbit-hd-212216 cloudforecast]# cat host_config/httpd.yaml
---
component_config:
resources:
  - traffic:2:eth0
  - traffic:3:eth1
  - basic
  - http:80
  - memcached:11211

 [root@rabbit-hd-212216 cloudforecast]# cat host_config/mysql.yaml
---
component_config:
resources:
  #- traffic:2:eth0
  - mysql
  - innodb
示例服务器列表文件(serverlistsample.yaml)
--- #Dev
# --- #Hogeと書くことでサーバ一覧を区切ることができます
# config 是指主机需要配置什么监测项目
# 主机的配置是“IP地址[空格]主机名[空格]备注“
servers:
- config: basic.yaml
hosts:
- 192.168.55.10 dev1 develop
- 192.168.55.11 dev2 develop

servers:
- config: httpd.yaml
label: DB #小标题
hosts:
- 192.168.51.10 web1 web memcached
- 192.168.51.11 web2 web memcached
- config: mysql.yaml
hosts:
- 192.168.51.60 db1 mysql master
- 192.168.51.61 db2 mysql slave
- 192.168.51.62 db2 mysql slave
- config: basic.yaml
hosts:
- 192.168.51.90 batch1 batch

servers:
  - config: basic.yaml
    hosts:
      - 192.168.55.10 dev1 develop
      - 192.168.55.11 dev2 develop

--- #Production 名子可随意填写
servers:
  - config: httpd.yaml
    label: DB #小标题
    hosts:
      - 192.168.51.10 web1 web memcached
      - 192.168.51.11 web2 web memcached
  - config: mysql.yaml
    hosts:
      - 192.168.51.60 db1 mysql master
      - 192.168.51.61 db2 mysql slave
      - 192.168.51.62 db2 mysql slave
  - config: basic.yaml
    hosts:
      - 192.168.51.90 batch1 batch
启动CloudForecast
守护进程.对远程的资源和数据进行检索 每5分钟一次
./cloudforecast_radar -c cloudforecast.yaml -l server_list.yaml
Web 显示用的服务器 5000 的端口
./cloudforecast_web -p 5000 -c cloudforecast.yaml -l server_list.yaml
深入 CloudForecast
CloudForecast 由RRDTool工具包装而成、被设计作为信息检索的框架.
CloudForecast 一共有四个大的部分.
- 一个不断循环守护进程
- HTTPD 用来显示信息
- Gearman 的 worker 采集的信息
- Gearman 的 进行 RRD文件的更新工作
在比较小的规模的时候 ,可以不使用 Gearman 就能达到性能的要求,如果你想看看架构图,可以看这个 blog 上的显示的这个
1. 不断循环守护进程
$ ./cloudforecast_radar -r -c cloudforecast.yaml -l server_list.yaml
从启动开始每5分钟更新一次
- -r 重新启动选项,重新启动时自动更新配置文件和库
- -c 配置文件
- -l 服务器列表
2. web server
$ ./cloudforecast_web -r -p 5000 -c cloudforecast.yaml -l server_list.yaml
查看图表,通过类 HTTPD
- -p 指定 httpd 的 port
- -o | -host httpd 的 Listen 主机 IP.默认为本机所有 IP
- –allow-from 客户端IP/被访问的IP段,您可以指定多个 192.168.0.1 or 192.168.0.1/24 如果你不指定,就是不控制任何访问
- –front-proxy 如果您前面使用的是反向代理,您可以指定多个,IP地址/ IP段.
3. 采集远程 snmp 的信息,通过 Gearman 来调度
$ ./cf_fetcher_worker -r -c cloudforecast.yaml -max-workers 2 -max-request-per-child 100 -max-exection-time 60
geamarn 调度 worker 进行远程信息检索采集
- -max-worker prefork 多少个 worker 同来
- -max-request-per-child 在处理时间的这个工作进程.如果处理的任务超过了这个数,这个进程重新启动
- -max-exection-time 如果你的 worker 超时,停止掉 worker
4. Gearman 调度 worker进行 RRD 的文件更新
$ ./cf_updater_worker -r -c cloudforecast.yaml -max-workers 2 -max-request-per-child 100 -max-exection-time 60
Gearman 让 worker 对 RRD 文件写入信息
环境变量 CF_DEBUG=1 当这个成立时.输出调试日志
范例

[root@rabbit-hd-212216 ~]# cat /usr/local/cloudforecast/cloudforecast.yaml
---
config:
# gearmanを利用する?合、enableを1にして、germandのhost名とportを指定します
  gearman_enable: 0
  gearman_server:
    host: localhost
    port: 7003
# rrdのファイルを?置する?所。「/」から始まると??パスとなります
  data_dir: /usr/local/cloudforecast/rra
# ???目の?定ファイルを?置するディレクトリ。「/」から始まると??パス
  host_config_dir: host_config

component_config:
# SNMPでデ?タを取得する?のオプション。communityとversion
  SNMP:
    community: public
    version: 2
# MySQLを??する?合のuser名とパスワ?ド
  MySQL:
    user: sql_read1
    password: "hd^R+O%ZU(5@oy#E"


[root@rabbit-hd-212216 ~]# cat /usr/local/cloudforecast/server_list.yaml
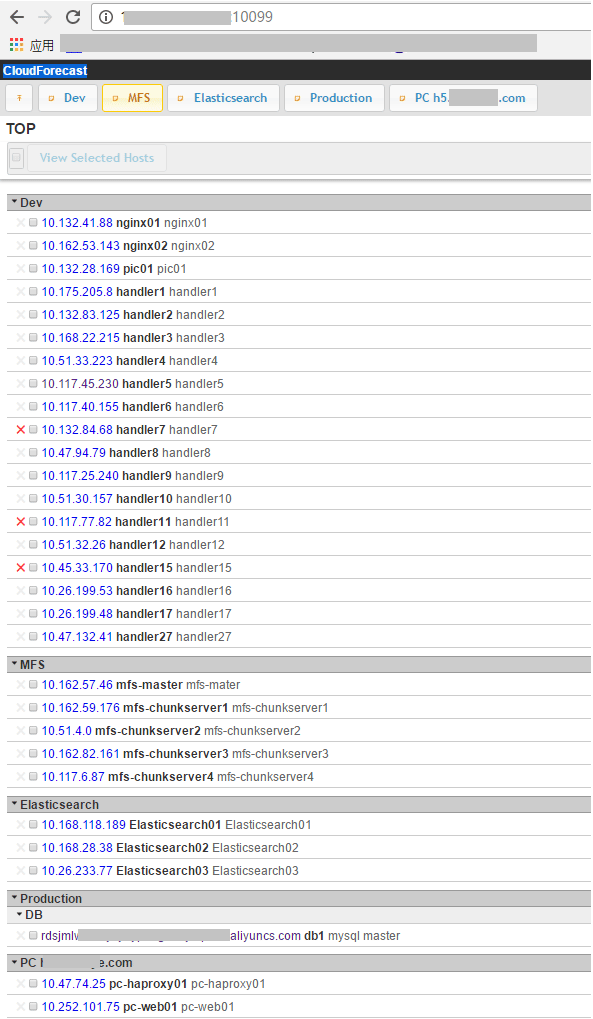
--- #Dev
# --- #Hogeと書くことでサーバ一覧を区切ることができます
# configはhost_config内の監視項目の設定ファイル名
# hostsは 「IPアドレス[space]ホスト名[space]コメント」です。コメント内にはスペースがあってもかまいません
servers:
  - config: basic.yaml
    hosts:
      - 10.132.41.88 nginx01 nginx01
      - 10.162.53.143  nginx02 nginx02
      - 10.132.28.169 pic01  pic01
      - 10.175.205.8 handler1 handler1
      - 10.132.83.125 handler2 handler2
      - 10.168.22.215 handler3 handler3
      - 10.51.33.223  handler4 handler4
      - 10.117.45.230 handler5 handler5
      - 10.117.40.155 handler6 handler6
      - 10.132.84.68 handler7 handler7
      - 10.47.94.79  handler8 handler8
      - 10.117.25.240 handler9 handler9
      - 10.51.30.157 handler10 handler10
      - 10.117.77.82 handler11 handler11
      - 10.51.32.26 handler12 handler12
      - 10.45.33.170 handler15 handler15
      - 10.26.199.53 handler16 handler16
      - 10.26.199.48 handler17 handler17
      - 10.47.132.41 handler27 handler27
      #- 10.252.101.75 hdweb hdweb

--- #MFS
servers:
  - config: basic.yaml
    hosts:
     - 10.162.57.46 mfs-master mfs-mater
     - 10.162.59.176 mfs-chunkserver1 mfs-chunkserver1
     - 10.51.4.0 mfs-chunkserver2 mfs-chunkserver2
     - 10.162.82.161 mfs-chunkserver3 mfs-chunkserver3
     - 10.117.6.87 mfs-chunkserver4 mfs-chunkserver4


--- #Elasticsearch
servers:
  - config: basic.yaml
    hosts:
      - 10.168.118.189 Elasticsearch01 Elasticsearch01
      - 10.168.28.38 Elasticsearch02 Elasticsearch02
      - 10.26.233.77 Elasticsearch03 Elasticsearch03

--- #Production
servers:
#  - config: httpd.yaml
#    label: Application Servers
#    hosts:
#      - 192.168.51.10 web1 web memcached
#      - 192.168.51.11 web2 web memcached
#  - config: httpd8080.yaml
#    hosts:
#      - 192.168.51.12 web3 mobile web
#      - 192.168.51.13 web4 mobile web
  - config: mysql.yaml
    label: DB
    hosts:
      - rdsjmlwvb.mysql.rds.aliyuncs.com db1 mysql master
#      - 192.168.51.61 db2 mysql slave
#      - 192.168.51.62 db2 mysql slave
#  - config: basic.yaml
#    label: ETC
#    hosts:
#      - 192.168.51.90 batch1 batch
--- #PC h5.cici.com
servers:
  - config: basic.yaml
    hosts:
       - 10.47.74.25 pc-haproxy01 pc-haproxy01
       - 10.252.101.75 pc-web01 pc-web01
       - 10.168.68.175 pc-web02 pc-web02
       - 10.24.255.220 pc-mysql01 pc-mysql01


[root@rabbit-hd-212216 ~]# cat   /usr/local/cloudforecast/host_config/basic.yaml
---
# component_configはこの監視項目の設定内だけで利用されます。
# 部分的にSNMPのcommunity名が異なる場合などに利用できます
# resourceには、監視項目を追加してきます。実際の監視内容は、CloudForecast::Data::Foo で定義
# されています。「:」で区切った値はオプションとして定義モジュールに渡されます
component_config:
resources:
  - traffic:eth0
  - traffic:eth1
  - basic
[root@rabbit-hd-212216 ~]# cat   /usr/local/cloudforecast/host_config/httpd8080.yaml
---
component_config:
resources:
  - traffic:2:eth0
  - traffic:3:eth1
  - basic
  - http:8080
[root@rabbit-hd-212216 ~]# cat   /usr/local/cloudforecast/host_config/httpd.yaml
---
component_config:
resources:
  - traffic:2:eth0
  - traffic:3:eth1
  - basic
  - http:80
  - memcached:11211
[root@rabbit-hd-212216 ~]# cat   /usr/local/cloudforecast/host_config/mysql.yaml
---
component_config:
resources:
  #- traffic:2:eth0
  - mysql
  - innodb

snmp 安装
yum list all | grep snmp
yum install net-snmp.x86_64 -y
cd /etc/snmp/
cp snmpd.conf snmpd.conf.bak
cat snmpd.conf.bak |grep -vE '^$|^#' > snmpd.conf
配合使用cloudforse 的snmpd.conf配置
[root@datanode03 snmp]# vim snmpd.conf

#第一步,定义安全体名称,将一个共同体映射到一个安全体名称里:
#com2sec 是net-snmp中定义安全体名字的关键字,表示这一行定义一个安全体名字。
#sec.name: 安全体名称
#source:可以访问的ip地址范围,默认值"default”,即任何ip都可以访问。
#community:共同体名称
#
#       sec.name    souce            community
com2sec cici  10.161.212.216       public
com2sec cici  114.215.191.163      public
com2sec cici  10.161.171.134      public
#第二步,定义安全组,将安全体名称加进一个安全组中
#groupName  安全组名称
#securityModel 安全模型,可选值:v1,v2c,usm
#securityName  安全体名称
#
#      groupName    securityModel  securityName
group   ciciGroup v1           cici
group   ciciGroup v2c          cici
#第三步,定义视图,供安全组使用
#view.name  视图名
#incl/excl  对下面的MIB子树是包括还是排除(included/excluded)
#subtree    视图中所涉及的mib子树
#mask(optional)  掩码
#        view.name    incl/excl       subtree                    [mask]
view    systemview    included   .1.3.6.1.2.1.1
view    systemview    included   .1.3.6.1.2.1.25.1.1
view    systemview    included .1.3.6.1.2.1.2
view    all           included  .1                      80
#第四步,向安全组授权相应的视图
#group 安全组名
#context 上下文v1,v2中始终为空
#sec.model 安全模型,可选值:v1,v2,usm
#sec.level 安全级别  可选值:auth,noauth,priv,      v1,v2c中只能为noauth
#prefix 前缀。指定context如何与PDU中的context匹配,V3使用
#read   授权的读视图
#write  授权的写视图
#notif  授权的trap视图
#       group    context  sec.model  sec.level  prefix read write notif

access  ciciGroup ""      any       noauth    exact  all none none
view all    included  .1
syslocation Unknown (edit /etc/snmp/snmpd.conf)
syscontact Root <root@localhost> (configure /etc/snmp/snmp.local.conf)
dontLogTCPWrappersConnects yes

[root@datanode03 snmp]# systemctl start snmpd