Linux: 企业级堡垒机 JumpServer
- TAGS: Linux
Jumpserver
Jumpserver 历史版本
2.19
创建数据库
- 进入mysql容器(kubectl exec -it -n jump mysql-0 bash)
- 进入控制台(mysql -uroot -p39fdlksajrhi)
- 创建数据库(CREATE DATABASE jump DEFAULT CHARACTER SET utf8mb4 COLLATE utf8mb4_unicode_ci; )
访问
- 域名:ops-jumpserver.xxx.com
- 用户名/密码:admin/eyu&3k0oQlG2PDsx
登陆方式:
ssh [email protected] -p 2222
Host jump
HostName jumpserver-ssh.xxx.com
User username
Port 2222
IdentityFile ~/.ssh/id_rsa
用户初始化脚本(ubuntu)
运维新加用户时,需要在跳板机上执行以下脚本,将用户名替换为下面的user1 user2等
`PASSWORD=l05A1KqgZX50g2342skld

for USER in jasper.xu fei.da

do

useradd -m -G root -s /bin/bash $USER

echo "$USER:$PASSWORD" |chpasswd

usermod -G sudo $USER

echo "${USER}  ALL=(ALL)       NOPASSWD:ALL" >> /etc/sudoers

done`

cat << \EOF >>/etc/sudoers
jasper.xu ALL=(ALL) NOPASSWD: ALL
fei.da ALL=(ALL) NOPASSWD: ALL
EOF

sed  -i  -r 's@(PasswordAuthentication) no@\1 yes@g' /etc/ssh/sshd_config
systemctl  restart sshd
系统用户说明
- self: 个人用户,会以每个人的身份登陆,都有sudo权限
- ubuntu: ubuntu默认用户
- ec2-user: al2默认用户
- db: db组使用,待建
- rd: 研发使用,待建
2.6版本
安装完成后配置文件在 /opt/jumpserver/config/config.txt
自动安装
数据目录: /opt/jumpserver
curl -sSL https://github.com/jumpserver/jumpserver/releases/download/v2.6.1/quick_start.sh | sh
手动部署
外置环境要求MySQL >= 5.7 Redis >= 5.0.0
下载文件
cd /apps/work/service/
yum -y install wget
wget https://github.com/jumpserver/installer/releases/download/v2.6.1/jumpserver-installer-v2.6.1.tar.gz
tar -xf jumpserver-installer-v2.6.1.tar.gz
cd jumpserver-installer-v2.6.1
export DOCKER_IMAGE_PREFIX=docker.mirrors.ustc.edu.cn
cat config-example.txt
安装
./jmsctl.sh install
注意:使用外置数据库就按提示修改

维护
可以使用如下命令启动, 然后访问
./jmsctl.sh start
其它一些管理命令
./jmsctl.sh stop
./jmsctl.sh restart
./jmsctl.sh backup
./jmsctl.sh upgrade
更多还有一些命令,你可以 ./jmsctl.sh --help来了解
- 访问 Web 后台页面 http://10.16.202.178:8888 https://10.16.202.178:8443
ssh/sftp 访问
ssh [email protected] -p2223
sftp -P2223 [email protected]
添加资产
添加管理用户
可以使用root或者有sudo权限的用户做为管理用户。这里用的root,上传的私钥。

添加资产 绑定管理用户来管理机器

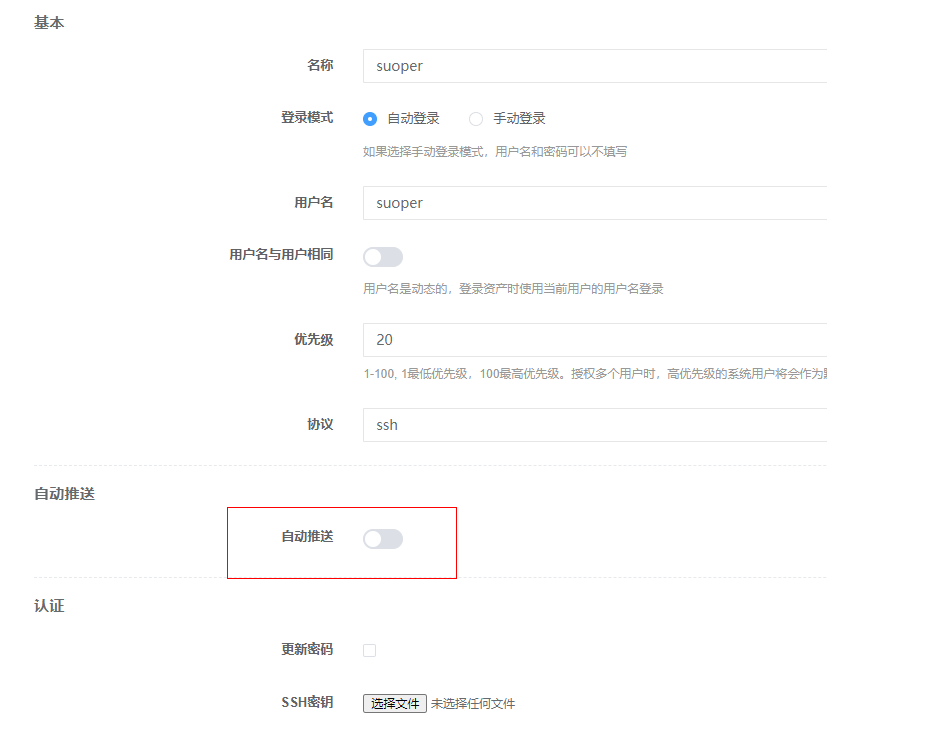
添加系统用户
登录到机器里以哪个用户身份显示,如果用户在机器上已经存在,可不勾选自 动推送。如果不存在则勾选,并按决定是否给予sudo权限。

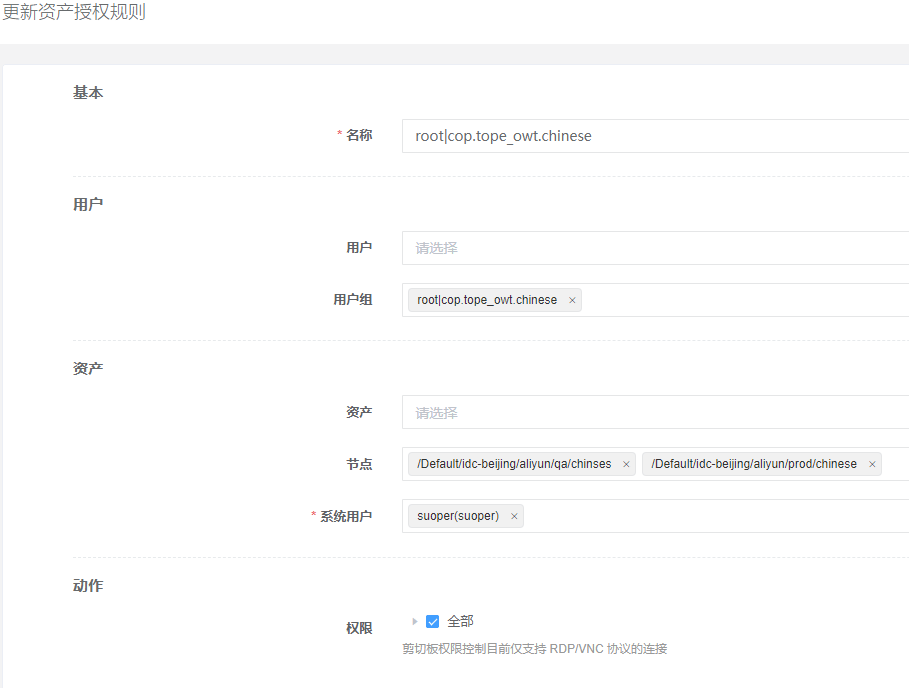
权限管理-添加授权
对资产进行授权,哪些jumpserver用户能登录资产,登录进机器显示什么系统用户

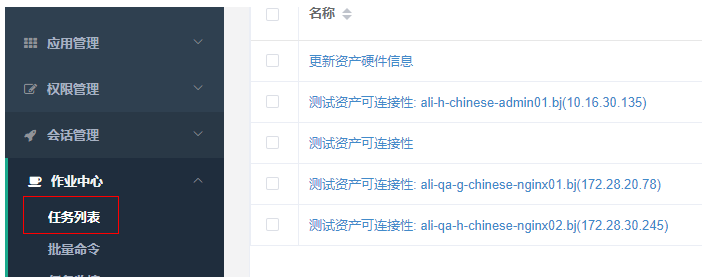
查看作业中心-权限推送情况
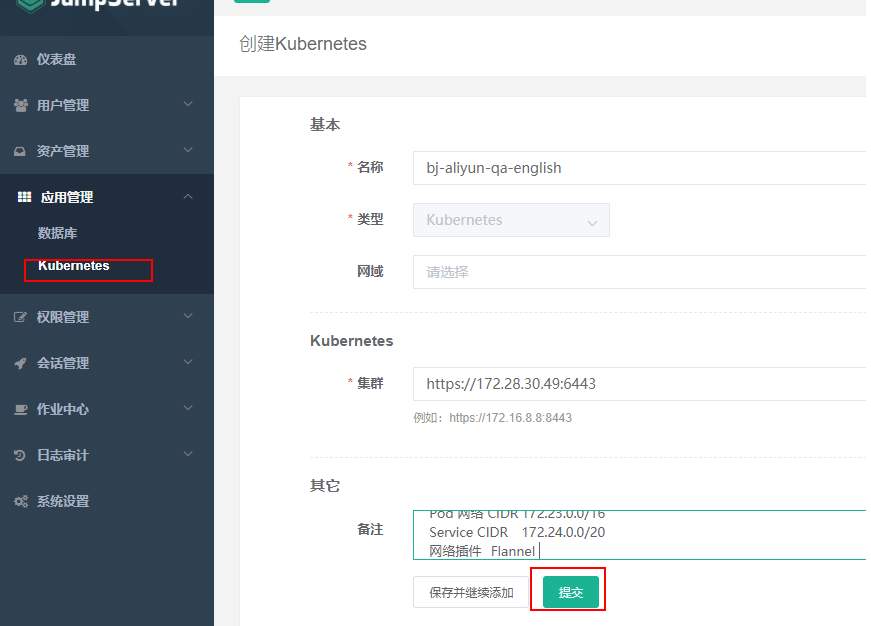
添加k8s
应用管理-创建k8s名称
添加系统用户
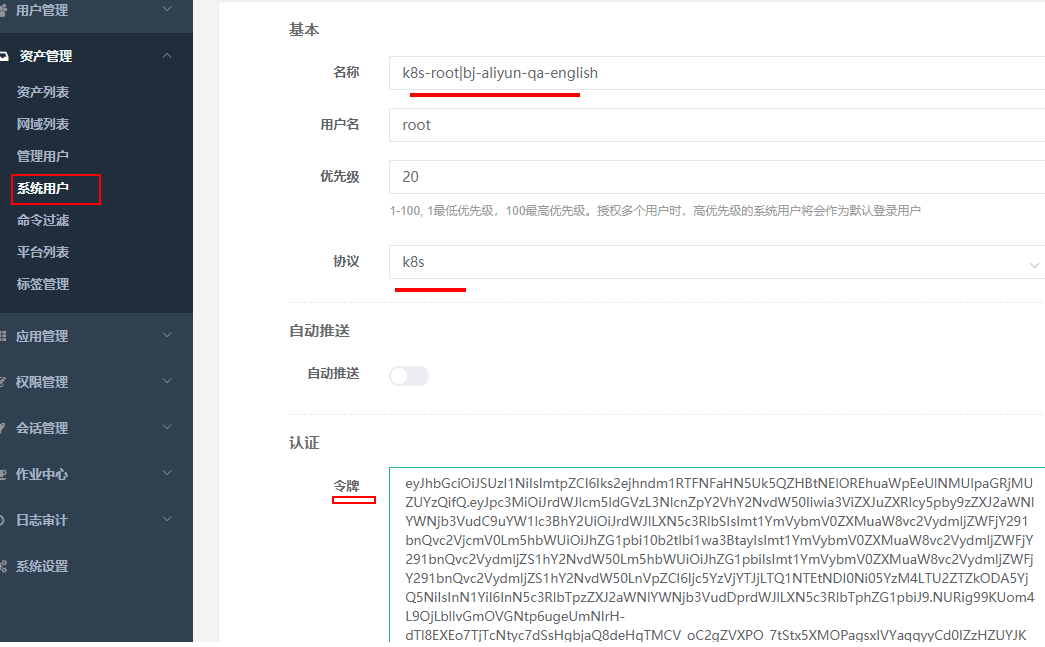
注意协议选择k8s,认证令牌填写集群token信息
kubectl --kubeconfig=config_qa describe secrets admin-token-pkpmk -n kube-system
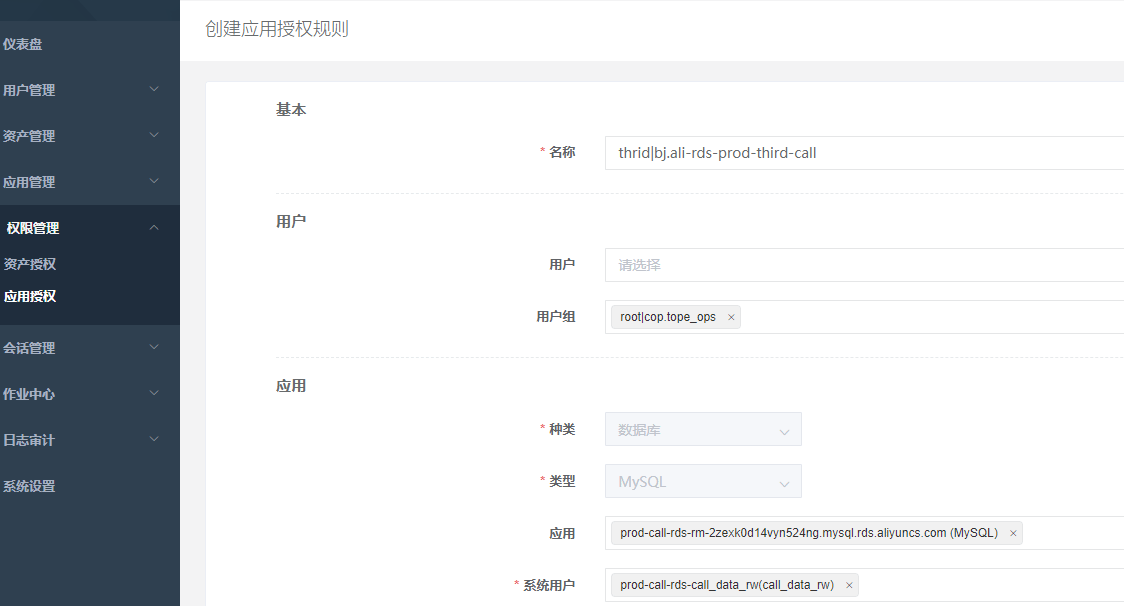
权限管理-应用管理
创建k8s权限规则
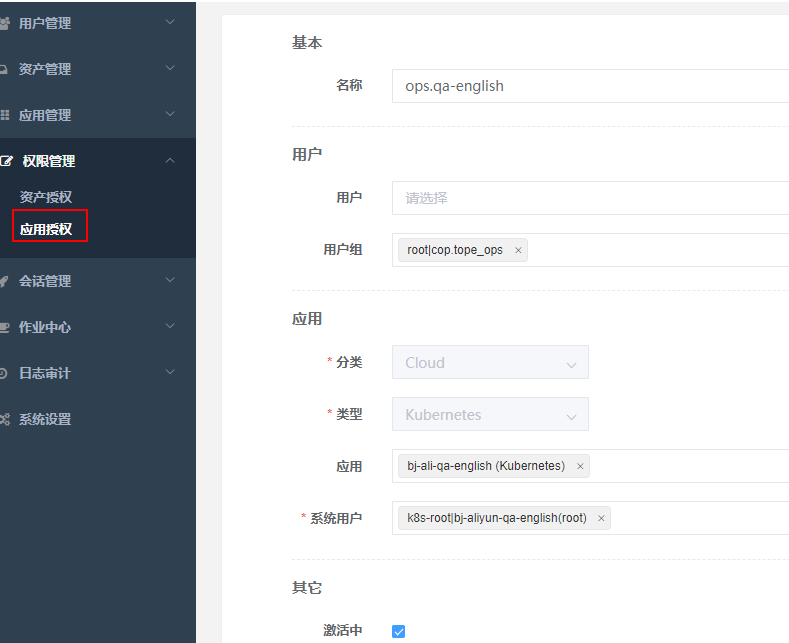
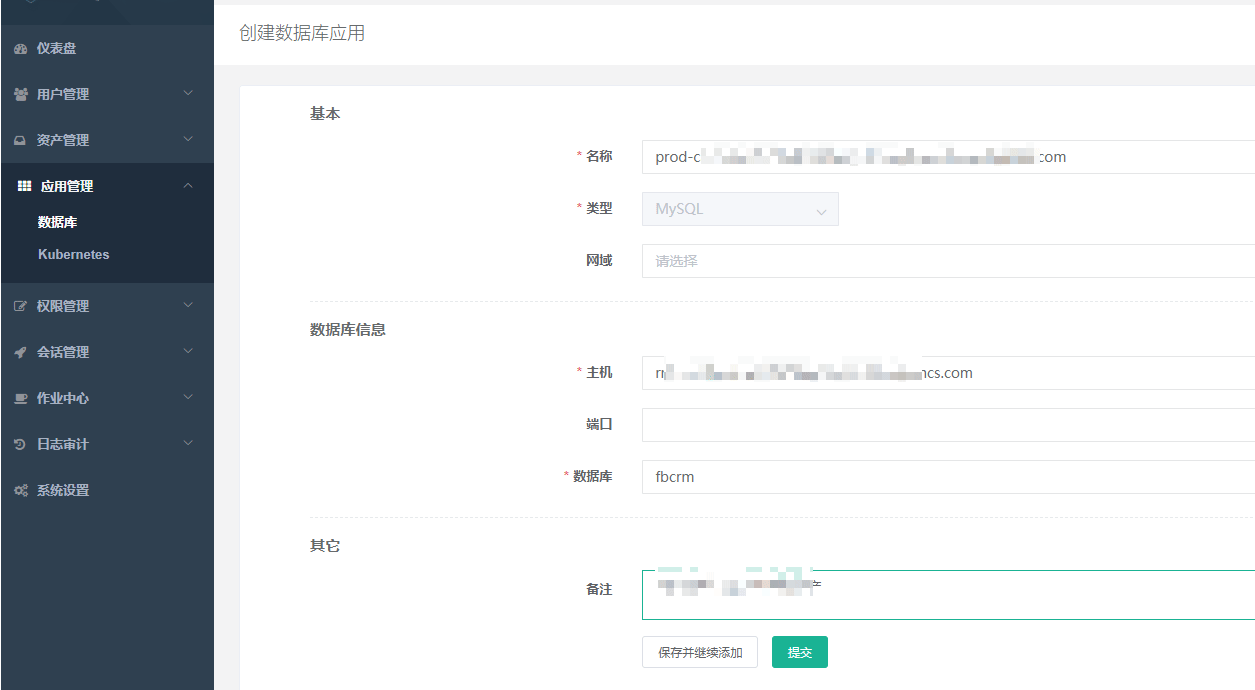
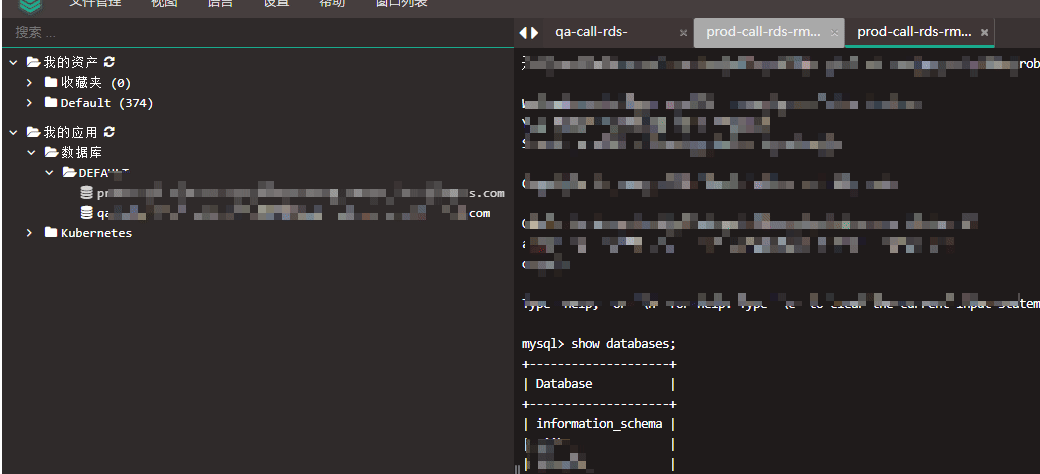
添加数据库
应用管理–数据库
系统用户-mysql协议
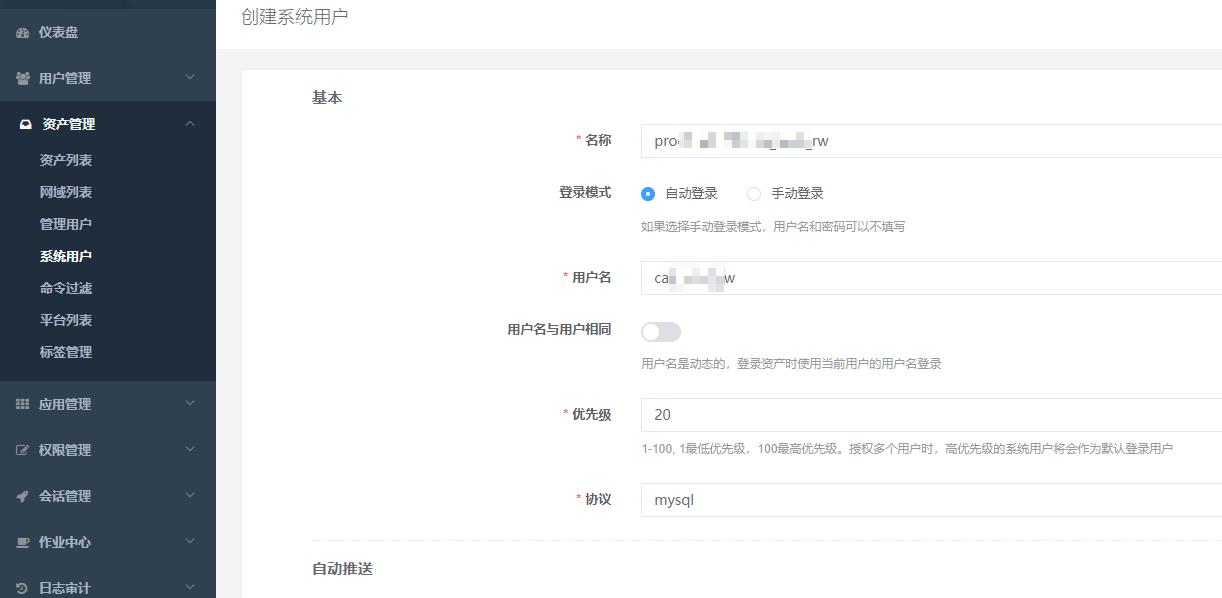
配置权限
审计功能
- 历史会话
- 命令记录
日志审计
登录日志、FTP日志、操作日志 、改密码日志、批量日志
如历史会话中可以回放用户操作记录
会话管理–历史会话中点击回放


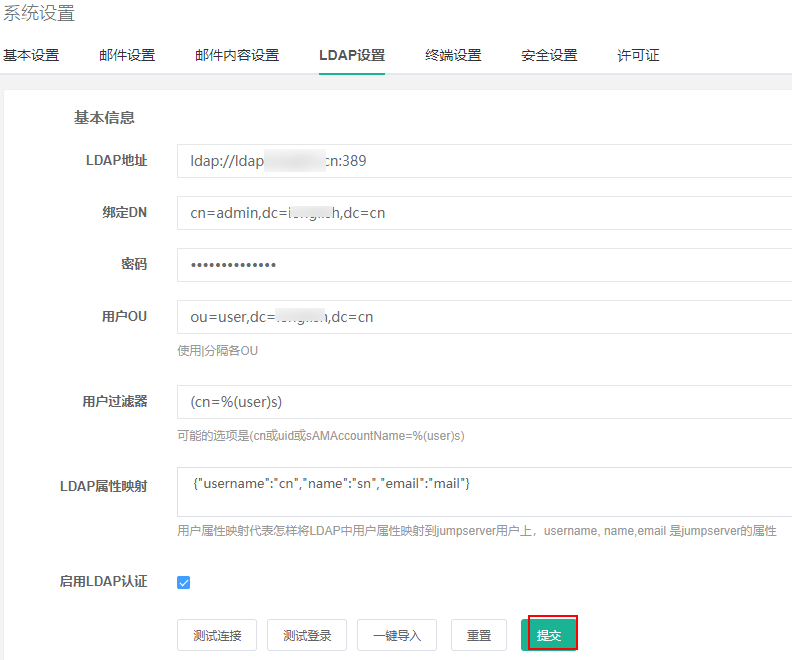
统一认证ldap 与多因素认证

备份与恢复
# 备份
./jmsctl.sh   backup_db

# 恢复
./jmsctl.sh  restore_db [sqlfile]

注意:
如果config.txt你修改了 COMPOSE_PROJECT_NAME=jms_new 字段,那么备份脚本也要修改。

# grep -r jms_new *
config-example.txt:COMPOSE_PROJECT_NAME=jms_new
scripts/5_db_backup.sh:  docker run --rm -i --network=jms_new_net jumpserver/mysql:5 ${backup_cmd} | gzip > ${DB_FILE_ZIP}
scripts/utils.sh:  docker run -it --rm --network=jms_new_net \
scripts/6_db_restore.sh:    gunzip <${DB_FILE} | docker run --rm -i --network=jms_new_net jumpserver/mysql:5 ${restore_cmd}
scripts/6_db_restore.sh:    docker run --rm -i --network=jms_new_net jumpserver/mysql:5 $restore_cmd <"${DB_FILE}"

问题:访问502
问题小结:
#现象
访问报错是后端服务有问题,502啥的,或者一串英文联系管理员,实际是数据库的问题,连接数超了,有人再用,后面的一直在等待
show variables like '%conn%';
#解决
扩大数据库连接数
2.5版本
git clone https://github.com/jumpserver/Dockerfile.git
cd Dockerfile
cp config_example.conf .env
cat .env
docker-compose up
访问 浏览器访问: http://sg-relay.xxx.cn/
SSH 访问: ssh -p 2222 sg-relay.xxx.cn
XShell 等工具请添加 connection 连接, 默认 ssh 端口2222
默认管理员账户 admin 密码 admin
从 v2.6 开始,JumpServer 统一了 社区版 和 企业版 的安装部署包,统一由 installer 项目来维护,dockerfile不再维护。
1.5.2版本
准备
jumpserver都部署在ldap001上。
登录方式:LDAP登录 管理员:admin 密码:xxxxx
| 机房 | 主机 | 公网ip | 公网端口 |
|---|---|---|---|
| 团华东1 | 192.168.110.224 | - | 80,2222 |
| 团华东2 | 192.168.201.208 | - | 80,2222 |
| 团华北2 | 192.168.101.106 | - | 80,2222 |
| 社华东1 | 10.0.2.216 | - | 80,2222 |
| 社华东2 | 192.168.20.161 | - | 80,2222 |
| 社华北2 | 192.168.10.94 | - | 80,2222 |
| 金融华北2 | 172.16.0.8 | - | 80,2222 |
| 西二旗 | 172.18.11.168 | - | 80,2222 |
- 各组件信息
Jumpserver 默认端口为 8080/tcp 配置文件 jumpserver/config.yml
koko 默认 SSH 端口为 2232/tcp, 默认 Web Terminal 端口为 5001/tcp 配置文件在 koko/config.yml
Guacamole 默认端口为 8081/tcp, 配置文件 /config/tomcat9/conf/server.xml
Nginx 默认端口为 81/tcp
Redis 默认端口为 6379/tcp
Mysql 默认端口为 3306/tcp
Protocol Server name Port TCP Jumpserver 8080 TCP koko 2231, 5001…. TCP Guacamole 8082…. TCP Db 3306 TCP Redis 6379 TCP Nginx 81 说明: 数据库信息由DBA提供。 redis使用yum本地安装。 koko,Guacamole使用docker 部署 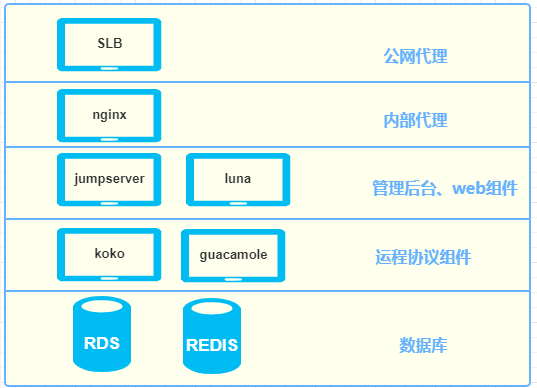
部署脚本与监控脚本
- 系统初始化
社华北2
rsync -r [email protected]::yz_hb2/init/init.sh /tmp
社华东2
rsync -r [email protected]::yz_hd2/init/init.sh /tmp
社华东1
rsync -r [email protected]::yz_hd1/init/init.sh /tmp
团华北2
rsync -r [email protected]::xy_hb2/init/init.sh /tmp
团华东2
rsync -r [email protected]::xy_hd2/init/init.sh /tmp
团华东1
rsync -r [email protected]::xy_hd1/init/init.sh /tmp
西
rsync -r [email protected]::hlg/init/init.sh /tmp
金融华北2
rsync -r [email protected]::qs_hb2/init/init.sh /tmp

cd /tmp && sh init.sh
密码:wowonetwork
- 部署步骤
1 拉取安装文件
rsync -r [email protected]::wanlin/jumpserver /tmp
密码:wowonetwork
2 部署单本版jumpserver 在ldap001上进行部署
bash /tmp/jumpserver/init.sh --help

社华北2
bash /tmp/jumpserver/init.sh schb2
社华东2
bash /tmp/jumpserver/init.sh schd2
社华东1
bash /tmp/jumpserver/init.sh schd1
团华北2
bash /tmp/jumpserver/init.sh tchb2
团华东2
bash /tmp/jumpserver/init.sh tchd2
团华东1
bash /tmp/jumpserver/init.sh tchd1
西
bash /tmp/jumpserver/init.sh xrq
金融华北2
bash /tmp/jumpserver/init.sh scmhb2
本地
bash /tmp/jumpserver/init.sh local
选错机房了,只需改config.yml中
DB_HOST值。3 修改admin管理员密码 各机房admin统一密码:xxxx
source /data/py3/bin/activate
cd /data/jumpserver/apps
python manage.py changepassword  admin
4 服务监控
mkdir  /data/work/open-falcon/script/
cat >>/data/work/open-falcon/script/report_agent.sh <<\EOF
#!/bin/bash
timestamp=`date +%s`
host_name=`hostname`
### jumpserver
jumpserver_num=0
[ `curl -o /dev/null -s -w %{http_code} http://127.0.0.1:8080/` == "302" ] && jumpserver_num=1 || jumpserver_num=0
if netstat -ntlp |grep 1988 |grep falcon &>/dev/null; then
curl -X POST -d '[{"metric": "jumpserverl.daemon_status", "endpoint": "'$host_name'", "timestamp": '$timestamp', "step": 60,"value": '$consul_num',"counterType": "GAUGE","tags": ""}]' http://127.0.0.1:1988/v1/push
fi
EOF

crontab -e
*/1 * * * *  bash /data/work/open-falcon/script/report_agent.sh
open-falcon中添加监控指标。
5 阿里SLB信息(加白名单) 后端ldap001,健康检查端口80,2222
机房 地址 tcp监听端口 团华东1 47.x.xx.xx 18888,2222 团华东2 101.x.xx.xx 18888,2222 团华北2 47.x.xx.xx 18888,2222 社华东1 47.x.xx.xx 18888,2222 社华东2 47.x.xx.xx 18888,2222 社华北2 60.x.xx.xx 18888,2222 金融华北2 39.x.xx.xx 18888,2222 西 172.x.xx.1xx 18888,2222 提供运维开发SLB地址,管理员账号密码。
DAT 18888 – 81 2222 – 2222
6 配置JMPS-ldap
JMPS管理页面–>系统设置–>LDAP设置
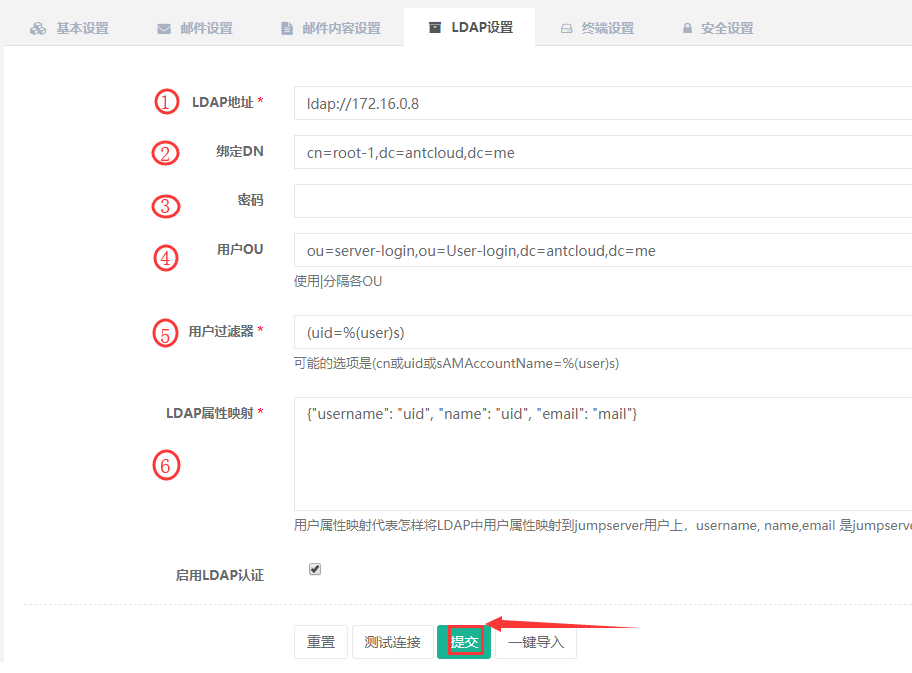
过滤器统一:(uid=%(user)s)
映射统一:{"username": "uid", "name": "uid", "email": "mail"}
机房 地址 DN OU 密码 团华东1 ldap://192.168.110.224 cn=root-1,dc=antcloud,dc=me ou=server-login,ou=User-login,dc=antcloud,dc=me TetEh6dv1jyw 团华东2 ldap://192.168.201.208 cn=root-106,dc=zonghengke,dc=yunzong ou=server-login,ou=User-login,dc=zonghengke,dc=yunzong TetEh6dv1jyw 团华北2 ldap://192.168.101.106 cn=root-106,dc=zonghengke,dc=yunzong ou=server-login,ou=User-login,dc=zonghengke,dc=yunzong TetEh6dv1jyw 社华东1 ldap://10.0.2.216 cn=root-1,dc=antcloud,dc=me ou=server-login,ou=User-login,dc=antcloud,dc=me TetEh6dv1jyw 社华东2 ldap://192.168.20.161 cn=root-1,dc=antcloud,dc=me ou=server-login,ou=User-login,dc=antcloud,dc=me TetEh6dv1jyw 社华北2 ldap://192.168.10.94 cn=root-1,dc=antcloud,dc=me ou=server-login,ou=User-login,dc=antcloud,dc=me TetEh6dv1jyw 金融华北2 ldap://172.16.0.8 cn=root-1,dc=antcloud,dc=me ou=server-login,ou=User-login,dc=antcloud,dc=me TetEh6dv1jyw 西 ldap://172.18.51.235 cn=root-1,dc=yunzong ou=server-login,ou=User-login,dc=yunzong TetEh6dv1jyw 7 创建管理用户oap
资产管理–>管理用户
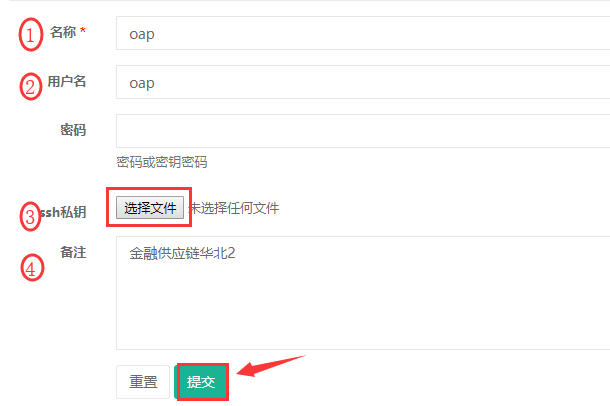
用户管理–>用户组 删除default用户组。
8 导入资产0. 修改对ECS中的主机标签 加入前缀: xrq 西 tc-hb2 团华北2 tc-hd2 团华东2 tc-hd1 团华东1 sc-hb2 社华北2 sc-hd2 社华东2 sc-hd1 社华东1 scm-hb2 金融华北2
如 金融供应链华北2机房
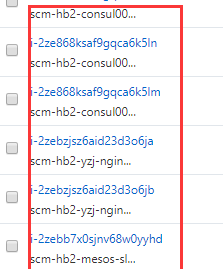
- JMS中下载资产模板
- SW中梳理信息整理到模板中
上线资产模板

- 维护
修改密码
tr -dc '0-9a-zA-Z' </dev/urandom |head -c 20
source /data/py3/bin/activate
cd /data/jumpserver/apps
python manage.py changepassword  <user_name>
(py3) [root@xu-3 apps]# python manage.py changepassword admin
Changing password for user 'Administrator(admin)'
Password:
Password (again):
Password changed successfully for user 'Administrator(admin)'
清理celery产生的数据
(无法正常推送及连接资产, 一直显示……..等可以使用, 请确定字符集是
zh_CN.UTF-8)source /data/py3/bin/activate cd /data/jumpserver/apps celery -A ops purge -f
更新升级
cd /data/jumpserver/
systemctl stop jms
git checkout master
git pull
git checkout 1.5.2
git pull origin 1.5.2
pip install -r requirements/requirements.txt
git branch -vv
systemctl restart jms
- 脚本内容
[root@rsync-server jumpserver]# tree /data/wanlin/jumpserver/
/data/wanlin/jumpserver/
├── init.sh
├── jms.service
├── jumpserver.conf
├── jumpserver.tar.gz
├── luna.tar.gz
├── nginx.conf
└── tcp.conf
[root@rsync-server jumpserver]# cat init.sh
#!/usr/bin/env bash
#
declare -A idc
idc['schb2']='hb2-yunzong-dns-dbm-local.mysql.rds.cici.com'
idc['schd2']='hd2-zhk-sw-dbm-local.mysql.rds.cici.com'
idc['schd1']='hd1-zhk-dns-dbm-local.mysql.rds.cici.com'
idc['tchb2']='hb2-swedge-dbm-local.mysql.rds.cici.com'
idc['tchd2']='hd2-swedge-dbm-local.mysql.rds.cici.com'
idc['tchd1']='hd1-dns-dbm.mysql.rds.cici.com'
idc['xrq']='172.18.50.161'
idc['scmhb2']='hb2-qs-dns-dbm-local.mysql.rds.cici.com'
idc['local']='127.0.0.1'

argus() {
cat <<EOF
机房:
idc['schb2']
idc['schd2']
idc['schd1']
idc['tchb2']
idc['tchd2']
idc['tchd1']
idc['xrq']
idc['scmhb2']
idc['local']
EOF
}
fist_arg=$1
[ $# -eq 0 -o "$fist_arg" == "--help" ] && argus && echo -e "\033[1;31m必须有机房参数,如bash init.sh schb2\033[0m"  && exit 1

DB_PASSWORD="XSURt3v2rZhoe4ISZ7jd2Zah"
DB_HOST=${idc["$fist_arg"]}
[ -z "$DB_HOST" ] && echo -e "DB_HOST空 \033[1;31mbash init.sh --help\033[0m" && exit 1
[ ! -d "/data" ] && mkdir /data

echo "$1 地址:$DB_HOST"

dependency_install() {
    echo -e "\033[31m 部署环境 \033[0m" \
      && wget -O /etc/yum.repos.d/CentOS-Base.repo http://mirrors.aliyun.com/repo/Centos-7.repo \
      && wget -O /etc/yum.repos.d/epel.repo http://mirrors.aliyun.com/repo/epel-7.repo \
      && yum -y install wget gcc  git \
      && yum install -y yum-utils device-mapper-persistent-data lvm2 \
      && yum-config-manager --add-repo http://mirrors.aliyun.com/docker-ce/linux/centos/docker-ce.repo \
      && yum makecache fast \
      && rpm --import https://mirrors.aliyun.com/docker-ce/linux/centos/gpg \
      && echo -e "[nginx-stable]\nname=nginx stable repo\nbaseurl=http://nginx.org/packages/centos/\$releasever/\$basearch/\ngpgcheck=1\nenabled=1\ngpgkey=https://nginx.org/keys/nginx_signing.key" > /etc/yum.repos.d/nginx.repo \
      && rpm --import https://nginx.org/keys/nginx_signing.key \
      && yum -y install redis mariadb mariadb-devel nginx container-selinux docker-ce \
      && if [ "$fist_arg" == "local" ]; then yum -y install mariadb-server MariaDB-shared;systemctl enable mariadb; systemctl start mariadb; fi \
      && systemctl enable redis nginx docker \
      && systemctl start redis \
      && yum -y install python36 python36-devel \
      && python3.6 -m venv /data/py3
    result=`echo $?`; [ $result -ne 0 ] && echo -e "\033[1;31m部署环境失败\033[0m" && exit 1
}

jumpserver_install() {
    echo -e "\033[31m 下载组件 \033[0m" \
      && cd /data \
      && if [ ! -d "/data/jumpserver" ]; then tar xf /tmp/jumpserver/jumpserver.tar.gz -C /data/ ; chown -R root:root jumpserver; fi \
      && if [ ! -f "/data/luna.tar.gz" ]; then tar xf /tmp/jumpserver/luna.tar.gz -C /data/ ; chown -R root:root luna; fi \
      && yum -y install $(cat /data/jumpserver/requirements/rpm_requirements.txt) \
      && echo -e "[easy_install]\nindex_url = https://mirrors.aliyun.com/pypi/simple/" > ~/.pydistutils.cfg \
      && source /data/py3/bin/activate \
      && pip install --upgrade pip setuptools -i https://mirrors.aliyun.com/pypi/simple/ \
      && pip install -r /data/jumpserver/requirements/requirements.txt -i https://mirrors.aliyun.com/pypi/simple/ \
      && curl -sSL https://get.daocloud.io/daotools/set_mirror.sh | sh -s http://f1361db2.m.daocloud.io \
      && systemctl restart docker \
      && docker pull jumpserver/jms_koko:1.5.2 \
      && docker pull jumpserver/jms_guacamole:1.5.2 \
      && rm -rf /etc/nginx/conf.d/default.conf \
      && cp /tmp/jumpserver/jumpserver.conf /etc/nginx/conf.d/jumpserver.conf \
      && \cp /tmp/jumpserver/nginx.conf /etc/nginx/nginx.conf \
      && \cp /tmp/jumpserver/tcp.conf /etc/nginx/tcp.conf \
      && \cp /tmp/jumpserver/jms.service /usr/lib/systemd/system/jms.service \
      && chmod 755 /usr/lib/systemd/system/jms.service; systemctl enable jms
    result=`echo $?`; [ $result -ne 0 ] && echo -e "\033[1;31m下载组件失败\033[0m" && exit 1
}

jumpserver_config() {
    echo -e "\033[31m 处理配置文件 \033[0m" \
      && source ~/.bashrc \
      && if [ "$DB_PASSWORD" = "" ]; then DB_PASSWORD=`cat /dev/urandom | tr -dc A-Za-z0-9 | head -c 24`; fi \
      && if [ "$SECRET_KEY" = "" ]; then SECRET_KEY=`cat /dev/urandom | tr -dc A-Za-z0-9 | head -c 50`; echo "SECRET_KEY=$SECRET_KEY" >> ~/.bashrc; fi \
      && if [ "$BOOTSTRAP_TOKEN" = "" ]; then BOOTSTRAP_TOKEN=`cat /dev/urandom | tr -dc A-Za-z0-9 | head -c 16`; echo "BOOTSTRAP_TOKEN=$BOOTSTRAP_TOKEN" >> ~/.bashrc; fi \
      && if [ "$Server_IP" = "" ]; then Server_IP=`ip addr | grep inet | egrep -v '(127.0.0.1|inet6|docker)' | awk '{print $2}' | tr -d "addr:" | head -n 1 | cut -d / -f1`; fi \
      && if [ ! -d "/var/lib/mysql/jumpserver" -a "$fist_arg" == "local" ]; then mysql -uroot -e "create database jumpserver default charset 'utf8';grant all on jumpserver.* to 'jumpserver'@'127.0.0.1' identified by '$DB_PASSWORD';flush privileges;"; fi \
      && if [ ! -f "/data/jumpserver/config.yml" ]; then \cp /data/jumpserver/config_example.yml /data/jumpserver/config.yml; sed -i "s/SECRET_KEY:/SECRET_KEY: $SECRET_KEY/g" /data/jumpserver/config.yml; sed -i "s/BOOTSTRAP_TOKEN:/BOOTSTRAP_TOKEN: $BOOTSTRAP_TOKEN/g" /data/jumpserver/config.yml; sed -i "s/# DEBUG: true/DEBUG: false/g" /data/jumpserver/config.yml; sed -i "s/# LOG_LEVEL: DEBUG/LOG_LEVEL: ERROR/g" /data/jumpserver/config.yml; sed -i "s/# SESSION_EXPIRE_AT_BROWSER_CLOSE: false/SESSION_EXPIRE_AT_BROWSER_CLOSE: true/g" /data/jumpserver/config.yml; sed -i "s/DB_PASSWORD: /DB_PASSWORD: $DB_PASSWORD/g" /data/jumpserver/config.yml; sed -i "s/DB_HOST: 127.0.0.1/DB_HOST: $DB_HOST/g" /data/jumpserver/config.yml; fi
    result=`echo $?`; [ $result -ne 0 ] && echo -e "\033[1;31m处理配置文件失败\033[0m" && exit 1
}

test_token() {
# cat .bashrc
SECRET_KEY=P1lMzFbMtmgYzQzZrcvsQQq0ovyjVLKlR6iYkmfz59coiasd2v
BOOTSTRAP_TOKEN=3IceRV3aYAHHxSkm
}

service_start() {
    echo -e "\033[31m 启动 Jumpserver \033[0m" \
      && systemctl start nginx \
      && systemctl start jms \
      && docker run --name jms_koko -d -p 2231:2222 -p 127.0.0.1:5001:5000 -e CORE_HOST=http://$Server_IP:8080 -e BOOTSTRAP_TOKEN=$BOOTSTRAP_TOKEN --restart=always jumpserver/jms_koko:1.5.2 \
      && docker run --name jms_guacamole -d -p 127.0.0.1:8081:8081 -e JUMPSERVER_SERVER=http://$Server_IP:8080 -e BOOTSTRAP_TOKEN=$BOOTSTRAP_TOKEN --restart=always jumpserver/jms_guacamole:1.5.2 \
      && echo -e "\033[31m 你的数据库密码是 $DB_PASSWORD \033[0m" \
      && echo -e "\033[31m 你的SECRET_KEY是 $SECRET_KEY \033[0m" \
      && echo -e "\033[31m 你的BOOTSTRAP_TOKEN是 $BOOTSTRAP_TOKEN \033[0m" \
      && echo -e "\033[31m 你的服务器IP是 $Server_IP \033[0m" \
      && echo -e "\033[31m 请在安全组里面放行81和2222端口 \033[0m" \
      && echo -e "\033[31m 请打开浏览器访问公网80端口 用户名:admin 密码:admin \033[0m"
    result=`echo $?`; [ $result -ne 0 ] && echo -e "\033[1;31m启动失败\033[0m" && exit 1
}

main() {
    dependency_install
    jumpserver_install
    jumpserver_config
    service_start
}

main
[root@rsync-server jumpserver]# cat nginx.conf
user  nginx;
worker_processes  auto;

error_log  /var/log/nginx/error.log warn;
pid        /var/run/nginx.pid;


events {
    worker_connections  8192;
    use epoll;
}


http {
    include       /etc/nginx/mime.types;
    default_type  application/octet-stream;
    charset utf-8;

    log_format  main  '$remote_addr - $remote_user [$time_local] "$request" '
                      '$status $body_bytes_sent "$http_referer" '
                      '"$http_user_agent" "$http_x_forwarded_for"';

    access_log  /var/log/nginx/access.log  main;

    server_tokens off;
    sendfile        on;
    #tcp_nopush     on;
    keepalive_timeout  65;
    client_max_body_size  10M;
    client_header_buffer_size 16k;

    server_names_hash_bucket_size 128;
    map_hash_max_size 2048;
    map_hash_bucket_size 128;
    fastcgi_intercept_errors on;


    gzip on;
    gzip_min_length  1k;
    gzip_buffers     4 16k;
    gzip_http_version 1.0;
    gzip_comp_level 2;
    gzip_types       text/plain application/javascript application/x-javascript text/css application/xml application/json text/xml;
    gzip_vary on;

    include /etc/nginx/conf.d/*.conf;
}
include /etc/nginx/tcp.conf;
[root@rsync-server jumpserver]# cat jumpserver.conf upstream jumpserver { server localhost:8080; # 这里是 jumpserver 的后端ip } upstream kokows { server localhost:5001 weight=1; # 多节点 # 这里是 koko ws 的后端ip ip_hash; } upstream guacamole { server localhost:8081 weight=1; # 这里是 guacamole 的后端ip ip_hash; } server { listen 81; client_max_body_size 100m; # 录像及文件上传大小限制 location /luna/ { try_files $uri / /index.html; alias /data/luna/; } location /media/ { add_header Content-Encoding gzip; root /data/jumpserver/data/; } location /static/ { root /data/jumpserver/data/; } location /socket.io/ { proxy_pass http://kokows/socket.io/; proxy_buffering off; proxy_http_version 1.1; proxy_set_header Upgrade $http_upgrade; proxy_set_header Connection "upgrade"; proxy_set_header X-Real-IP $remote_addr; proxy_set_header Host $host; proxy_set_header X-Forwarded-For $proxy_add_x_forwarded_for; access_log off; } location /coco/ { proxy_pass http://kokows/coco/; proxy_set_header X-Real-IP $remote_addr; proxy_set_header Host $host; proxy_set_header X-Forwarded-For $proxy_add_x_forwarded_for; access_log off; } location /guacamole/ { proxy_pass http://guacamole/; proxy_buffering off; proxy_http_version 1.1; proxy_set_header Upgrade $http_upgrade; proxy_set_header Connection $http_connection; proxy_set_header X-Real-IP $remote_addr; proxy_set_header Host $host; proxy_set_header X-Forwarded-For $proxy_add_x_forwarded_for; access_log off; } location / { proxy_pass http://jumpserver; proxy_set_header X-Real-IP $remote_addr; proxy_set_header Host $host; proxy_set_header X-Forwarded-For $proxy_add_x_forwarded_for; } }[root@rsync-server jumpserver]# cat tcp.conf stream { log_format proxy '$remote_addr [$time_local] ' '$protocol $status $bytes_sent $bytes_received ' '$session_time "$upstream_addr" ' '"$upstream_bytes_sent" "$upstream_bytes_received" "$upstream_connect_time"'; access_log /var/log/nginx/tcp-access.log proxy; open_log_file_cache off; upstream kokossh { server localhost:2231 weight=1; # 这里是 koko ssh 的后端ip hash $remote_addr; } server { listen 2222; proxy_pass kokossh; proxy_connect_timeout 10s; } } - 高可用
这里需要注意记录在server01上自动生成的SECRET_KEY和BOOTSTRAP_TOKEN要同步到server02上,主要修改三处,第一个是在~/.bashrc文件的末尾追加,还有一个就是在jumpserver的配置文件中需要用到,最后就是创建koko和guacamole的时候需要用到。
Server_IP=`ip addr | grep 'state UP' -A2 | grep inet | egrep -v '(127.0.0.1|inet6|docker)' | awk '{print $2}' | tr -d "addr:" | head -n 1 | cut -d / -f1`
- NFS搭建
在mysql上安装NFS服务端,做一个共享目录,让server01和server02能够把录屏文件写到共享目录中,可以同步查询。
[root@mysql ~]#  rpm -qa | egrep "nfs|rpcbind"
[root@mysql ~]# yum search nfs-utils  rpcbind
[root@mysql ~]# yum install -y nfs-utils  rpcbind
[root@mysql ~]# systemctl status rpcbind
[root@mysql ~]# yum install -y net-tools lsof
[root@mysql ~]# systemctl start rpcbind
[root@mysql ~]# systemctl enable rpcbind

# 配置共享文件目录
[root@mysql ~]# mkdir /opt/move
[root@mysql ~]# vi /etc/exports
/opt/move/      10.211.55.0/24(rw,sync,no_root_squash)
[root@mysql ~]# systemctl reload nfs

# 把NFS挂载到这个目录即可。
[root@serve01 ~]# yum -y install showmount
[root@serve01 ~]# showmount 10.211.55.129      #查看共享的客户端地址
Hosts on 10.211.55.129:
[root@serve01 media]# mount -t nfs 10.211.55.129:/opt/move /opt/jumpserver/data/media
[root@serve02 media]# mount -t nfs 10.211.55.129:/opt/move /opt/jumpserver/data/media

cat /etc/fstab<<>>\EOF
10.211.55.129:/opt/move /opt/jumpserver/data/media nfs  defaults        _rnetdev        0 0
EOF
测试,使用两个不同的jumpserver远程操作同一台机器,看看是否有录屏存在
- NFS搭建
0.5.0版本
环境
- 系统: CentOS 7
- IP: 192.168.244.144
- 关闭 selinux 和防火墙
# CentOS 7
setenforce 0 # 可以设置配置文件永久关闭
systemctl stop iptables.service
systemctl stop firewalld.service

# CentOS6
setenforce 0
service iptables stop
准备 Python3 和 Python 虚拟环境
1.1 安装依赖包
yum -y install wget sqlite-devel xz gcc automake zlib-devel openssl-devel epel-release git
1.2 编译安装
wget https://www.python.org/ftp/python/3.6.1/Python-3.6.1.tar.xz
tar xvf Python-3.6.1.tar.xz && cd Python-3.6.1
./configure && make && make install
1.3 建立 Python 虚拟环境
因为 CentOS 6/7 自带的是 Python2,而 Yum等工具依赖原来的 Python,为了 不扰乱原来的环境我们来使用 Python 虚拟环境
cd /opt
python3 -m venv py3
source /opt/py3/bin/activate

# 看到下面的提示符代表成功,以后运行 Jumpserver 都要先运行以上 source 命令,以下所有命令均在该虚拟环境中运行(py3) [root@localhost py3]
安装 Jumpserver
2.1 下载或 Clone 项目
项目提交较多 git clone 时较大,你可以选择去 Github项目页面直接下载zip 包。
cd /opt/
git clone --depth=1 https://github.com/jumpserver/jumpserver.git && cd jumpserver && git checkout master
2.2 安装依赖 RPM 包
cd /opt/jumpserver/requirements
yum -y install $(cat rpm_requirements.txt) # 如果没有任何报错请继续
2.3 安装 Python 库依赖
pip install -r requirements.txt # 不要指定-i参数,因为镜像上可能没有最新的包,如果没有任何报错请继续
2.4 安装 Redis, Jumpserver 使用 Redis 做 cache 和 celery broke
yum -y install redis
service redis start
2.5 安装 MySQL
本教程使用 Mysql 作为数据库,如果不使用 Mysql可以跳过相关 Mysql 安装和 配置
# centos7
yum -y install mariadb mariadb-devel mariadb-server # centos7下安装的是mariadb
service mariadb start

# centos6
yum -y install mysql mysql-devel mysql-server
service mysqld start
2.6 创建数据库 Jumpserver 并授权
mysql
> create database jumpserver default charset 'utf8';
> grant all on jumpserver.* to 'jumpserver'@'127.0.0.1' identified by 'somepassword';
2.7 修改 Jumpserver 配置文件
cd /opt/jumpserver
cp config_example.py config.py
vi config.py # 我们计划修改 DevelopmentConfig中的配置,因为默认jumpserver是使用该配置,它继承自Config
注意: 配置文件是 Python 格式,不要用 TAB,而要用空格
class DevelopmentConfig(Config):
DEBUG = True
DB_ENGINE = 'mysql'
DB_HOST = '127.0.0.1'
DB_PORT = 3306
DB_USER = 'jumpserver'
DB_PASSWORD = 'somepassword'
DB_NAME = 'jumpserver'

...

config = DevelopmentConfig() # 确保使用的是刚才设置的配置文件
2.8 生成数据库表结构和初始化数据
cd /opt/jumpserver/utils
bash make_migrations.sh
2.9 运行 Jumpserver
cd /opt/jumpserver
python run_server.py all
运行不报错,请浏览器访问 http://192.168.244.144:8080/ (这里只是 Jumpserver, 没有 Web Terminal,所以访问 Web Terminal 会报错) 账号: admin 密码: admin
安装 SSH Server 和 WebSocket Server: Coco
3.1 下载或 Clone 项目 新开一个终端,连接测试机,别忘了 source /opt/py3/bin/activate
cd /opt
git clone https://github.com/jumpserver/coco.git && cd coco && git checkout master
3.2 安装依赖
cd /opt/coco/requirements
yum -y install $(cat rpm_requirements.txt)
pip install -r requirements.txt
3.3 查看配置文件并运行
cd /opt/coco
cp conf_example.py conf.py
python run_server.py
这时需要去 Jumpserver 管理后台-会话管理-终端管理 (http://192.168.244.144:8080/terminal/terminal/)接受Coco 的注册
Coco version 0.4.0, more see https://www.jumpserver.org
Starting ssh server at 0.0.0.0:2222
Quit the server with CONTROL-C.
3.4 测试连接
ssh -p2222 [email protected]
密码: admin

如果是用在 Windows 下,Xshell Terminal 登录语法如下
$ssh [email protected] 2222
密码: admin
如果能登陆代表部署成功
安装 Web Terminal 前端: Luna
Luna 已改为纯前端,需要 Nginx 来运行访问
访问(https://github.com/jumpserver/luna/releases)下载对应版本的 release 包,直接解压,不需要编译
4.1 解压 Luna
$ pwd
/opt/

tar xvf luna.tar.gz
ls /opt/luna
...
安装 Windows 支持组件
因为手动安装 guacamole 组件比较复杂,这里提供打包好的 docker 使用, 启动 guacamole
# 注意:这里一定要改写一下本机的IP地址, 否则会出错

docker run --name jms_guacamole -d \
  -p 8081:8080 -v /opt/guacamole/key:/config/guacamole/key \
  -e JUMPSERVER_KEY_DIR=/config/guacamole/key \
  -e JUMPSERVER_SERVER=http://<填写本机的IP地址>:8080 \
  registry.jumpserver.org/public/guacamole:1.0.0
docker run --name jms_guacamole -d \
  -p 8081:8080 -v /opt/guacamole/key:/config/guacamole/key \
  -e JUMPSERVER_KEY_DIR=/config/guacamole/key \
  -e JUMPSERVER_SERVER=http://localhost:8080 \
registry.jumpserver.org/public/guacamole:latest
这里所需要注意的是 guacamole 暴露出来的端口是8081,若与主机上其他端口 冲突请自定义一下。
再次强调:修改JUMPSERVER_SERVER 环境变量的配置,填上 Jumpserver 的内网 地址, 这时 去Jumpserver-会话管理-终端管理 接受[Gua]开头的一个注册Z
配置 Nginx 整合各组件
6.1 安装 Nginx 根据喜好选择安装方式和版本
yum -y install nginx
6.2 准备配置文件 修改 /etc/nginx/nginx.conf
server {
listen 80;

proxy_set_header X-Real-IP $remote_addr;
proxy_set_header Host $host;
proxy_set_header X-Forwarded-For $proxy_add_x_forwarded_for;

location /luna/ {
try_files $uri / /index.html;
alias /opt/luna/;
}

location /media/ {
add_header Content-Encoding gzip;
root /opt/jumpserver/data/;
}

location /static/ {
root /opt/jumpserver/data/;
}

location /socket.io/ {
proxy_pass http://localhost:5000/socket.io/;
proxy_buffering off;
proxy_http_version 1.1;
proxy_set_header Upgrade $http_upgrade;
proxy_set_header Connection "upgrade";
}

location /guacamole/ {
proxy_pass http://localhost:8081/;
proxy_buffering off;
proxy_http_version 1.1;
proxy_set_header X-Forwarded-For $proxy_add_x_forwarded_for;
proxy_set_header Upgrade $http_upgrade;
proxy_set_header Connection $http_connection;
access_log off;
}

location / {
proxy_pass http://localhost:8080;
}
}
6.3 运行 Nginx
nginx -t
service nginx start
6.4 访问 http://192.168.244.144