Linux: 虚拟化技术KVM
TAGS: Linux
内容概述
- 虚拟化基础
- 虚拟化KVM
- 创建虚拟机
- 管理虚拟机
- 存储管理
- 网络管理
- 综合实战案例
虚拟化基础
传统的物理机部署方案
- IDC选择,如:联通,电信,世纪互联,鹏博士等
- 服务器选型及采购
- 服务器系统选择、系统安装、上架
- 应用规划及部署
- 域名选择及注册
- DNS配置映射
- 测试外网访问

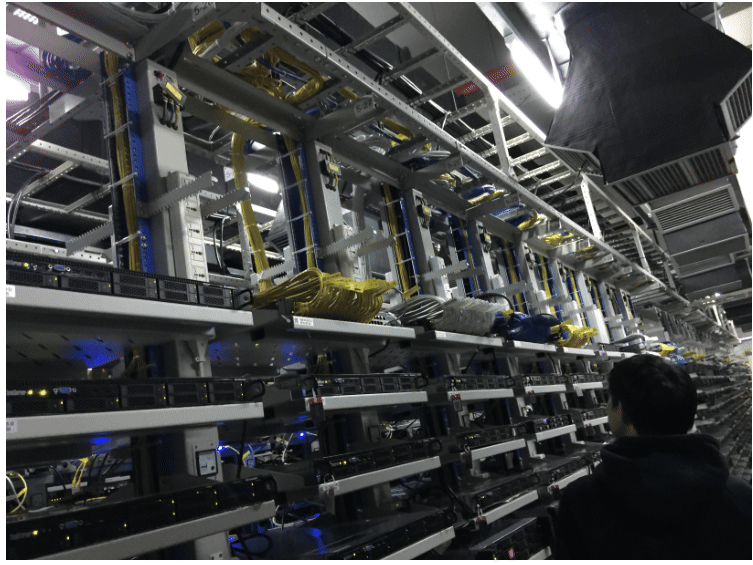
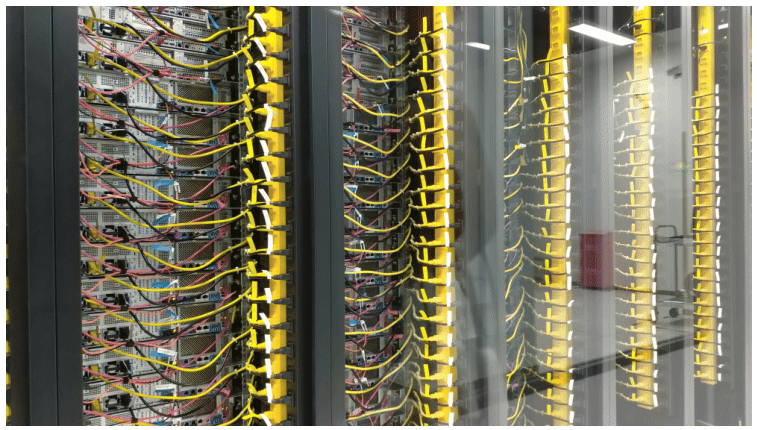
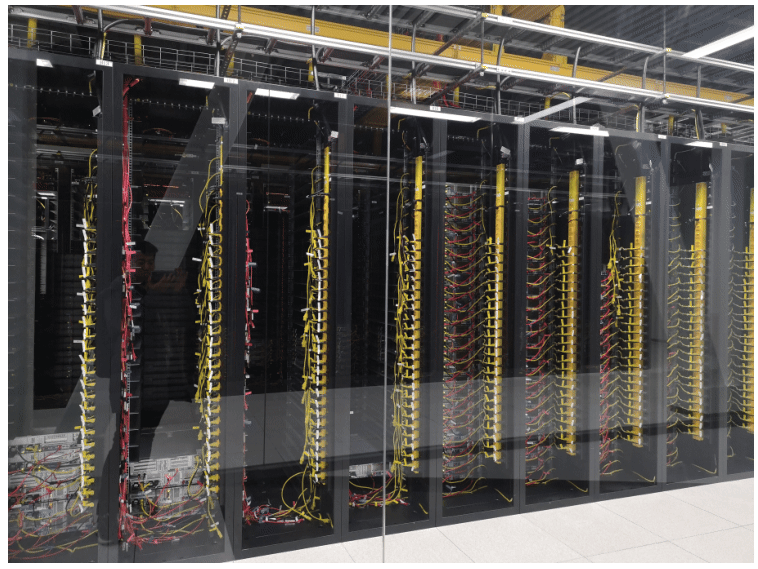
传统数据中心面临的问题:
服务器和网络设备资源利用率过低,并且无法共享,导致资源浪费
据统计大部分数据中心中的服务器和网络设备的利用率仅在24%~30%之间,有的CPU利用率、硬盘利用率都在10%以下
资源分配后进行调整困难
资源分配不合理也是传统网络架构存在的问题,因为资源不能动态调配,分配出去的资源是固定的,不能随意添加或删除。
难以实现自动化
初始化成本高,服务器迁移和升级很繁琐,无法实现自动化
成本高昂
集群环境需要大量的服务器主机,硬件投入和后期维护管理成本巨大
虚拟化和虚拟机
什么是虚拟化
在计算机技术中,虚拟化(Virtualization)是一种资源管理技术,是将计算机 的各种实体资源(CPU、内存、磁盘空间、网络适配器等),予以抽象、转换后 呈现出来并可供分割、组合为一个或多个计算机配置环境,并重新分割、重新组 合,以达到最大化合理利用物理资源的目的。
虚拟化优势
虚拟化可以提高 IT敏捷性、灵活性和可扩展性,同时大幅节约成本。更高的工 作负载移动性、更高的性能和资源可用性、自动化运维 -这些都是虚拟化的优势, 虚拟化技术可以使 IT部门更轻松地进行管理以及降低拥有成本和运维成本。
其优势包括:
- 资源超分,如物理内存128G,可以给虚拟机分配200G内存
- 降低资金成本和运维成本
- 最大限度减少或消除停机
- 提高 IT 部门的工作效率、效益、敏捷性和响应能力
- 加快应用和资源的调配速度
- 提高业务连续性和灾难恢复能力
- 简化数据中心管理
- 真正的 Software-Defined Data Center 的可用性
- 减少端口的冲突
虚拟化的发展史
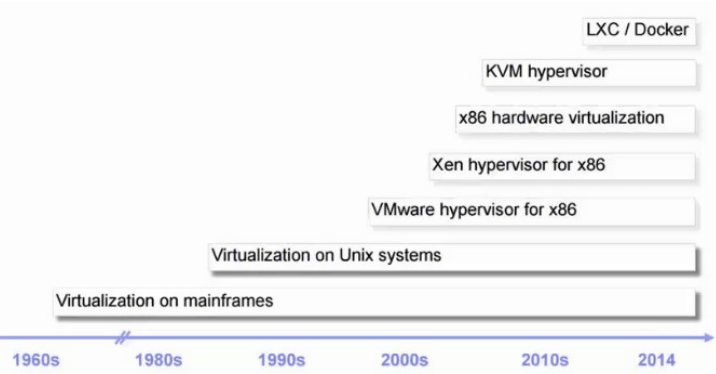
1959年,计算机科学家Christopher Strachey发表了一篇名为《大型高速计算机中的时间共享》(Time Sharing in Large Fast Computers)的学术报告,他在文中首次提出了虚拟化的基本概念,被认为是虚拟化技术的最早论述

1964年,IBM推出了专为 System/360 Mainframe 量身订造的操作系统 CP-40,首次实现了虚拟内存和虚拟机。

1967年,第一个管理程序(hypervisor)诞生,5年之后,IBM 发布用于创建灵活大型主机的虚拟机(VM)技术,该技术可根据动态的需求快速而有效地使用各种资源。从此,虚拟化这一词汇正式被引入了IT的现实世界。

20世纪70年代的 System 370 系列中通过虚拟机监控器(Virtual Machine Monitor,VMM)的程序在物理硬件之上生成多个可以独立运行操作系统软件的虚拟机实例

20世纪 90 年代 Windows 的广泛使用以及 Linux 作为服务器系统的出现奠定了 x86 服务器的行业标准地位。

1998年VMware公司在美国成立,1999年VMware发布了它的第一款产品VMware Workstation、 2001年发布VMware GSX Server和VMware ESXI Server宣布进入服务器虚拟化市场, 2003年VMware推出了VMware Virtual Center, 2004年推出了64位支持版本,同年被EMC收购,2013年收入52.1亿美元。2015年10月12日,戴尔与数据存储公司EMC的并购宣布完成,最终戴尔以670亿美元收购了EMC

2003年,Xen实现半虚拟化
2005年,HVM硬件辅助的虚拟化,Intel VT-x,AMD-V
2005年,openVZ出现,在linux平台上的容器化技术实现
2006年,QEMU
2007年,KVM(Kernel-based Virtual Machine)基于内核Linux 2.6.20
2007年8月21日,思杰宣布5亿美元收购XenSource公司,并推出服务器虚拟化XenServer、桌面虚拟化XenDesktop和应用虚拟化XenApp,2013年收入29亿美元。
2008年,LXC发布
2008年3月13日微软在北京发布Windows Server 2008,内置虚拟化技术hyper-v。
2008年9月,红帽以1.07亿美元的价格收购KVM的以色列母公司Qumranet,并推出企业级虚拟化解决方案RHEV,目前最新版本3.3,2013年收入超过13亿美元
2013年,docker发布
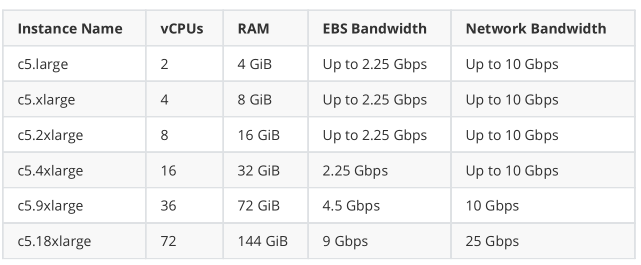
2017年11月全球最大公有云厂商AWS宣布了全新的C5实例,该实例完全基于新的虚拟机监控程序(Hypervisor):KVM。在之前的11年里,AWS的所有虚拟化实例都是基于XEN技术实现的。也就是说AWS也开始转向了KVM之路而不再坚持使用从其诞生之日起一直使用的XEN技术,事实上国内的阿里云早在2015年就开始从XEN切换到KVM
查看虚拟机中使用的虚拟化技术
~]# lscpu
Hypervisor vendor:     Xen  #亚马逊
Hypervisor vendor:     KVM #阿里云、腾讯云
虚拟机
虚拟机
虚拟计算机称为”虚拟机”(VM,Virtual Machine),它是一种严密隔离且内含操 作系统和应用的软件容器。每个虚拟机都是完全独立的。通过将多台虚拟机放置 在一台物理计算机上,可仅在一台物理服务器或”主机”上运行多个操作系统和 应用,名为”hypervisor”的精简软件层可将虚拟机与主机分离开来,并根据需 要为每个虚拟机动态分配计算资源。
虚拟机的主要特性
虚拟机具有以下特征,这些特征可提供多项优势
分区 可在一台物理机上运行多个操作系统 可在虚拟机之间分配系统资源。
隔离 可在硬件级别进行故障和安全隔离。 可利用高级资源控制功能保持性能
封装 可将虚拟机的完整状态保存到文件中。 移动和复制虚拟机就像移动和复制文件一样轻松
独立于硬件 可将任意虚拟机调配或迁移到任意物理服务器上 安装系统不会受硬件兼容性的影响
虚拟化类型
服务器虚拟化
服务器虚拟化支持将多个操作系统作为高效的虚拟机在单个物理服务器上运行。主要优势包括:
- 提升 IT 效率
- 降低运维成本
- 更快地部署工作负载
- 提高应用性能
- 提高服务器可用性
- 消除服务器数量剧增情况和复杂性
网络虚拟化
通过软件定义网络(Software Defined Network,SDN),即网络的创建不再依赖 于物理设备,如公有云厂商允许用户自己创建新的网络,在kubernetes、 openstack中都会使用到网络虚拟化。
桌面虚拟化
将桌面部署为代管服务,使 IT组织能够更快地响应不断变化的工作场所需求和新 出现的机会。还可以将虚拟化桌面和应用快速、轻松地交付给分支机构、外包和 离岸员工以及使用iPad 和 Android 平板电脑的移动员工。
Citrix思杰公司在云计算虚拟化、虚拟桌面和远程接入技术领域的处于优势地位
应用虚拟化
将软件虚拟化,比如 office 365,钉钉,企业微信
存储虚拟化
SAN(基于磁盘)/NAS(NFS/Samba)/GlusterFS/ceph等
库虚拟化
在linux上运行windows 程序使用wine,在mac系统运行windows程序使用 CrossOver等
容器虚技术
被称为下一代虚拟化技术,典型代表: Docker、Podman、Linux Container(LXC)、 Pouch
Hypervisor类型
Hypervisor 介绍
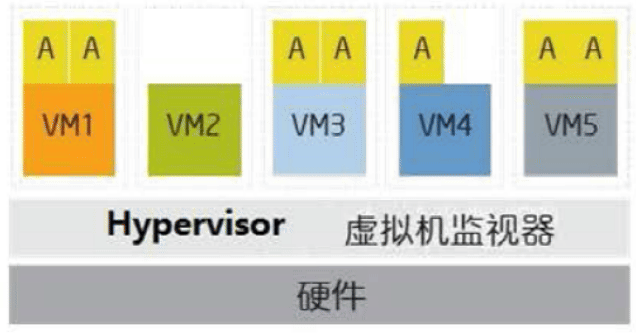
- Hypervisor是一种运行在基础物理服务器和操作系统之间的中间软件层,其可以允许多个操作系统和应用共享底层的内存、CPU、磁盘等物理硬件,也可叫做VMM( virtual machine monitor),即虚拟机监视器。
- Hypervisor是所有虚拟化技术的核心,非中断地支持多工作负载迁移的能力是Hypervisor的基本功能,当服务器启动并执行Hypervisor时,它会给每一台虚拟机分配适量的内存、CPU、网络和磁盘,并加载所有虚拟机的客户操作系统。
- 多数的虚拟化而采用虚拟机管理程序Hypervisor
- 允许多种操作系统在相同的物理系统中运行
- 控制硬件并向来宾操作系统提供访问底层硬件的途径
- 向来宾操作系统提供虚拟化的硬件
X86 CPU 的保护环
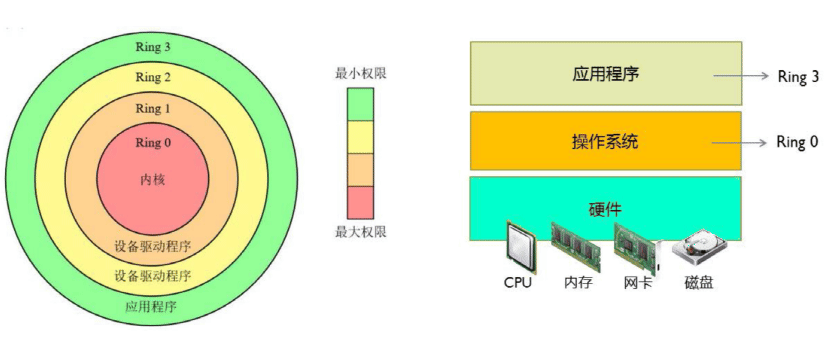
注意 :CPU为了保证程序代码执行的安全性、多用户的独立性、保护OS的正常 运行,提出了CPU执行状态的概念。这样能够限制不同程序之间的访问能力,避 免一个程序获取另一个程序的内存数据造成数据混乱,同时也避免了程序错误的 操作物理硬件。一般CPU都会划分为用户态 和内核态 ,x86的CPU架构更是细分 为了Ring3~0四种状态。
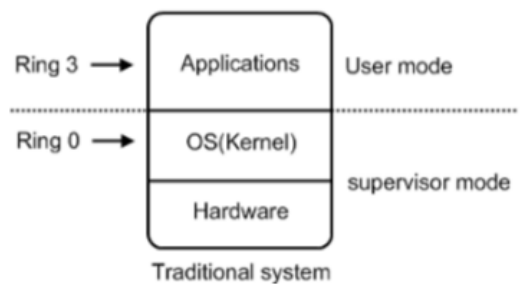
Ring3 用户态(User Mode) :运行在用户态的程序代码需要受到CPU的检查, 用户态程序代码只能访问内存页表项中规定能被用户态程序代码访问的页面虚拟 地址(受限的内存访问),而且还只能访问任务描述符TSS中的I/O Permission Bitmap中规定能被用户态程序代码访问的端口。甚至不能直接访问外围硬件设备、 不能抢占CPU。所有的应用程序都运行在用户态上。当运行在用户态的 Application需要调用只能被核心态代码直接访问的硬件设备时,CPU会通过特别 的接口去调用核心态的代码,以此来实现Application对硬件设备的调用。如果 用户态的Application直接调用硬件设备时,就会被Host OS捕捉到并触发异常, 弹出警告窗口。
Ring0 核心态(Kernel Mode) :是Host OS Kernel运行的模式,运行在核心态 的代码可以无限制的对系统内存、设备驱动程序、网卡接口、显卡接口等外围硬 件设备进行访问。只有Host OS能够无限制的访问磁盘、键盘等外围硬件设备的 数据,但是首先需要在Host OS上安装驱动程序
Hypervisor 分类
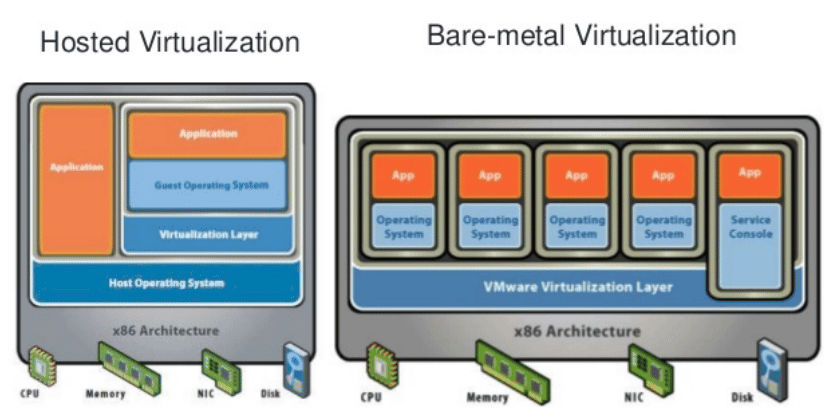
1974年Gerald J.Popek和Robert P.Goldberg的文章”Formal Requirements forVirtualizable Third Generation Architectures” 将Hypervisor分为两类:
类型 I : 裸金属型
直接运行到物理机的Hypervisor上,这种架构搭建的虚拟化环境称为裸机虚拟化环境(Bare-Metal Hardware
- KVM
- XEN
- vmware esxi
- rhev hypervisor
- Hyper-v Server
Redhat将KVM划分到类型I即裸机型: https://www.redhat.com/zh/topics/virtualization/what-is-KVM
类型 II : 宿主型
即需要运行在具有虚拟化功能的操作系统上的Hypervisor,构建的是主机虚拟化 环境(Hosted Virtualization)
- vmware workstation
- Microsoft Hyper-V
- VirtualBox
- paralles desktop #Mac系统最强虚拟机技术
虚拟化技术分类
模拟器/软件仿真
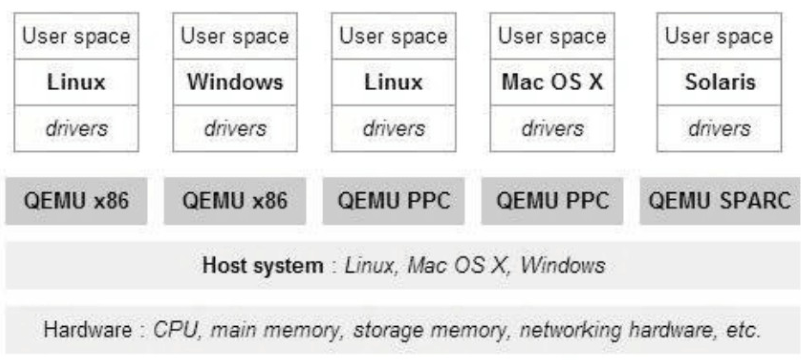
- 简介:通过软件模拟完整的硬件环境来虚拟化来宾平台。可以模拟X86、ARM 、PowerPC等多种CPU
- 优点:Guest OS无需修改,而且非常适合用于操作系统开发,也利于进行固件和硬件的协作开发;
- 缺点:效率比较低, 速度非常慢,有时速度比物理情况慢100倍以上;
- 产品或方案:QEMU、Bochs、PearPC
- 模拟:
emulation模拟: 纯软件实现,性能不好。如果物理架构和虚拟架构不一致,如物理x86架构上虚拟ppc架构,则虚拟架构上的非特权指令和特权指令都需要转换, 才可以运行在物理CPU上,故需模拟虚拟机内核的环0、1、2、3;
固然可以使上层模拟的环境很灵活,但也意味着上层环境的主机如果执行某一架构指令的话,它就不得不将其转换成底层架构的指令。所以其性能一般是非常差的。
全虚拟机化 full virtualization / 本地虚拟化 native virtualization
不需要对GuestOS操作系统软件的源代码做任何的修改,就可以运行在这样的VMM中
在全虚拟化的虚拟平台中,GuestOS并不知道自己是一台虚拟机,它会认为自己 就是运行在计算机物理硬件设备上的HostOS。全虚拟化的GuestOS具有完全的物 理机特性。因为全虚拟化的VMM会将一个OS所能够操作的CPU、内存、外设等物理 设备逻辑抽象成为虚拟CPU、虚拟内存、虚拟外设等虚拟设备后,再交由GuestOS 来操作使用。这样的GuestOS会将底层硬件平台视为自己所有的,但是实际上, 这些都是VMM为GuestOS制造了这种假象。
全虚拟化/本地虚拟化不做CPU和内存模拟,只对CPU和内存做相应的分配等操作
全虚拟化又分为: 软件辅助的全虚拟化 硬件辅助的全虚拟化
软件辅助的全虚拟化
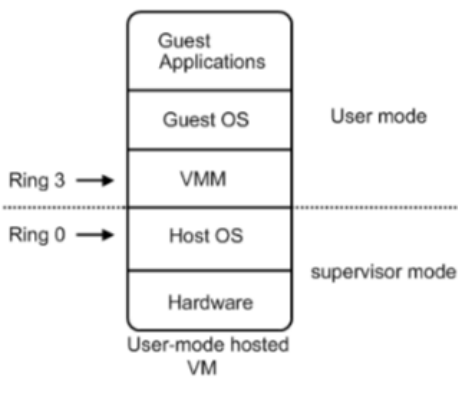
在Intel等CPU厂商还没有发布x86 CPU虚拟化技术之前,完全虚拟化都是通过软件辅助的方式来实现的。
代表技术: Vmware Workstation,QEMU,Virtual PC
当使用GuestOS的时候,不可避免的会调用GuestOS中的虚拟设备驱动程序和核心 调度程序来操作硬件设备。与HostOS的不同在于,HostOS运行在CPU的核心态中, 这就表示HostOS可以直接对硬件设备进行操作。但GuestOS作为一个运行在CPU用 户态中应用程序,不能够直接的操作硬件设备。为了解决这个问题,VMM引用了 两个机制-–— 特权解除和陷入模拟 。
软件辅助的全虚拟化主要是应用了两种机制:
- 特权解除 :VMM、GuestOS、GuestApplications都是运行在Ring 1-3用户态 中的应用程序代码.当GuestOS需要调用运行在核心态的指令时,VMM就会动态 的将核心态指令捕获并调用若干运行在非核心态的指令来模拟出期望得到的效 果(GuestOS和VMM是运行在用户态上的应用程序),从而将核心态的特权解除。 解除了核心态的特权后,就能够在GuestOS中执行大部分的核心态指令了。但 是,这仍然不能完美的解决问题。因为在一个OS的指令集中还存在着一种敏感 指令(可能是内核态,也可能是用户态)。此时就需要陷入模拟的实现。
- 陷入模拟 :无论是HostOS还是GuestOS,只要是一个OS都必然会存在有敏感
指令(reboot、shutdown等)。试想如果我们希望将GuestOS重启,并在GuestOS
中执行了
reboot指令,但是却将HostOS给重启了,这将会非常糟糕。VMM的陷 入模拟机制就是为了解决这个问题。在GuestOS中执行了敏感指令 reboot 时, VMM首先会将敏感指令reboot捕获、检测并判定其为敏感指令。此时VMM就会 陷入模拟,将敏感指令 reboot模拟成一个只针对GuestOS进行操作的、非敏感 的、并且运行在非核心态上的"reboot" 指令,最后CPU执行虚拟机的重启操作
简而言之,软件辅助虚拟化能够成功的将所有在GuestOS中执行的系统内核特权指令进行捕获、翻译,使之成为只能对GuestOS生效的虚拟特权指令。之所以需要这么做的前提是因为CPU并不能准确的去判断一个特权指令到底是由GuestOS发出的还是由HostOS发出的,这样也就无法针对一个正确的OS去将这一个特权指令执行。
由于全虚拟化VMM会频繁的捕获这些核心态的和敏感的指令,将这些指令进行转换之后,再交给CPU执行。所以经过了转换,导致其效率低,但全虚拟化VMM应用程序的好处在于其不需要对GuestOS的核心源码做修改,所以全虚拟化的VMM可以安装绝大部分的OS(暂时来说只有已Linux、open soralis、BSD等几种OS开源了内核代码)。
直到后来CPU厂商们发布了能够判断特权指令归属的标准x86 CPU之后,迎来了硬件辅助全虚拟化。
硬件辅助的全虚拟化 HVM(Hardware Virtual Machine)
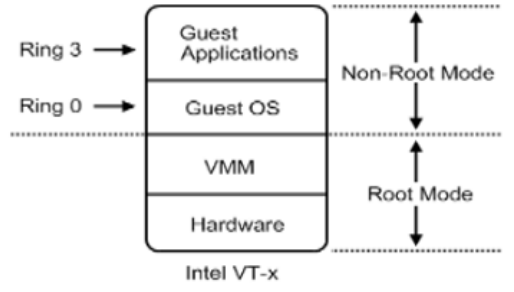
2005年Intel提出并开发了由CPU直接支持的虚拟化技术。这种虚拟化技术引入新 的CPU运行模式和新的指令集,使得VMM和GuestOS运行于不同的模式下(VMM=Root Mode;GuestOS=Non-Root Mode),GuestOS运行于受控模式,原来的一些敏感指令 在受控模式下会全部陷入VMM,由VMM来实现模拟,这样就解决了部分非内核态敏 感指令的陷入-–—模拟难题,而且模式切换时上下文的保存恢复由硬件来完成, 这样就大大提高了陷入-–—模拟时上下文切换的效率。该技术的引入使x86 CPU可以很容易地实现完全虚拟化。故皆被几乎所有之前分歧的各大流派所采用, 包括KVM-x86,VMWare ESX Server 3,Xen 3.0 。
虚拟化CPU形成了新的CPU执行状态 Non-Root Mode 和 Root Mode .GuestOS运行 在Non-Root Mode的Ring 0核心态中,这意味着GuestOS能够直接执行特权指令, 而不再需要特权解除和陷入模拟机制。并且在硬件层上面紧接的就是虚拟化层的 VMM,而不需要HostOS。这是因为在硬件辅助全虚拟化的VMM会以一种更具协作性 的方式来实现虚拟化-–—将虚拟化模块加载到HostOS的内核中,例如:KVM, KVM通过在HostOS内核中加载*KVM Kernel Module*来将HostOS转换成为一个VMM。 所以此时VMM可以看作是HostOS,反之亦然。
硬件辅助全虚拟化主要使用了支持虚拟化功能的CPU进行支撑,CPU可以明确的分辨出来自GuestOS的特权指令,并针对GuestOS进行特权操作,而不会影响到HostOS。
硬件辅助全虚拟化需要物理硬件的支持,比如需要CPU必须支持并且打开虚拟化功能,例如Intel 的Intel VT-X/EPT,AMD的AMD-V/RVI,以在CPU 层面支持虚拟化功能和内存虚拟化技术
全虚拟化软件(硬件辅助全虚拟化):
- vmware esxi
- Xen3.0
- KVM
- Microsoft Hyper-V
vmware workstation https://www.vmware.com/cn/products/workstation-pro.html
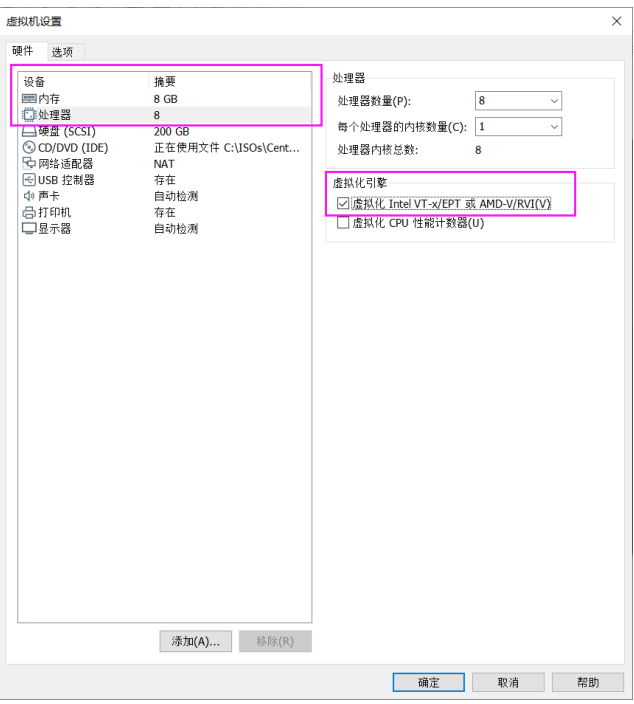
打开硬件虚拟化:虚拟机设置–硬件–处理器–虚拟化引擎,勾选“虚拟化Intel VT-x/EPT或 AMD-V/RVI(V)”
- VirtualBox
- paralles desktop
KVM 是硬件辅助的虚拟化技术 ,主要负责比较繁琐的 CPU 和内存虚拟化,而 Qemu 则负责 I/O 虚拟化,两者合作各自发挥自身的优势
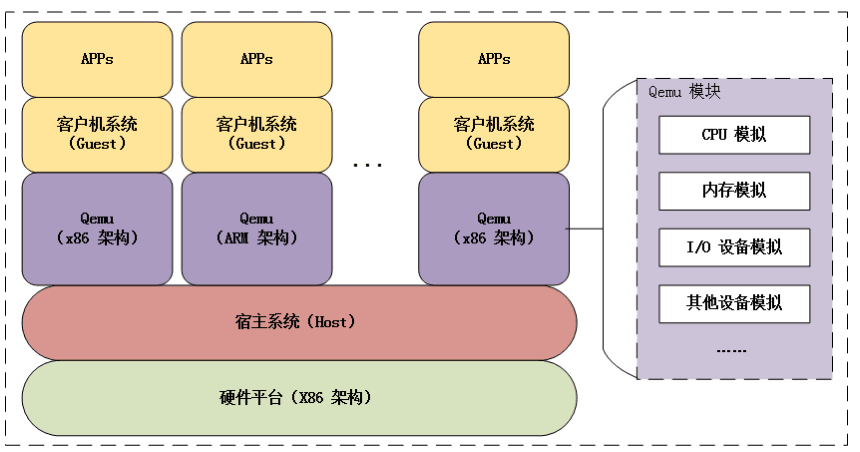
发展历史: 早期全虚拟化,纯软件模拟性能很差;后来变成半虚拟化,需要修改内核;目前变成硬件辅助的虚拟化
半虚拟化 para virtualization
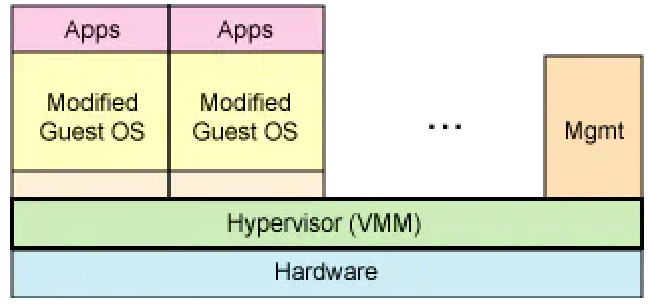
半虚拟化是需要GuestOS协助的虚拟化。因为在半虚拟化VMM中运行的GuestOS,都需要将其内核源码进行都进过了特别的修改。
通过修改客户操作系统代码,将原来在物理机上执行的一些特权指令(主要是修 改GuestOS指令集中的敏感指令和核心态指令),修改成可以和VMM直接交互的方 式,实现操作系统的定制化。这样,就不会有捕获异常、翻译和模拟的过程,性 能损耗比较少。
半虚拟化VMM在处理敏感指令和内核态指令的流程上相对更简单一些。让HostOS 在捕抓到GuestOS内核态指令或敏感指令时,HostOS也能够准确的判断出该指令 是否属于GuestOS(GuestOS知道自己是虚拟机)。这样就可以高效的避免了上述问 题。典型的半虚拟化软件有-–—Xen、KVM-PowerPC(简易指令集)
半虚拟化除了修改内核外还有另外一种实现方法-–—在每一个GuestOS中安装半虚拟化软件,如:VMTools、RHEVTools。
注意 :若使用KVM运行Windows时,一定要安装半虚拟化驱动Tools,否则无法 工作。现在主流的半虚拟化驱动是由IBM和redhat联合开发一个通用半虚拟机驱 动virtio。
半虚拟化要求guest OS 的内核是知道自己运行在虚拟化环境当中的,因此guest OS的系统架构必须和宿主机的系统架构相同,并且要求对guest OS的内核做相应的修改,因此半虚拟化只支持开源内核的系统,不支持闭源的系统,比较常见的半虚拟化就是早期版本的XEN,但是Xen 从其3.0 版本开始,可以支持利用硬件辅助虚拟化技术(http://www-archive.xenproject.org/files/xen_3.0_datasheet.pdf),实现了完全虚拟化,可以在其平台上不加修改的直接运行如Linux/Windows 等系列的操作系统,使得系统具备了更好的兼容性。
xen 的半虚拟化相关技术:
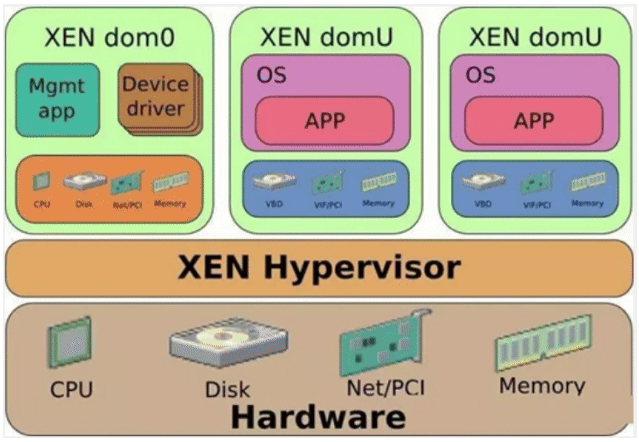
- Domain 0:Domain 0 是一个修改过的 Linux kernel,是唯一运行在 Xen Hypervisor 之上的虚拟机,它拥有访问物理 I/O资源的权限,同时和系统上 运行的其他虚拟机进行交互。Domain 0 需要在其它Domain 启动 之前启动。
- Domain U:运行在 Xen Hypervisor上的所有半虚拟化(paravirtualized)虚 拟机被称为”Domain U PV Guests”,其 上运行着被修改过内核的操作系统, 如 Linux、Solaris、FreeBSD等其它 UNIX 操作系统。所有的全虚拟化虚拟 机被称为”Domain U HVM Guests”,其上运行着不用修改内核的操作系统, 如 Windows 等。
各虚拟化技术性能对比
| 虚拟机名称 | 开发厂商及其简介 | 虚拟类型 | 执行效率 | GuestOS是否可以跨平台 |
|---|---|---|---|---|
| Xen | http://www.xensource.com/ | 半虚拟化、完全虚拟化 | 非常高 | 可以 |
| Vmware | http://www.vmware.com/ | 完全虚拟化 | 较高 | 可以 |
| KVM | http://www.linux-kvm.org/page/Main_Page | 完全虚拟化 | 较高 | 可以 |
| QEMU | http://www.qemu.com/ | 模拟 | 较低 | 可以 |
虚拟化技术厂商
软件技术厂商
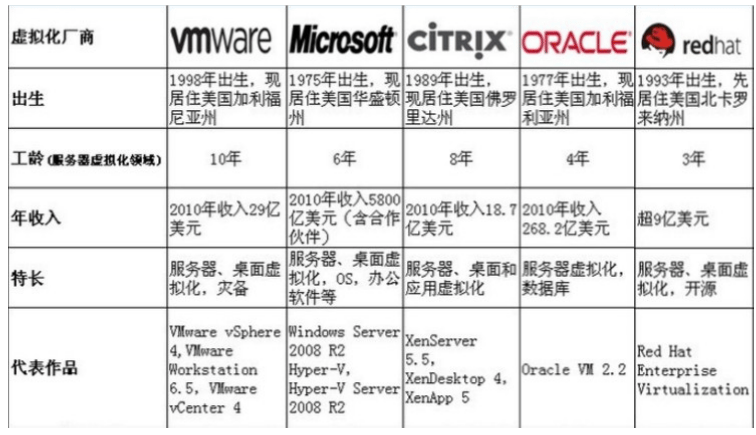
硬件技术厂商
英特尔® 虚拟化技术(英特尔® VT) https://www.intel.cn/content/www/cn/zh/virtualization/virtualization-technology/intel-virtualization-technology.html
Intel从2005年开始支持在CPU中加入硬件虚拟化的支持,intel virtualazation tochnology,简称intelVT,IntelVT虚拟化技术包括分别针对CPU的增强虚拟化 技术Intel VT-x、I/O虚拟化的Intel VT-d、网络虚拟化的Intel VT-c 技术
Intel VT-x
Intel VT-x可以让一个CPU工作起来像多个CPU在并行运行,从而使得在一台物理 服务器内可以同时运行多个操作系统,能够降低(甚至消除)多个虚拟机操作系 统之间的资源争夺和限制,从硬件上极大地改善虚拟机的安全性和性能,有助于 提高基于软件的虚拟化解决方案的灵活性与稳定性,此外,Intel VT-x具备的虚 拟机迁移特性还可为IT投资提供有力保护,并进一步提高故障切换、负载均衡、 灾难恢复和维护的灵活性。
Intel VT Flex Priority(灵活优先级):当处理器执行任务时,往往会收到其它设备或应用发出的请求或"中断"命令。为了最大程度减少对性能的影响,处理器内的一个寄存器专用来监控任务优先级,只有优先级高于当前运行任务的请求或"中断"才被及时处理。

Intel VT Flex Migration(灵活迁移):虚拟化能够在无需停机的情况下,将运行中的虚拟机在物理服务器之间进行迁移,借助此项技术,管理程序能够在迁移池内的所有服务器中建立一套一致的指令,实现工作负载的无缝迁移

Intel VT Extended Page Tables(EPT,扩展页表):为了降低实现内存虚拟化的难度和提升内存虚拟化的性能,Extended Page Tables直接在硬件上支持虚拟机内存的逻辑地址->虚拟机内存的物理地址->物理服务器内存的物理地址的两次转换。
Intel VT-d
Intel VT-d技术支持直接I/O访问,虚拟机创建好之后,数据即可直接在虚拟机 与为其分配的I/O设备之间进行传输,这样就加快了I/O的流动,减少VMM活动及 服务器处理器的负载。
Intel VT-c
Intel VT-c技术:支持网络连接的Intel虚拟化技术,包括:
虚拟机设备队列(VMDq)、虚拟机直接互连(VMDc)。

虚拟机设备队列(VMDq),最大限度提高I/O吞吐率,IntelVT-c可将网络I/O吞吐量提高一倍以上,使虚拟化应用达到接近物理服务器的吞吐率

虚拟机直接互连(VMDc):大幅提升虚拟化性能。VMDc支持虚拟机直接访问网络I/O硬件,从而显著提升虚
拟机性能,这些通信链路直接绕过了VMM交换机,进一步提升了I/O性能并减少服务器处理器的负载。
云计算
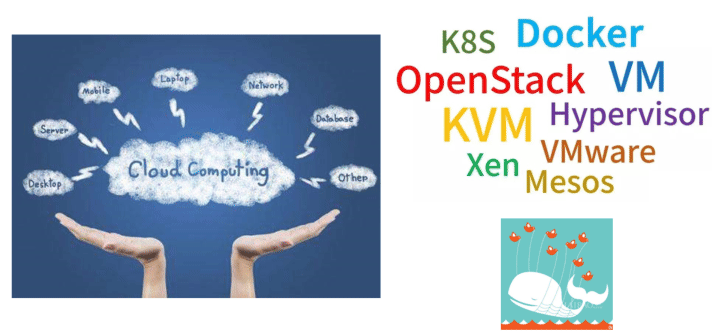
什么是云计算
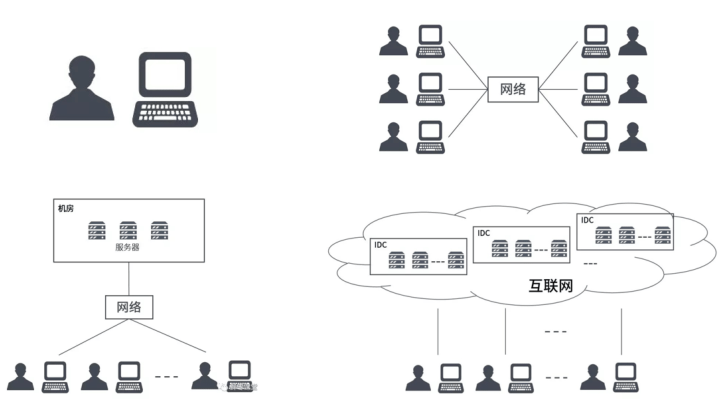
以前电脑被发明的时候,还没有网络,每个电脑,就是一个单机。用户在单机上, 安装操作系统和应用软件,完成自己的工作.后来,有了网络,单机与单机之间, 可以交换信息,协同工作.再后来,单机性能越来越强,就有了服务器。人们发 现,可以把一些服务器集中起来,放在机房里,然后让用户通过网络,去访问和 使用机房里的计算机资源.再再后来,小型网络变成了大型网络,就有了互联网 (Internet)。小型机房变成了大型机房,就有了IDC(Internet Data Center, 互联网数据中心)当越来越多的计算机资源和应用服务被集中起来,就变成 了-–—"云计算(Cloud Computing)"。无数的大型机房,就成了”云端”
云计算(Cloud Computing)是概念最早是由Google 前首席执行官埃里克•施密特 (EricSchmidt)在2006 年8 月9日的搜索引擎大会上首次提出的一种构想,而”云 计算”就是这种构想的代名词,云计算以虚拟化为基础,以网络为中心,为用户 提供安全、快速、便捷的数据存储和网络计算服务,包括所需要的硬件、平台、 软件及服务等资源,而提供资源的网络就被称为”云”。
美国国家标准与技术研究院(NIST)定义:云计算是一种按使用量付费的模式,这种模式提供可用的、便捷的、按需的网络访问, 进入可配置的计算资源共享池(资源包括网络,服务器,存储,应用软件,服务),这些资源能够被快速提供,只需投入很少的管理工作,或与服务供应商进行很少的交互
云计算是指服务的交付和使用模式,指通过网络以按需、易扩展的方式获得所需 的资源(可以是IT和软件、互联网相关的,也可以使任意其他的服务)。提供资 源的网络被称为”云”。"云"中的资源在使用者看来是可以无限扩展的,并且可 以随时获取,按需使用,随时扩展,按使用付费。意味着计算能力也可以作为一 种商品进行流通,就像煤气、水电一样,取用方便,费用低廉。最大的不同在于, 它是通过网络进行传输的.
云是网络、互联网的一种比喻说法。过去在画图时往往用云来表示电信网,后来也用来表示互联网和底层基础设施的抽象
云计算分类

公有云:Public Cloud,通常指第三方提供商为用户提供的能够通过互联网来 使用的云主机,所有入驻的用户都称为租户。公有云本质上是一种共享资源服 务,最大的特点是成本低,扩展性非常好,对于对安全要求不高的中小型企业 或是个人站长来说是非常好的选择。缺点是对于云端的资源缺乏控制、保密数 据的安全性、网络性能和匹配性问题
代表:阿里云、亚马逊、腾讯云、华为云等
- 私有云:Private Cloud,是为使用者单独使用而构建的,是企业的专有资源, 对数据保密、数据安全、服务质量都能有效控制。特点是安全性与私有化,是 订制化解决方案的根本,可保证企业的数据安全与稳定
- 混合云: Hybird Cloud,是一种混合了私有云和公有云的新型解决方案,集 公有云的方便便捷与私有云的安全稳定为一体,是近年来云计算的主要模式和 发展方向。企业出于安全考虑,会将敏感数据或是运行关键性的工作负载放在 私有云上面,同时又希望能使用公有云的免费资源,达到安全又省钱的目的。
公有云和私有云的对比

公有云:比如阿里云/aws、azure、金山云、腾讯云等都属于公有云,每个人都可以付费使用,不需要自己关心底层硬件,但是数据安全需要考虚

私有云:在自己公司内部或IDC自建Openstack、VMware等环境

混合云:既要使用公有云,又要使用私有云,即自己的私有云的部分业务和公有云有交接,这部分称为混合云
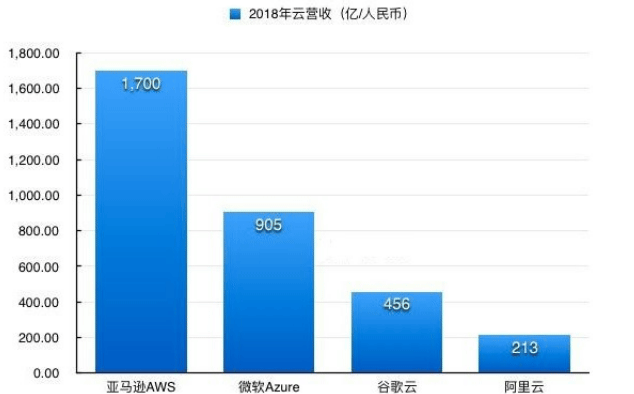
下图为截止到2018年底,全球主要云计算厂商的营收对比:
云计算分层
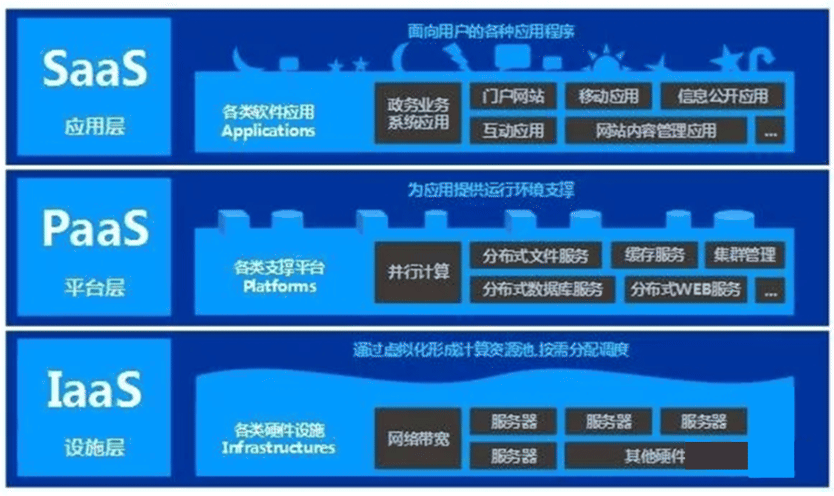
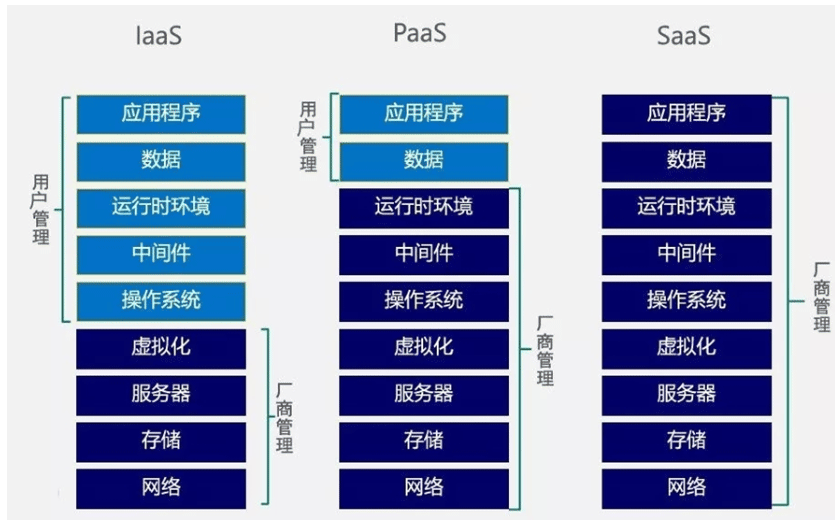
传统IDC:直接在物理机运行服务,不能快速对业务横向扩容。
把计算机资源放在云端,如何提供给用户,又分为三种层次:
第一层次,是最底层的硬件资源,主要包括CPU(计算资源),硬盘(存储资源),还有网卡(网络资源)等,即为IAAS
IaaS:Infrastructure as a service,基础设施即服务自建基础服务(openstack)、阿里云ECS。
第二层次,更高级些,用户不直接使用CPU、硬盘、网卡,而是希望把操作系统,数据库软件等安装好,用户再来使用,即为PAAS
PaaS:Platform-as-a-service 平台即服务, 如:公有云的RDS云数据库 (Relational DatabaseService)、docker、Redis、SLB(Server Load Balancer)等服务。
第三层次,更进一步,用户期望不但要装好操作系统等服务,还要把具体的应用软件装好,例如:邮件、OA系统等,用户可以直接使用服务,即为SAAS
SaaS:Software-as-a-service 软件即服务,如:企业邮箱、OA系统、云盘、云音乐等
云计算和虚拟化
面对这么多样化多层次的云计算服务,需要对资源进行调用和管理.如果人工对 物理资源进行管理效率太低,需要各种软件和平台,负责对资源进行调用和管理, 即所谓自动化运维管理要对物理资源进行灵活和动态的弹性管理,就需要实现” 虚拟化”
通俗的说,虚拟化就是把物理资源转变为逻辑上可以管理的资源,以打破物理结 构间的壁垒,计算元件运行在虚拟的基础上而不是真实的基础上,可以扩大硬件 的容量,简化软件的重新配置过程。
虚拟化是云计算的基础。常见的虚拟化就是在一台物理服务器上,运行多台”虚 拟服务器”,也叫虚拟机(VM,Virtual Machine),从表面来看,这些虚拟机都 是独立的服务器,但实际上,它们共享物理服务器的CPU、内存、硬件、网卡等 资源
云计算是一种服务模式,虚拟化是一种技术
虚拟化是云计算的重要支撑技术。云计算是基于互联网的相关服务的增加、使用 和交付模式,通常涉及通过互联网来提供动态易扩展且经常是虚拟化的资源。通 过虚拟化,可以将应用程序和数据在不同层次以不同的方式展现给客户,为云计 算的使用者和开发者提供便利。云计算的虚拟化过程为组织带来了灵活性,从而 改善IT运维和减少成本支出.
虚拟化和云计算并不是相互捆绑的,而是可以优势互补为用户提供更优质的服务。 在云计算的部署方案中,虚拟化技术可以使其IT资源应用更加灵活。而在虚拟化 的应用过程中,云计算也提供了按需所取的资源和服务。在一些特定场景中,云 计算和虚拟化无法剥离,只有相互搭配才能更好地解决客户需求
虚拟化和云的区别 参考链接: https://www.redhat.com/zh/topics/cloud-computing/cloud-vs-virtualization
由于两者的核心理念都是从硬件中分离资源,以创建可用的环境,所以很容易被混为一谈。虚拟化有助于创建云,但它并非实现云计算的决定性技术。你可以这样理解:
虚拟化是一种将功能与硬件分离的技术
云计算远非只是依赖于这种分离的解决方案

美国国家标准与技术协会这样描述云计算的 5 种功能:一个网络、池化资源、一个用户界面、置备功能、自动化资源控制/分配。虽然虚拟化可以创建网络和池化资源,但还需要其他管理和操作系统软件来创建用户界面、部署虚拟机、控制/分配资源
虚拟化和云计算的对比:
| 项目 | 虚拟化 | 云 |
| 定义 | 技术 | 方法 |
| 目的 | 从 1 个物理硬件系统创建多个模拟环境 | 汇聚并自动化分配虚拟资源以供按需使用 |
| 用途 | 针对具体用途为特定用户提供打包资源 | 针对多种用途为用户群组提供不同资源 |
| 配置 | 基于镜像 | 基于模板 |
| 成本 | 资本性支出(CAPEX)高、运营支出(OPEX)低 | 私有云:CAPEX 高、OPEX低 公共云: CAPEX 低 |
| 可扩展性 | 纵向扩展 | 横向扩展 |
| 使用场景 | 少量服务器的环境 | 众多服务器的大环境 |
虚拟化技术之KVM架构和部署
KVM 概述
KVM 介绍

KVM( Kernel-based Virtual Machine)是一个完整的虚拟化解决方案,适用于 包含虚拟化扩展(IntelVT或AMD-V)的x86硬件上的Linux。目前也支持ARM等其 它硬件平台. 它由可加载的内核模块kvm.ko组成,它提供核心虚拟化基础架构和 处理器特定模块,kvm-intel.ko或kvm-amd.ko,KVM的用户空间组件包含在 QEMU1.3后续版本中,KVM目前已成为学术界的主流VMM (virtual machine monitor,虚拟机监视器,也称为 hypervisor)之一
KVM是开源软件,可运行多个运行未修改的Linux或Windows映像的虚拟机
依赖于HVM;Intel VT-x, AMD AMD-V
2006年10月,以色列 Qumranet 公司发布 KVM,早期开发者 Avi Kivity
2007年2月,KVM内核组件收录至Linux 2.6.20及后续版本中
2008年9月,Redhat 1.7亿美元收购
2009年9月, RHEL5.4 中在集成XEN的同时,也将KVM添加进来
2011年11月,RHEL6使用KVM代替XEN
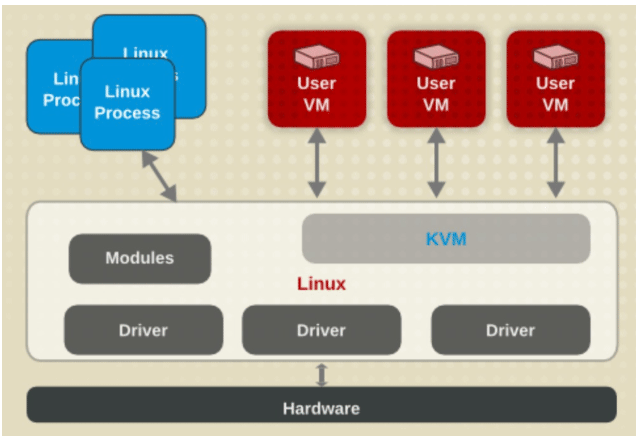
红帽 kvm 介绍 https://www.redhat.com/zh/topics/virtualization/what-is-KVM
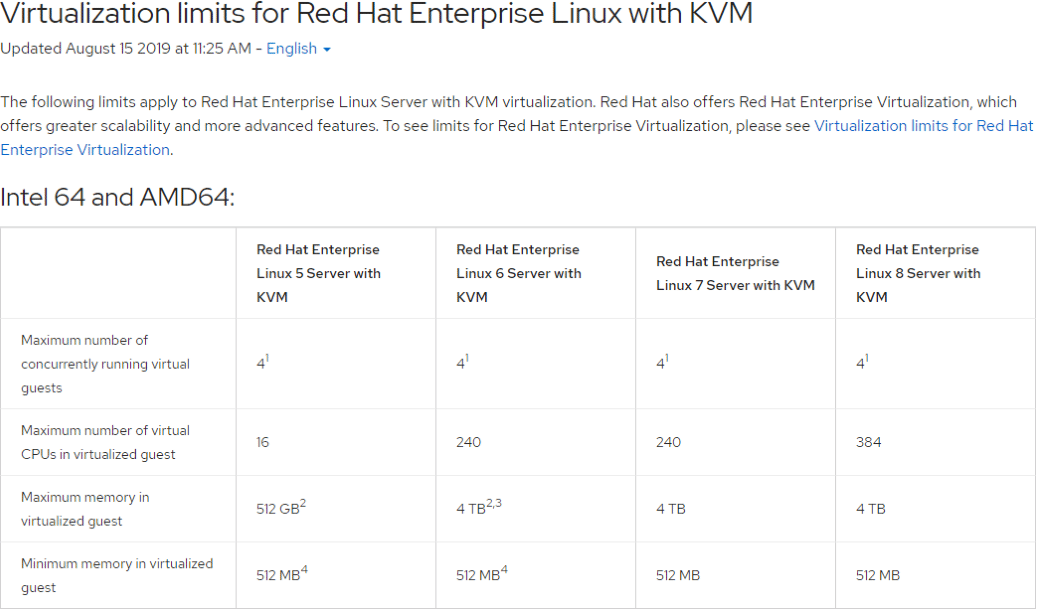
RedHat创建虚拟机数量限制: https://access.redhat.com/articles/rhel-kvm-limits
KVM架构
KVM 是基于虚拟化扩展(Intel VT 或者 AMD-V)的 X86 硬件的开源的 Linux 原生的全虚拟化解决方案。KVM 中,虚拟机被实现为常规的 Linux 进程,由标准 Linux 调度程序进行调度;虚机的每个虚拟CPU 被实现为一个常规的 Linux 进程。这使得 KVM 能够使用 Linux 内核的已有功能。
但是,KVM 本身不执行任何硬件模拟,需要客户空间程序通过 /dev/kvm接口设 置一个客户机虚拟服务器的地址空间,向它提供模拟的I/O,并将它的视频显示 映射回宿主的显示屏。目前这个应用程序是QEMU。
KVM 体系结构
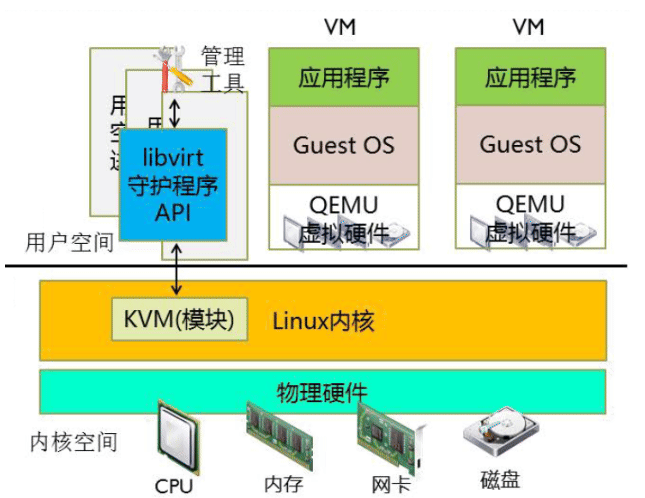
- KVM: 初始化CPU硬件,打开虚拟机模式,负责CPU,内存,中断控制器,时钟. 由 内核模块kvm_xxx.ko实现,工作于hypervisor,设备/dev/kvm,是一个字符设 备,在用户空间可通过ioctl()系统调用来完成VM创建、启动,为VM分配内存、 读写VCPU的寄存器、向VCPU注入中断、时钟等管理功能
- QEMU进程:工作于用户空间,主要用于实现模拟IO设备,如显卡,网卡,硬盘等, qemu-kvm进程:工作于用户空间,用于实现一个虚拟机实例
- Libvirt:提供统一API,守护进程libvirtd和相关工具,如:virsh,virt-manager等
KVM 模块载入后的系统的运行模式
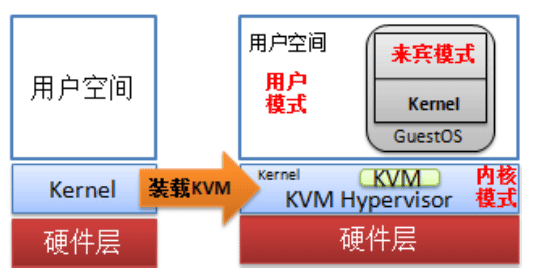
- 内核模式:GuestOS执行I/O类操作,或其它的特殊指令的操作;称作”来宾-内核”模式
- 用户模式:代表GuestOS请求I/O类操作
- 来宾模式:GuestOS的非I/O类操作;它被称作”来宾-用户”模式,称作虚拟机的用户模式更贴切.
KVM 的组件
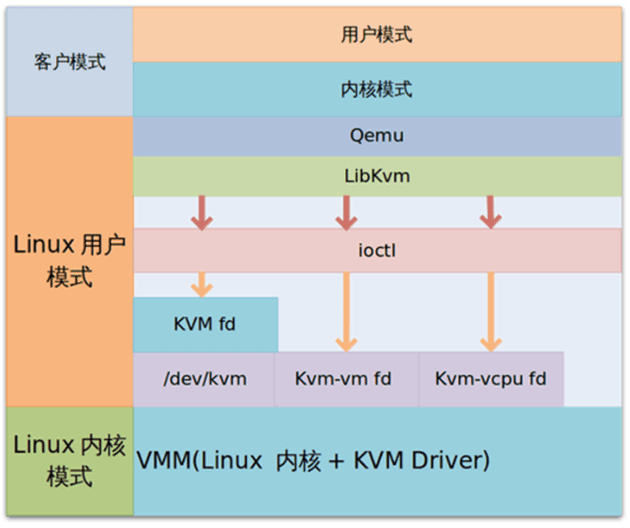
KVM:运行在内核空间,提供 CPU 和内存的虚级化,以及客户机的 I/O拦截,Guest的部分I/O被KVM拦截后,交给QEMU处理。
两类组件:
- (kvm.ko)/dev/kvm:工作为hypervisor,在用户空间可通过系统调用ioctl() 与内核中的kvm模块交互,从而完成虚拟机的创建、启动、停止、删除等各种 管理功能,可虚拟CPU和内存
- qemu-kvm进程:工作于用户空间,用于实现IO设备模拟;也用于实现一个虚拟机实例
KVM 功能
KVM 所支持的功能包括:
- 支持CPU 和 memory 超分(Overcommit)
- 支持半虚拟化I/O (virtio)
- 支持热插拔 (cpu,块设备、网络设备等)
- 支持对称多处理(Symmetric Multi-Processing,缩写为 SMP )
- 支持实时迁移(Live Migration)
- 支持 PCI 设备直接分配和 单根I/O 虚拟化 (SR-IOV)
- 支持内核同页合并 (KSM )
- 支持NUMA (Non-Uniform Memory Access,非一致存储访问结构 )
QEMU
QEMU是一个广泛使用的开源计算机仿真器和虚拟机。当作为仿真器时,可在一种 架构(如PC机)下运行另一种架构(如ARM)下的操作系统和程序。而通过动态转化, 其可以获得很高的运行效率。当作为一个虚拟机时,qemu可以通过直接使用物理 机的系统资源,让虚拟系统能够获得接近于物理机的性能表现。qemu支持xen或 者kvm模式下的虚拟化。当用kvm时,qemu可以虚拟x86、服务器和嵌入式powerpc, 以及s390的系统
QEMU 当运行与主机架构相同的目标架构时可以使用KVM。例如,当在一个x86兼 容处理器上运行qemu-system-x86 时,可以利用 KVM加速-–—为宿主机和客户 机提供更好的性能
Qemu是纯软件实现的虚拟化模拟器,几乎可以模拟任何硬件设备,最熟悉的就是 能够模拟一台能够独立运行操作系统的虚拟机,虚拟机认为自己和硬件打交道, 但其实是和Qemu 模拟出来的硬件打交道,Qemu 将这些指令转译给真正的硬件, 正因为 Qemu是纯软件实现的,所有的指令都要经Qemu,性能非常低,所以,在 生产环境中,大多数的做法都是配合KVM来完成虚拟化工作,KVM完成复杂及要求 比较高的设备虚拟化,而Qemu完成像鼠标、键盘等设备的虚拟化。
如果没有kvm模拟cpu,QEMU也可以模拟CPU
QEMU有如下几个部分组成:
- 处理器模拟器(x86、PowerPC和Sparc)
- 仿真设备(显卡、网卡、硬盘、鼠标等)
- 用于将仿真设备连接至主机设备(真实设备)的通用设备,实现透传
- 模拟机的描述信息
- 调试器
- 与模拟器交互的用户接口
KVM 局限性
- CPU overcommit:过载使用,性能下降
- 时间记录难以精确,依赖于时间同步机制,如NTP
- VM量特别大时,MAC地址存在冲突的可能性
- 实时迁移:共享存储,CPU架构,版本等
- 性能局限性
比较 KVM 和 Xen
KVM与XEN对比
| XEN | KVM | |
| 问世时间 | 2003年 | 2007年 |
| 支持企业 | Citrix、Novell、Oracle、Sun、Ret Hat(RHEL5)和 Virtual Iron | Redhat、Ubuntu等 |
| 支持的虚、拟化技术 | 全虚拟化、半虚拟化 | 全虚拟化 |
| 支持架构 | x86、IA64和AMD、Fujitsu、IBM、Sun等公司的ARM,以及 x86/64 CPU商家和Intel嵌入式的支持 | 支持虚拟化的CPU |
| 支持操作系统 | UNIX、Linux和Microsoft Windows | UNIX、Linux和Microsoft Windows |
| 动态迁移 | 支持 | 支持(以前不支持) |
| 内核支持 | 需要对内核打补丁 | 内置在内核中 |
IBM文档 http://www.ibm.com/developerworks/cn/linux/l-using-kvm/
Xen 虚拟化环境在传统上提供了 Linux 系统上性能最高的开源虚拟化技术。Xen 使用一个虚拟机管理程序来管理虚拟机和相关的资源,还支持半虚拟化,这可在 "知道" 自己已实现虚拟化的虚拟机中提供更高的性能。Xen 提供了一个专门执行资源和虚拟管理与计划的开源虚拟机管理程序。在裸机物理硬件上引导系统时,Xen 虚拟机管理程序启动一个称为 Domain0 或管理域的主虚拟机,该虚拟机提供了对所有在该物理主机上运行的其他虚拟机(称为 Domain1 到 DomainN,或者简单地称为 Xen Guest)的中央虚拟机管理功能。

不同于 Xen,KVM 虚拟化使用 Linux 内核作为它的虚拟机管理程序。对 KVM 虚拟化的支持自 2.6.20版开始已成为主流 Linux 内核的默认部分。使用 Linux 内核作为虚拟机管理程序是 KVM 受到批评的一个主要方面,因为(在默认情况下)Linux 内核并不符合 Type 1 虚拟机管理程序的传统定义—"一个小操作系统"。尽管大多数 Linux 发行版所提供的默认内核的确如此,但可以轻松地配置 Linux 内核来减少它的编译大小,以便它仅提供作为 Type 1 虚拟机管理程序运行所需的功能和驱动程序。Red Hat 自己的Enterprise Virtualization 产品仅依靠这样一种特殊配置的、相对轻量型的 Linux 内核来运行。但更重要的是,"小"只是一个相对的词汇,如今具有数 GB 内存的 64 位服务器可轻松地提供现代 Linux 内核所需的几 MB 空间。

KVM 超越 Xen 成为大多数企业环境首选的开源裸机虚拟化技术,这有多个原因:

KVM 支持自 2.6.20 版开始已自动包含在每个 Linux 内核中。在 Linux 内核 3.0 版之前,将 Xen支持集成到 Linux 内核中需要应用大量的补丁,但这仍然无法保证每个可能硬件设备的每个驱动程序都能在Xen 环境中正确工作。

Xen 支持所需的内核源代码补丁仅提供给特定的内核版本,这阻止了 Xen 虚拟化环境利用仅在其他内核版本中可用的新驱动程序、子系统及内核修复和增强。KVM 在 Linux 内核中的集成使它能够自动利用新 Linux内核版本中的任何改进。

Xen 要求在物理虚拟机服务器上运行一个特殊配置的 Linux 内核,以用作在该服务器上运行的所有虚拟机的管理域。KVM 可在物理服务器上使用在该物理系统上运行的 Linux VM 中使用的相同内核。
Xen 的虚拟机管理程序是一段单独的源代码,它自己的潜在缺陷与它所托管的操作系统中的缺陷无关。因为KVM 是 Linux 内核的一个集成部分,所以只有内核缺陷能够影响它作为 KVM 虚拟机管理程序的用途。
尽管 Xen 仍可提供比 KVM 性能更高的裸机虚拟化,但这些性能改进的价值常常比不上 KVM 虚拟化的简单性和易用性价值。
目前在各大公有云厂商新购买的虚拟机基本运行在KVM环境下,就连早期一直使用Xen的AWS也在2017年开始逐渐转换到KVM环境,以下是AWS基于KVM技术提供的最新示例部分性能。
KVM的虚拟化需要硬件支持(如Intel VT技术或者AMD V技术),是基于硬件的完 全虚拟化,而Xen早期则是基于软件模拟的半虚拟化,新版本则是支持基于硬件 支持的完全虚拟化,但Xen本身有自己的进程调度器,存储管理模块等,所以代 码较为庞大.
广为流传的商业系统虚拟化软件VMware ESXI系列是Full-Virtualization
RHEL(CentOS)对虚拟设备三种工作模式
Red Hat Enterprise Linux 7 的虚拟化功能为虚拟机提供了三种不同形式的系统设备。这些硬件设备都
被显示为物理连接到虚拟机,但设备的驱动以不同方式工作。这三种形式包括:
虚拟和仿真设备
半虚拟化设备
物理共享设备
虚拟和仿真设备
KVM 实现了虚拟机的多个核心设备。这些仿真硬件设备对虚拟化操作系统至关重要。仿真设备即完全使用软件实现的虚拟化设备
仿真驱动可能使用物理设备,或虚拟化软件设备。仿真驱动是虚拟机和 Linux内 核(管理源设备)间的”翻译层”。设备层的指示会由 KVM虚拟机监控程序进行 完全转换。任何可以被 Linux内核识别的同类设备(储存、网络、键盘和鼠标), 都可以作为仿真驱动的后端源设备
虚拟化 CPU (vCPU):无论主机 CPU 的数量有多少,主机系统都可以为客机提供多达 160 个虚拟化CPU (vCPU)

仿真图形设备:有两种仿真图形设备可供选择。这类设备可以使用 SPICE (Simple Protocol forIndependent Computing Environments)协议或 VNC 进行连接:
    Cirrus CLGD 5446 PCI VGA 卡(使用 cirrus 设备)
    标准 VGA 图形卡,带有 Bochs VESA 扩展程序(硬件等级,包括所有非标准模式)

仿真系统组件:仿真以下核心系统组件来提供基本系统功能:
    Intel i440FX 主机 PCI 网桥,PIIX3 PCI 到 ISA 的网桥,PS/2 鼠标和键盘,EvTouch USB
图形平板设备,PCI UHCI USB 控制器与虚拟化 USB 集线器,仿真串口,EHCI 控制器,虚拟化 USB 存储和 USB 鼠标,USB 3.0 xHCI 主机控制器

仿真声音设备
仿真监视器设备:提供了两种仿真监视器设备。监视器可以在虚拟机超载或未响应时,自动重启虚拟机。
watchdog 程序包务必安装在客机上
两种可供选择的设备为:
i6300esb,仿真 Intel 6300 ESB PCI 监视器设备。为推荐使用设备
ib700,仿真 iBase 700 ISA 监视器设备

仿真网络设备
两种仿真网络设备可供选择:
e1000 设备仿真了 Intel E1000 网络适配器(Intel 82540EM、82573L、82544GC)
rtl8139 设备仿真了 Realtek 8139 网络适配器。

仿真储存驱动:储存驱动与储存池可以使用这些仿真设备,将储存设备与虚拟机相连。客机使用仿真储存驱动可访问储存池
注意,同所有虚拟设备一样,储存驱动不是储存设备。对于虚拟机器,该驱动作为备用储存设备、文件或储存池容量进行使用。备用储存设备可为任何支持的储存设备、文件、或储存池容量形式

仿真 IDE 驱动:KVM 提供两种仿真 PCI IDE 接口。仿真 IDE 驱动可以用于将多达四个虚拟化 IDE 硬盘或虚拟化 IDE 光盘驱动组合与每台虚拟机相连接。仿真 IDE 驱动同样可用于虚拟化 CDROM和 DVD-ROM驱动

仿真软盘驱动:仿真软盘驱动用于创造虚拟化软驱

仿真 AHCI 控制器:仿真 Advanced Host Controller Interface(AHCI)是 IDE 的一种替代产品
半虚拟化设备
半虚拟化设备:半虚拟化为客机使用主机上的设备提供了快速且高效的通讯方式。 KVM为虚拟机提供准虚拟化设备,它使用Virtio API作为虚拟机监控程序和客机 的中间层
一些半虚拟化设备可以减少 I/O 的延迟,并把 I/O的吞吐量提高至近裸机水平, 而其它准虚拟化设备可以把本来无法使用的功能添加到虚拟机上。当虚拟机运行 大小需要密集I/O 操作的应用程序时,推荐使用半虚拟化设备,而不是使用仿真 设备
所有 virtio设备都有两部分:主机设备和客机驱动。半虚拟化设备驱动允许客 机操作系统访问主机系统上的物理设备
半虚拟化设备的驱动必须安装在客机操作系统上。半虚拟化设备驱动须在 Windows客机上手动安装
半虚拟化网络设备(virtio-net):半虚拟化网络设备是虚拟化网络设备,它为虚拟机提供了网络访问能力,并可以提供网络性能及减少网络延迟。

半虚拟化块设备(virtio-blk):半虚拟化块设备是高性能虚拟化储存设备,它可以为虚拟机提供高性能、低延迟的 I/O 存储。半虚拟化块设备由虚拟机监控程序支持,与虚拟机相连(软盘驱动除外,它只能被仿真)

半虚拟化控制器设备(virtio-scsi):半虚拟化 SCSI 控制器设备是一种更为灵活且可扩展的 virtio-blk 替代品。virtio-scsi 客机能继承目标设备的各种特征,并且能操作几百个设备,相比之下,virtio-blk 仅能处理 28

半虚拟化时钟:使用时间戳计数器(TSC,Time Stamp Counter)作为时钟源的客机可能会出现与时间相关的问题。KVM 在主机外围工作,这些主机在向客机提供半虚拟化时间时没有固定的 TSC。此外,半虚拟化时钟会在客机运行 S3 或挂起 RAM 时帮助调整所需时间。半虚拟化时钟不支持 Windows 客机

半虚拟化串口设备 (virtio-serial):半虚拟化串口设备是面向比特流的字符流设备,它为主机用户空间与客机用户空间之间提供了一个简单的交流接口

气球设备(virtio-balloon):气球(ballon)设备可以指定虚拟机的部分内存为没有被使用(这个过程被称为气球"充气 " —inflation),从而使这部分内存可以被主机(或主机上的其它虚拟机)使用。当虚拟
机这部分内存时,气球可以进行"放气 "(deflated),主机就会把这部分内存重新分配给虚拟机

半虚拟化随机数字生成器 (virtio-rng:半虚拟化随机数字生成器使虚拟机可以直接从主机收集熵或随意值来使用,以进行数据加密和安全。因为典型的输入数据(如硬件使用情况)不可用,虚拟机常常急需熵。取得熵很耗时;virtiorng通过直接把熵从主机注入客机虚拟机从而使这个过程加快

半虚拟化图形卡(QXL):半虚拟化图形卡与 QXL 驱动一同提供了一个有效地显示来自远程主机的虚拟机图形界面。SPICE需要 QXL 驱动
透传物理主机设备
物理主机设备:特定硬件平台允许虚拟机直接访问多种硬件设备及组件。在虚拟 化中,此操作被称为”设备分配"(device assignment)。设备分配又被称作" 传递 “(passthrough)
VFIO 设备分配:虚拟功能 I/O(VFIO)是 RHEL 7 中一个新的内核驱动,它为虚拟机提供了高性能的访问物理硬件。VFIO 把主机系统上的 PCI 设备与虚拟机直接相连,允许客机在执行特定任务时有独自访问PCI 设备的权限。这就象 PCI 设备物理地连接到客机虚拟机上一样。通过把设备分配从 KVM 虚拟机监控系统中移出,并在内核级中强制进行设备隔离,VFIO 比以前的PCI 设备分配有很大改进。VFIO 安全性更高。VFIO 也支持对NVIDIA GPU 的分配

USB 传递:KVM hyperviso 支持把主机系统上的 USB 设备连接到虚拟机。USB 设备分配允许客机拥有在执行特定任务时有专有访问 USB 设备的权利。这就象 USB 设备物理地连接到虚拟机上一样

SR-IOV:SR-IOV (Single Root I/O Virtualization)是一个 PCI 快捷标准,把单一物理 PCI功能扩展到同分散的虚拟化功能(VF)一样共享 PCI 资源。通过 PCI 设备分配,每个功能可以被不同虚拟机使用。支持 SR-IOV 的 PCI-e 设备提供一个单一根功能(如单一以太网接口),并把多个各自分离的虚拟设备作为独特 PCI 设备功能。每个虚拟化设备都可能有自身独特的 PCI 配置空间、内存映射的寄存器以及单独的基于 MSI 的中断系统

NPIV:N_Port ID Virtualization(NPIV)是对光纤通道设备有效的功能。NPIV 共享单一物理

N_Port 作为多个 N_Port ID。NPIV 为 HBA(光纤通道主机总线适配器,Fibre Channel Host BusAdapter)提供和 SR-IOV 为 PCIe 接口提供的功能相似的功能。有了 NPIV,可以为 SAN(存储区域网络,Storage Area Network)提供带有虚拟光纤通道发起程序的虚拟机。NPIV 可以提供带有企业级存储解决方案的高密度虚拟环境
KVM 集中管理与控制
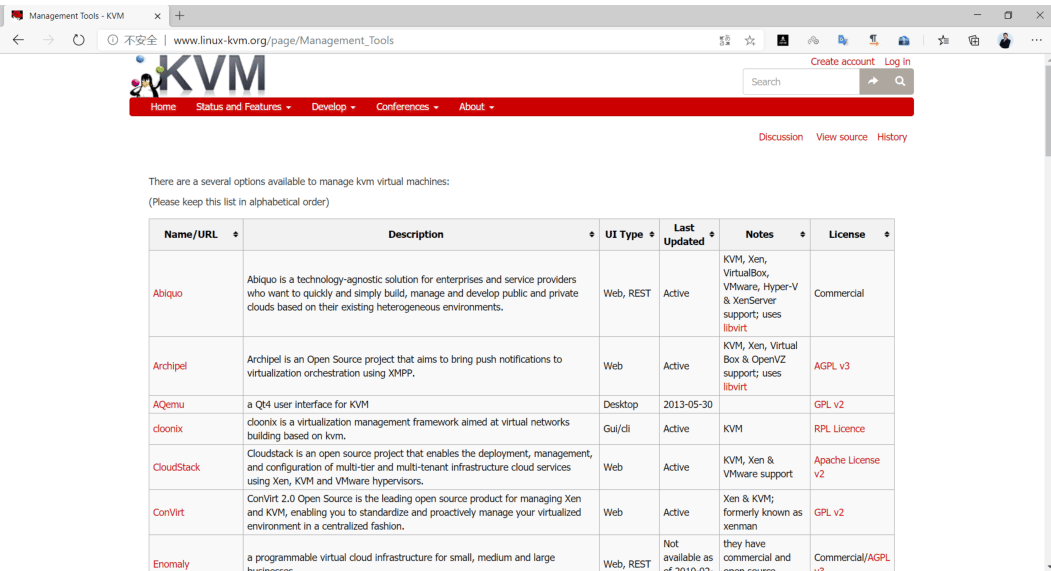
http://www.linux-kvm.org/page/Management_Tools
oVirt 功能强大,是Redhat虚拟化管理平台RHEV的开源版本。
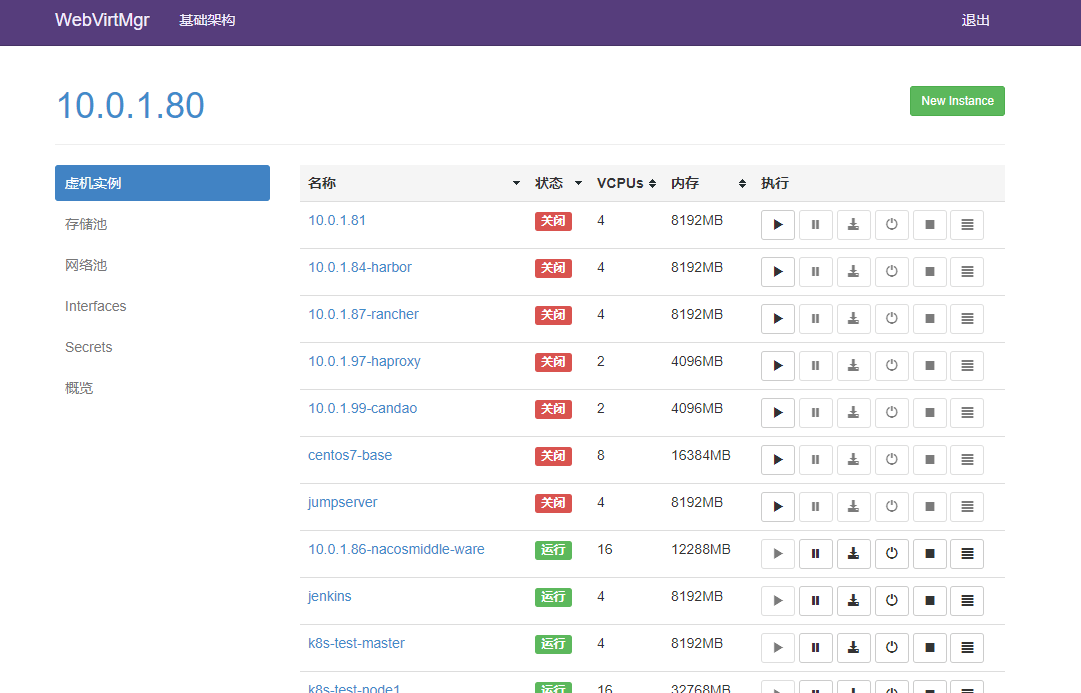
WebVirtMgr
virt-manager的Web模式的替代品
OpenStack
最主流的开源虚拟化管理平台
Proxmox virtualization environment
简称PVE,是一个开源免费的基于linux的企业级虚拟化方案,功能不输专业收 费的VMware。是一个完整的企业虚拟化开源平台。借助内置的Web界面,您可 以轻松管理VM和容器,软件定义的存储和网络,高可用性集群以及单个解决方 案上的多个开箱即用工具。
宿主机环境准备
KVM需要宿主机CPU必须支持虚拟化功能,因此如果是在vmware workstation上使用虚拟机做宿主机,那么必须要在虚拟机配置界面的处理器选项中开启虚拟机化功能。
CPU开启虚拟化
vmware workstation
- 打开硬件虚拟化:虚拟机设置–硬件–处理器–虚拟化引擎,勾选“虚拟化Intel VT-x/EPT或 AMD-V/RVI(V)”
验证开启虚拟化
查看硬件支持虚拟化信息
grep -Em 1     "vmx|svm" /proc/cpuinfo

#Intel CPU 对应 vmx
#AMD CPU 对应 svm
[root@centos8 ~]#gr
范例: 验证是否开启虚拟化支持
grep -Em 1 "vmx|svm" /proc/cpuinfo
flags : fpu vme de pse tsc msr pae mce cx8 apic sep mtrr pge mca cmov pat
pse36 clflush mmx fxsr sse sse2 syscall nx mmxext fxsr_opt pdpe1gb rdtscp lm
constant_tsc rep_good nopl tsc_reliable nonstop_tsc cpuid extd_apicid pni
pclmulqdq ssse3 fma cx16 sse4_1 sse4_2 x2apic movbe popcnt aes xsave avx f16c
rdrand hypervisor lahf_lm svm extapic cr8_legacy abm sse4a misalignsse
3dnowprefetch osvw ssbd ibpb vmmcall fsgsbase bmi1 avx2 smep bmi2 rdseed adx
smap clflushopt clwb sha_ni xsaveopt xsavec xsaves clzero arat npt svm_lock
nrip_save vmcb_clean flushbyasid decodeassists overflow_recov succor

范例: 查看AMD主机的内核模块
[root@centos8 ~]#lscpu|grep svm
Flags:                             fpu vme de pse tsc msr pae mce cx8 apic sep mtrr pge mca
cmov pat pse36 clflush mmx fxsr sse sse2 syscall nx mmxext fxsr_opt pdpe1gb
rdtscp lm constant_tsc rep_good nopl tsc_reliable nonstop_tsc cpuid extd_apicid
pni pclmulqdq ssse3 fma cx16 sse4_1 sse4_2 x2apic movbe popcnt aes xsave avx
f16c rdrand hypervisor lahf_lm svm extapic cr8_legacy abm sse4a misalignsse
3dnowprefetch osvw ssbd ibpb vmmcall fsgsbase bmi1 avx2 smep bmi2 rdseed adx
smap clflushopt clwb sha_ni xsaveopt xsavec xsaves clzero arat npt svm_lock
nrip_save vmcb_clean flushbyasid decodeassists overflow_recov succor

[root@centos8 ~]#lsmod |grep kvm
kvm_amd                             110592     0
ccp                                         98304     1 kvm_amd
kvm                                     786432     1 kvm_amd
irqbypass                             16384     1 kvm

~]# modinfo kvm_amd

[root@centos8 ~]#ll /dev/kvm
crw-rw-rw- 1 root kvm 10, 232 Sep 13 21:21 /dev/kvm
安装KVM工具包
KVM 相关工具包介绍
- qemu-kvm: 为kvm提供底层仿真支持
- libvirt-daemon: libvirtd守护进程,管理虚拟机
- libvirt-client: 用户端软件,提供客户端管理命令
- libvirt-daemon-driver-qemu: libvirtd连接qemu的驱动
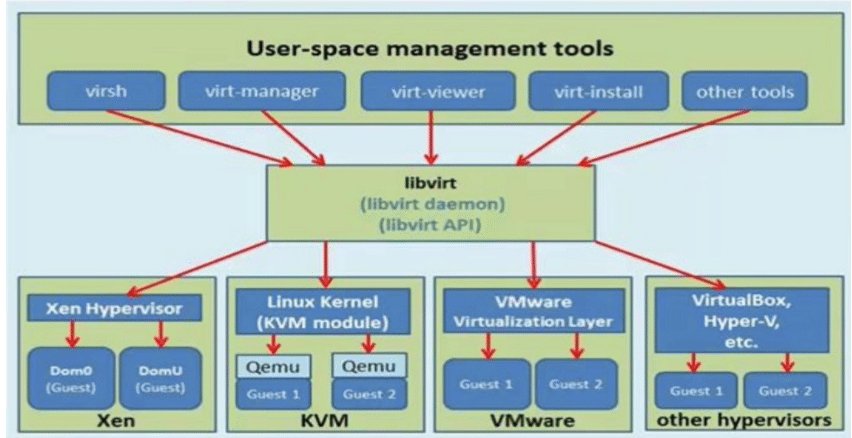
- libvirt: 使用最多的KVM虚拟化管理工具和应用程序接口,即通过libvirt调用KVM创建虚拟机,
- libvirt是KVM通用的访问API,其不但能管理KVM,还能管理VMware、Xen、Hyper-V、virtualBox等虚拟化方案。
- virt-manager: 图形界面管理工具,其底层也是调用libvirt API来完成对虚拟机的操作,包括虚拟机的创建、删除、启动、停止以及一些简单的监控功能等。
- virt-install: 虚拟机命令行安装工具
- virsh: 命令行工具是基于 libvirt API 创建的命令行工具,它可以作为图形化的 virt-manager 应用的备选工具。virsh 命令可以被用来创建虚拟化任务管理脚本,如安装、启动和停止虚拟机
- virt-viewer: 通过 VNC 和 SPICE 协议显示虚拟机器图形控制台的最小工具。该工具在其同名软件包中:virtviewer
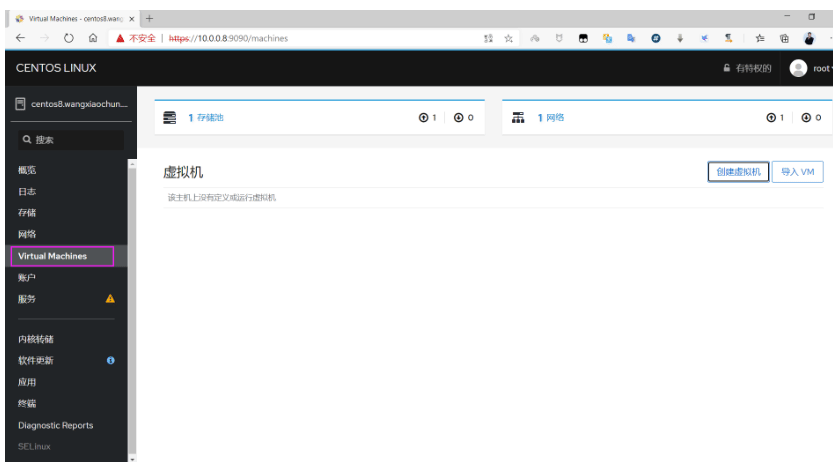
- cockpit: CentOS8 专门提供的基于Web的虚拟机管理界面
libvirt 包功能
libvirt 介绍

libvirt 程序包是一个与虚拟机监控程序相独立的虚拟化应用程序接口,它可以与操作系统的一系列虚拟化性能进行交互
libvirt 程序包提供:
- 一个稳定的通用层来安全地管理主机上的虚拟机。
- 一个管理本地系统和连网主机的通用接口。
在虚拟机监控程序支持的情况下,部署、创建、修改、监测、控制、迁移以及停止虚拟机操作都需要这些API。尽管 libvirt 可同时访问多个主机,但 API 只限于单节点操作
libvirt 程序包被设计为用来构建高级管理工具和应用程序,例如 virt-manager 与 virsh 命令行管理工具。libvirt 主要的功能是管理单节点主机,并提供 API 来列举、监测和使用管理节点上的可用资源,其中包括CPU、内存、储存、网络和非一致性内存访问(NUMA)分区。管理工具可以位于独立于主机的物理机上,并通过安全协议和主机进行交流
libvirt 结构图
安装KVM相关包
CentOS 安装 KVM
使用虚拟化,需要至少 qemu-kvm 和 qemu-img(安装qemu-kvm会自动安装) 软件包
建议安装:yum install qemu-kvm libvirt virt-manager virt-install
范例: CentOS 8 安装 KVM相关工具
[root@centos8 ~]#yum -y install qemu-kvm libvirt    virt-manager virt-install virt-viewer
[root@centos8 ~]#systemctl start --now libvirtd
范例: CentOS 8 还提供基于Web的虚拟机管理方式
[root@centos8 ~]#yum -y install cockpit
[root@centos8 ~]#systemctl enable --now cockpit.socket
Created symlink /etc/systemd/system/sockets.target.wants/cockpit.socket →/usr/lib/systemd/system/cockpit.socket.
[root@centos8 ~]#dnf -y install cockpit

#打开浏览器,访问以下地址:
https://centos8主机:9090
Ubuntu 安装 KVM
Ubuntu 18.04: 官方文档: https://ubuntu.com/server/docs/virtualization-libvirt
# apt install qemu-kvm virt-manager libvirt-daemon-system
# kvm-ok #验证是否支持kvm,只有Ubuntu支持,CentOS 不支持
INFO: /dev/kvm exists
KVM acceleration can be used
范例:
[root@ubuntu1804 ~]#apt -y install qemu-kvm virt-manager libvirt-daemon-system
[root@ubuntu1804 ~]#ip a
1: lo: <LOOPBACK,UP,LOWER_UP> mtu 65536 qdisc noqueue state UNKNOWN group
default qlen 1000
    link/loopback 00:00:00:00:00:00 brd 00:00:00:00:00:00
    inet 127.0.0.1/8 scope host lo
            valid_lft forever preferred_lft forever
    inet6 ::1/128 scope host
            valid_lft forever preferred_lft forever
2: eth0: <BROADCAST,MULTICAST,UP,LOWER_UP> mtu 1500 qdisc fq_codel state UP
group default qlen 1000
    link/ether 00:0c:29:40:27:06 brd ff:ff:ff:ff:ff:ff
    inet 10.0.0.100/24 brd 10.0.0.255 scope global eth0
            valid_lft forever preferred_lft forever
    inet6 fe80::20c:29ff:fe40:2706/64 scope link
            valid_lft forever preferred_lft forever
3: virbr0: <NO-CARRIER,BROADCAST,MULTICAST,UP> mtu 1500 qdisc noqueue state DOWN
group default qlen 1000
    link/ether 52:54:00:8d:a6:fe brd ff:ff:ff:ff:ff:ff
    inet 192.168.122.1/24 brd 192.168.122.255 scope global virbr0
            valid_lft forever preferred_lft forever
4: virbr0-nic: <BROADCAST,MULTICAST> mtu 1500 qdisc fq_codel master virbr0 state
DOWN group default qlen 1000
    link/ether 52:54:00:8d:a6:fe brd ff:ff:ff:ff:ff:ff

#如果没有开启CPU虚拟化功能会提示以下信息
[root@ubuntu1804 ~]#kvm-ok
INFO: Your CPU does not support KVM extensions
KVM acceleration can NOT be used

#添加CPU的虚拟化支持再执行
[root@ubuntu1804 ~]#kvm-ok
INFO: /dev/kvm exists
KVM acceleration can be used
图形化工具 virt-manager
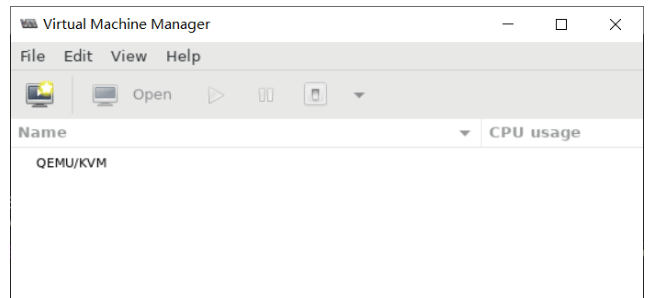
范例: CentOS 上管理工具 virt-manager
[root@centos8 ~]#export DISPLAY=10.0.0.1:0.0
[root@centos8 ~]#virt-manager
[root@centos8 ~]#libGL error: No matching fbConfigs or visuals found
libGL error: failed to load driver: swrast
范例: Ubuntu 上管理工具 virt-manager
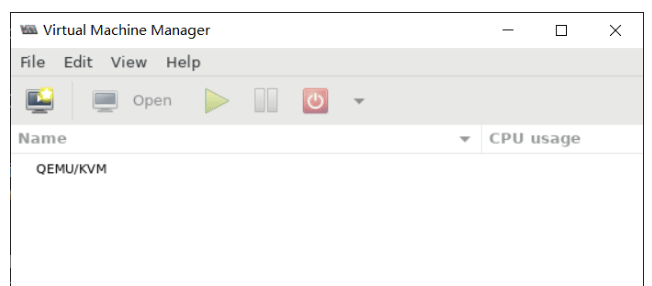
[root@ubuntu1804 ~]#virt-manager
默认网络配置
安装完虚拟工具后,会自动生成一个 virbr0 网卡,类似于Vmware workstation 生成的VMnet8 网卡,充当虚拟机的 NAT 网卡
[root@centos8 ~]#ip a
1: lo: <LOOPBACK,UP,LOWER_UP> mtu 65536 qdisc noqueue state UNKNOWN group
default qlen 1000
    link/loopback 00:00:00:00:00:00 brd 00:00:00:00:00:00
    inet 127.0.0.1/8 scope host lo
            valid_lft forever preferred_lft forever
    inet6 ::1/128 scope host
            valid_lft forever preferred_lft forever
2: eth0: <BROADCAST,MULTICAST,UP,LOWER_UP> mtu 1500 qdisc fq_codel state UP
group default qlen 1000
    link/ether 00:0c:29:8a:51:21 brd ff:ff:ff:ff:ff:ff
    inet 10.0.0.8/24 brd 10.0.0.255 scope global noprefixroute eth0
            valid_lft forever preferred_lft forever
    inet6 fe80::20c:29ff:fe8a:5121/64 scope link
            valid_lft forever preferred_lft forever
3: virbr0: <NO-CARRIER,BROADCAST,MULTICAST,UP> mtu 1500 qdisc noqueue state DOWN
group default qlen 1000
    link/ether 52:54:00:97:eb:e3 brd ff:ff:ff:ff:ff:ff
    inet 192.168.122.1/24 brd 192.168.122.255 scope global virbr0
            valid_lft forever preferred_lft forever
4: virbr0-nic: <BROADCAST,MULTICAST> mtu 1500 qdisc fq_codel master virbr0 state
DOWN group default qlen 1000
    link/ether 52:54:00:97:eb:e3 brd ff:ff:ff:ff:ff:ff

[root@centos8 ~]#grep -R 192.168.122.1 /etc/libvirt/*
/etc/libvirt/qemu/networks/autostart/default.xml: <ip address='192.168.122.1'
netmask='255.255.255.0'>
/etc/libvirt/qemu/networks/default.xml: <ip address='192.168.122.1'
netmask='255.255.255.0'>root@centos8 ~]#ip a show virbr0
3: virbr0: <NO-CARRIER,BROADCAST,MULTICAST,UP> mtu 1500 qdisc noqueue state DOWN
group default qlen 1000
    link/ether 52:54:00:97:eb:e3 brd ff:ff:ff:ff:ff:ff
    inet 192.168.122.1/24 brd 192.168.122.255 scope global virbr0
            valid_lft forever preferred_lft forever

#网桥信息
[root@centos8 ~]#cat /etc/libvirt/qemu/networks/default.xml
<!--
WARNING: THIS IS AN AUTO-GENERATED FILE. CHANGES TO IT ARE LIKELY TO BE
OVERWRITTEN AND LOST. Changes to this xml configuration should be made using:
virsh net-edit default
or other application using the libvirt API.
-->
<network>
<name>default</name>
<uuid>1ebc4504-5da9-4b7e-b367-90b8cb20029b</uuid>
<forward mode='nat'/>
<bridge name='virbr0' stp='on' delay='0'/>
<mac address='52:54:00:97:eb:e3'/>
<ip address='192.168.122.1' netmask='255.255.255.0'>
    <dhcp>
        <range start='192.168.122.2' end='192.168.122.254'/>
    </dhcp>
</ip>
</network>

#查看网桥信息
[root@centos8 ~]#nmcli connection show virbr0
connection.id:                                                 virbr0
connection.uuid:                                             54c671c1-28be-4ce7-8a0e-30ee0ecdca64
connection.stable-id:                                     --
connection.type:                                             bridge
connection.interface-name:                         virbr0
connection.autoconnect:                                 no
connection.autoconnect-priority:                 0
connection.autoconnect-retries:                 -1 (default)
connection.multi-connect:                             0 (default)
connection.auth-retries:                                 -1
connection.timestamp:                                     1596945412
connection.read-only:                                     no
connection.permissions:                                 --
connection.zone:                                                 --
connection.master:                                             --
connection.slave-type:                                     --
connection.autoconnect-slaves:                     -1 (default)
connection.secondaries:                                 --
connection.gateway-ping-timeout:                 0
connection.metered:                                         unknown
connection.lldp:                                             default
connection.mdns:                                                 -1 (default)
connection.llmnr:                                             -1 (default)
connection.wait-device-timeout:                 -1
ipv4.method:                                                     manual
ipv4.dns:                                                             --
ipv4.dns-search:                                                 --
ipv4.dns-options:                                             --
ipv4.dns-priority:                                             100
ipv4.addresses:                                                 192.168.122.1/24
ipv4.gateway:                                                     --
ipv4.routes:                                                         --
ipv4.route-metric:                                             -1
ipv4.route-table:                                             0 (unspec)
ipv4.routing-rules:                                         --
ipv4.ignore-auto-routes:                             no
ipv4.ignore-auto-dns:                                     no
ipv4.dhcp-client-id:                                         --
ipv4.dhcp-iaid:                                                 --
ipv4.dhcp-timeout:                                             0 (default)
ipv4.dhcp-send-hostname:                                 yes
ipv4.dhcp-hostname:                                         --
ipv4.dhcp-fqdn:                                                 --
ipv4.dhcp-hostname-flags:                             0x0 (none)
ipv4.never-default:                                         no
ipv4.may-fail:                                                     yes
ipv4.dad-timeout:                                             -1 (default)
ipv6.method:                                                     ignore
ipv6.dns:                                                             --
ipv6.dns-search:                                                 --
ipv6.dns-options:                                             --
ipv6.dns-priority:                                             100
ipv6.addresses:                                                 --
ipv6.gateway:                                                     --
ipv6.routes:                                                         --
ipv6.route-metric:                                             -1
ipv6.route-table:                                             0 (unspec)
ipv6.routing-rules:                                         --
ipv6.ignore-auto-routes:                             no
ipv6.ignore-auto-dns:                                     no
ipv6.never-default:                                         no
ipv6.may-fail:                                                     yes
ipv6.ip6-privacy:                                             -1 (unknown)
ipv6.addr-gen-mode:                                         stable-privacy
ipv6.ra-timeout:                                                 0 (default)
ipv6.dhcp-duid:                                                 --
ipv6.dhcp-iaid:                                                 --
ipv6.dhcp-timeout:                                             0 (default)
ipv6.dhcp-send-hostname:                                 yes
ipv6.dhcp-hostname:                                         --
ipv6.dhcp-hostname-flags:                             0x0 (none)
ipv6.token:                                                         --
bridge.mac-address:                                         --
bridge.stp:                                                         yes
bridge.priority:                                                 32768
bridge.forward-delay:                                     2
bridge.hello-time:                                             2
bridge.max-age:                                                 20
bridge.ageing-time:                                         300
bridge.group-forward-mask:                             0
bridge.multicast-snooping:                             yes
bridge.vlan-filtering:                                 no
bridge.vlan-default-pvid:                             1
bridge.vlans:                                                     --
proxy.method:                                                     none
proxy.browser-only:                                         no
proxy.pac-url:                                                     --
proxy.pac-script:                                             --
GENERAL.NAME:                                                     virbr0
GENERAL.UUID:                                                     54c671c1-28be-4ce7-8a0e-30ee0ecdca64
GENERAL.DEVICES:                                             virbr0
GENERAL.IP-IFACE:                                             virbr0
GENERAL.STATE:                                                 activated
GENERAL.DEFAULT:                                             no
GENERAL.DEFAULT6:                                             no
GENERAL.SPEC-OBJECT:                                         --
GENERAL.VPN:                                                     no
GENERAL.DBUS-PATH:
/org/freedesktop/NetworkManager/ActiveConnection/3
GENERAL.CON-PATH:
/org/freedesktop/NetworkManager/Settings/2
GENERAL.ZONE:                                                     --
GENERAL.MASTER-PATH:                                         --
IP4.ADDRESS[1]:                                                 192.168.122.1/24
IP4.GATEWAY:                                                         --
IP4.ROUTE[1]:                                                     dst = 192.168.122.0/24, nh = 0.0.0.0, mt
= 0
IP6.GATEWAY:                                                         --
[root@centos8 ~]#
范例: Ubuntu 网络配置
[root@ubuntu1804 ~]#ip a
1: lo: <LOOPBACK,UP,LOWER_UP> mtu 65536 qdisc noqueue state UNKNOWN group
default qlen 1000
    link/loopback 00:00:00:00:00:00 brd 00:00:00:00:00:00
    inet 127.0.0.1/8 scope host lo
            valid_lft forever preferred_lft forever
    inet6 ::1/128 scope host
            valid_lft forever preferred_lft forever
2: eth0: <BROADCAST,MULTICAST,UP,LOWER_UP> mtu 1500 qdisc fq_codel state UP
group default qlen 1000
    link/ether 00:0c:29:40:27:06 brd ff:ff:ff:ff:ff:ff
    inet 10.0.0.100/24 brd 10.0.0.255 scope global eth0
            valid_lft forever preferred_lft forever
    inet6 fe80::20c:29ff:fe40:2706/64 scope link
            valid_lft forever preferred_lft forever
3: virbr0: <NO-CARRIER,BROADCAST,MULTICAST,UP> mtu 1500 qdisc noqueue state DOWN
group default qlen 1000
    link/ether 52:54:00:8d:a6:fe brd ff:ff:ff:ff:ff:ff
    inet 192.168.122.1/24 brd 192.168.122.255 scope global virbr0
            valid_lft forever preferred_lft forever
4: virbr0-nic: <BROADCAST,MULTICAST> mtu 1500 qdisc fq_codel master virbr0 state
DOWN group default qlen 1000
    link/ether 52:54:00:8d:a6:fe brd ff:ff:ff:ff:ff:ff
[root@ubuntu1804 ~]#brctl show
bridge name bridge id STP enabled interfaces
virbr0 8000.5254008da6fe yes virbr0-nic

[root@ubuntu1804 ~]#cat /etc/libvirt/qemu/networks/default.xml
<!--
WARNING: THIS IS AN AUTO-GENERATED FILE. CHANGES TO IT ARE LIKELY TO BE
OVERWRITTEN AND LOST. Changes to this xml configuration should be made using:
virsh net-edit default
or other application using the libvirt API.
-->
<network>
<name>default</name>
<uuid>a3235b68-6dc0-4951-8a35-7a60a567f1a7</uuid>
<forward mode='nat'/>
<bridge name='virbr0' stp='on' delay='0'/>
<mac address='52:54:00:8d:a6:fe'/>
<ip address='192.168.122.1' netmask='255.255.255.0'>
    <dhcp>
        <range start='192.168.122.2' end='192.168.122.254'/>
    </dhcp>
</ip>
</network>
准备安装系统的ISO相关文件
将需要安装的系统的ISO文件上传到宿主机
[root@centos8 ~]#mkdir -pv /data/isos/
[root@centos8 ~]#ls /data/isos/
CentOS-7-x86_64-Minimal-2003.iso
CentOS-8.2.2004-x86_64-minimal.iso
cn_windows_server_2008_r2_standard_enterprise_datacenter_and_web_with_sp1_vl_bui
ld_x64_dvd_617396.iso
AMD CPU 创建虚拟机时的故障排错
AMD CPU 使用virt-manager 或 virt-install 在创建虚拟机可能会出错,用下面方法解决
AMD CPU 使用virt-manager创建虚拟机出错提示
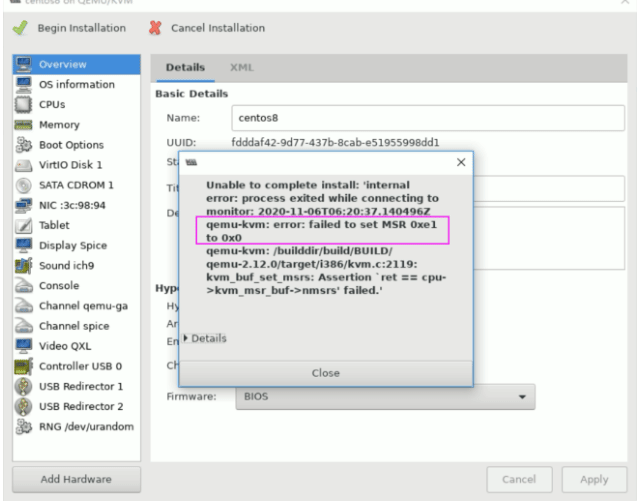
AMD CPU 使用virt-install创建虚拟机出错提示
[root@centos8 ~]#virt-install --virt-type kvm --name centos7 --ram 1024 --vcpus
2 --cdrom=/data/isos/CentOS-7-x86_64-Minimal-2003.iso --disk
path=/var/lib/libvirt/images/centos7.qcow2 --network network=default --graphics
vnc,listen=0.0.0.0 --noautoconsole
WARNING No operating system detected, VM performance may suffer. Specify an OS
with --os-variant for optimal results.
Starting install...
ERROR     internal error: qemu unexpectedly closed the monitor: 2020-08-
09T15:57:08.872365Z qemu-kvm: error: failed to set MSR 0xe1 to 0x0
qemu-kvm: /builddir/build/BUILD/qemu-2.12.0/target/i386/kvm.c:2119:
kvm_buf_set_msrs: Assertion `ret == cpu->kvm_msr_buf->nmsrs' failed.
Domain installation does not appear to have been successful.
If it was, you can restart your domain by running:
virsh --connect qemu:///system start centos7
otherwise, please restart your installation.
AMD CPU 创建虚拟机故障修复方法
#修复以上故障
[root@centos8 ~]# tee /etc/modprobe.d/qemu-system-x86.conf << EOF
options kvm ignore_msrs=1
EOF

options kvm ignore_msrs=1
[root@centos8 ~]#reboot
创建虚拟机
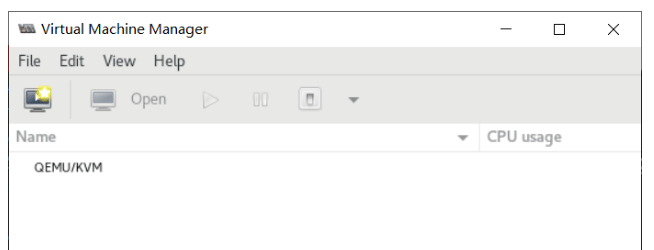
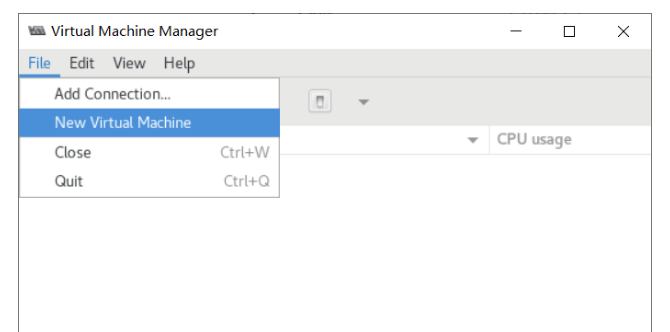
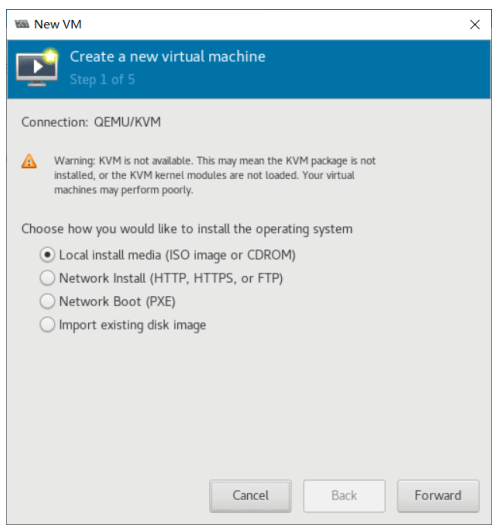
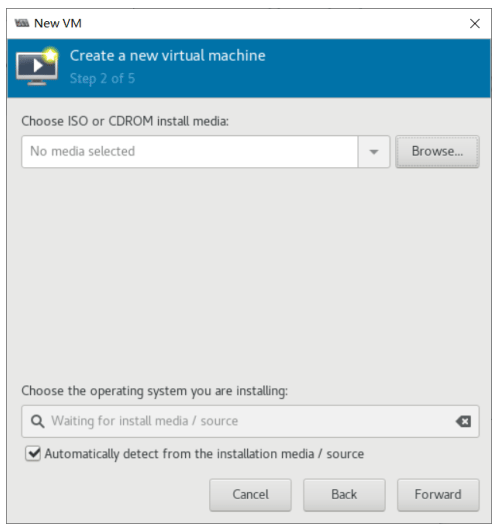
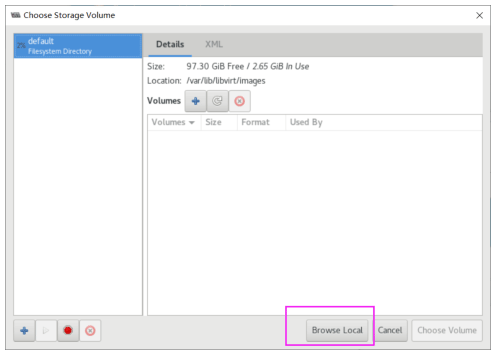
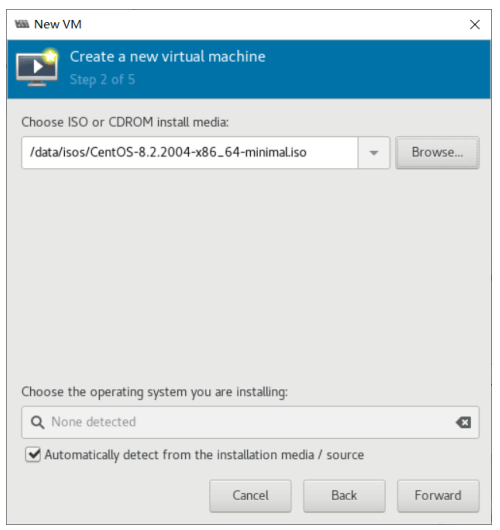
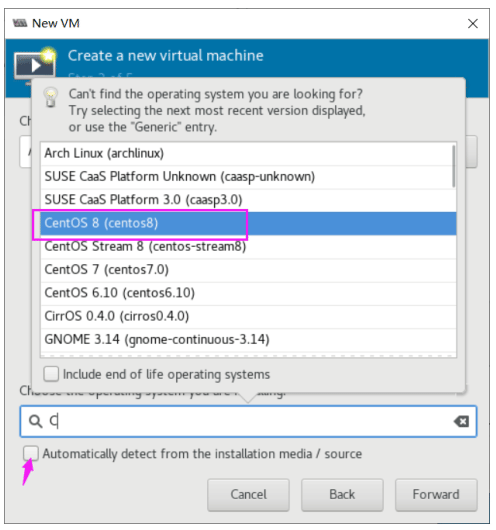
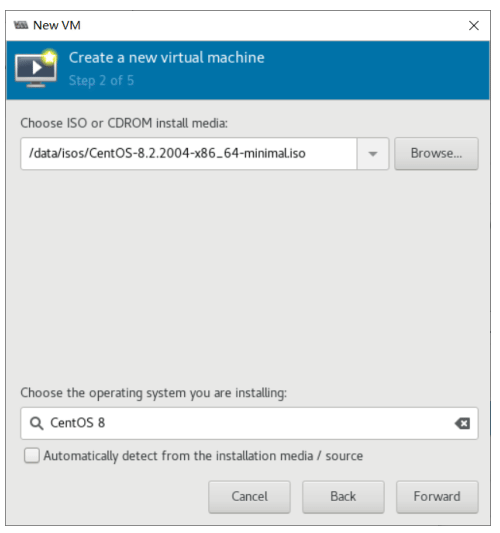
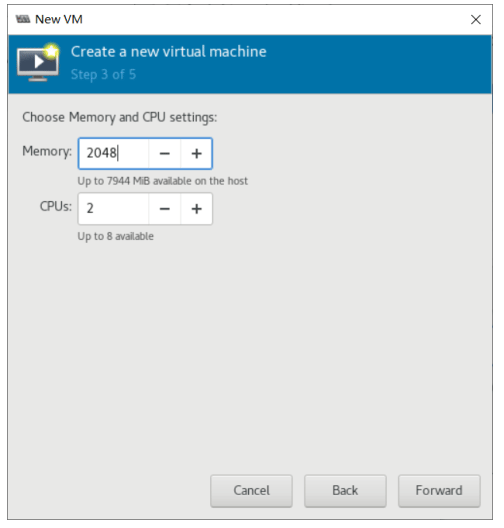
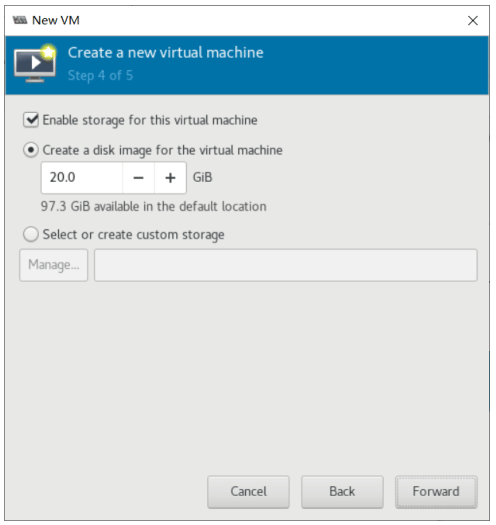
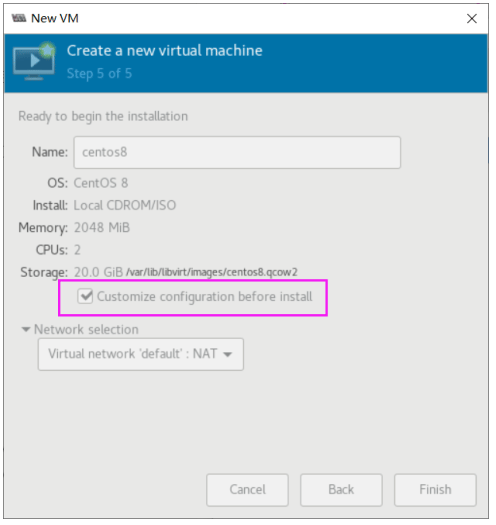
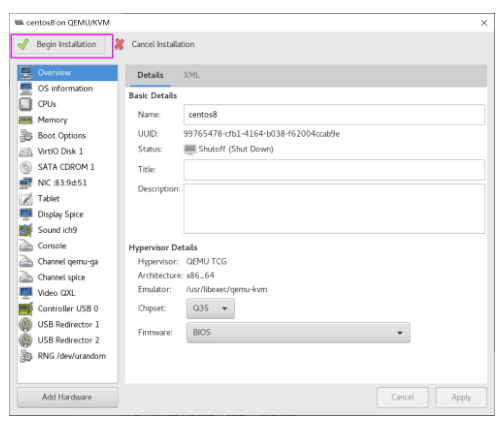
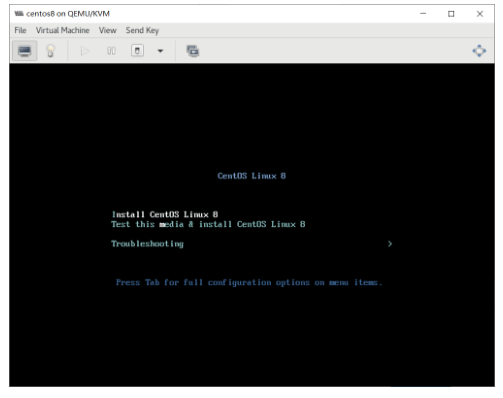
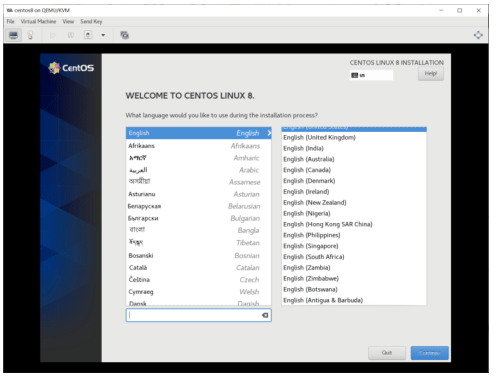
使用 virt-manager 创建虚拟机
virt-manager 是一个图形化虚拟机管理工具,方便管理和查看虚拟机
缺点:交互式操作繁琐,不能批量安装。
[root@centos8 ~]#export DISPLAY=10.0.0.1:0.0
[root@centos8 ~]#virt-manager
[root@centos8 ~]#libGL error: No matching fbConfigs or visuals found
libGL error: failed to load driver: swrast
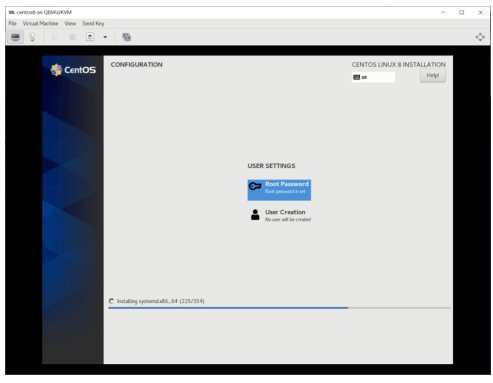
虚拟机磁盘文件位置
#virt-manager创建的磁盘,分多大实际占用多大
[root@centos8 ~]#ll /var/lib/libvirt/images/centos8.qcow2 -h
-rw------- 1 qemu qemu 21G Sep 13 20:08 /var/lib/libvirt/images/centos8.qcow2
使用 virt-install 创建虚拟机
虽然使用virt-manager可以方便的管理虚拟机,但如果需要批量进行虚拟机的创 建管理,命令行工具virt-install更加适合
virt-install 使用说明
# virt-install --help
usage: virt-install --name NAME --ram RAM STORAGE INSTALL [options]
使用 '--option=?' 或者 '--option help' 查看可用子选项
有关示例及完整选项语法,请查看 man page。
使用指定安装介质新建虚拟机
optional arguments:
-h, --help show this help message and exit
--version show program's version number and exit
--connect URI 使用 libvirt URI 连接到 hypervisor
通用选项:
-n NAME, --name NAME 客户端虚拟机的名称
--memory MEMORY 配置虚拟机内存分配
例如:
--memory 1024 (in MiB)
--memory 512,maxmemory=1024

--vcpus VCPUS 为虚拟机配置的 vcpus 数。
例如:
--vcpus 5
--vcpus 5,maxcpus=10,cpuset=1-4,6,8
--vcpus sockets=2,cores=4,threads=2

--cpu CPU CPU 型号及功能。
例如:
--cpu coreduo,+x2apic
--cpu host

--metadata METADATA 配置虚拟机元数据
例如:
--metadata name=foo,title="My pretty title",uuid=...
--metadata description="My nice long description"

安装方法选项:
--cdrom CDROM 光驱安装介质
-l LOCATION, --location LOCATION 安装源
例如:
nfs:host:/path
http://host/path
ftp://host/path

--pxe 使用 PXE 协议从网络引导
--import 在磁盘映像中构建虚拟机
--livecd 将光驱介质视为 Live CD
-x EXTRA_ARGS, --extra-args EXTRA_ARGS 附加到使用 --location 引导的内核的参数
--initrd-inject INITRD_INJECT 使用 --location 为 initrd 的 root 添加给定文件
--os-variant DISTRO_VARIANT 在其中安装 OS 变体的虚拟机,比
如:'fedora18'、'rhel6'、'winxp' 等等

--boot BOOT 配置虚拟机引导设置。
例如:
--boot hd,cdrom,menu=on
--boot init=/sbin/init (for containers)

--idmap IDMAP 为 LXC 容器启用用户名称空间。
例如:
--idmap uid_start=0,uid_target=1000,uid_count=10

设备选项:
--disk DISK 使用不同选项指定存储。例如:
--disk size=10 (new 10GiB image in default location)
--disk /my/existing/disk,cache=none
--disk device=cdrom,bus=scsi
--disk=?
-w NETWORK, --network NETWORK 配置虚拟机网络接口。
例如:
--network bridge=mybr0
--network network=my_libvirt_virtual_net
--network network=mynet,model=virtio,mac=00:11...
--network none
--network help

--graphics GRAPHICS 配置虚拟机显示设置。
例如:
--graphics vnc
--graphics spice,port=5901,tlsport=5902
--graphics none
--graphics vnc,password=foobar,port=5910,keymap=ja

--controller CONTROLLER 配置虚拟机控制程序设备。
例如:
--controller type=usb,model=ich9-ehci1

--input INPUT 配置虚拟机输入设备。
例如:
--input tablet
--input keyboard,bus=usb

--serial SERIAL 配置虚拟机串口设备
--parallel PARALLEL 配置虚拟机并口设备
--channel CHANNEL 配置虚拟机沟通频道
--console CONSOLE 配置虚拟机与主机之间的文本控制台连接
--hostdev HOSTDEV 将物理 USB/PCI/etc 主机设备配置为与虚拟机共享
--filesystem FILESYSTEM 将主机目录传递给虚拟机。
例如:
--filesystem /my/source/dir,/dir/in/guest
--filesystem template_name,/,type=template

--sound [SOUND] 配置虚拟机声音设备模拟
--watchdog WATCHDOG 配置虚拟机 watchdog 设备
--video VIDEO 配置虚拟机视频硬件。
--smartcard SMARTCARD 配置虚拟机智能卡设备。例如:--smartcard mode=passthrough

--redirdev REDIRDEV 配置虚拟机重定向设备。例如:--redirdev usb,type=tcp,server=192.168.1.1:4000
--memballoon MEMBALLOON 配置虚拟机 memballoon 设备。例如:--memballoon model=virtio
--tpm TPM 配置虚拟机 TPM 设备。例如:--tpm /dev/tpm
--rng RNG 配置虚拟机 RNG 设备。例如:--rng /dev/random
--panic PANIC 配置虚拟机 panic 设备。例如:--panic default

虚拟机配置选项:
--security SECURITY 设定域安全驱动器配置。
--numatune NUMATUNE 为域进程调整 NUMA 策略。
--memtune MEMTUNE 为域进程调整内粗策略。
--blkiotune BLKIOTUNE为域进程调整 blkio 策略。
--memorybacking MEMORYBACKING 为域进程设置内存后备策略。例如:
--memorybacking hugepages=on
--features FEATURES 设置域 <features> XML。
例如:
--features acpi=off
--features apic=on,eoi=on

--clock CLOCK 设置域 <clock> XML。例如:--clock
offset=localtime,rtc_tickpolicy=catchup
--pm PM 配置 VM 电源管理功能
--events EVENTS 配置 VM 生命周期管理策略
--resource RESOURCE 配置 VM 资源分区(cgroups)

虚拟化平台选项:
-v, --hvm 客户端应该是一个全虚拟客户端
-p, --paravirt 这个客户端一个是一个半虚拟客户端
--container 这台虚拟机需要一个容器客户端
--virt-type HV_TYPE 要使用的管理程序名称(kvm、qemu、xen等等)
--arch ARCH 模拟的 CPU 构架
--machine MACHINE 要模拟的机器类型

其它选项:
--autostart 引导主机时自动启动域。
--wait WAIT 等待安装完成的分钟数。
--noautoconsole 不要自动尝试连接到客户端控制台
--noreboot 完成安装后不要引导虚拟机。
--print-xml [XMLONLY] 输出所生成域 XML,而不是创建虚拟机。
--dry-run 完成安装步骤,但不要创建设备或者定义虚拟机。
--check CHECK 启用或禁用验证检查。例如:
--check path_in_use=off
--check all=off
-q, --quiet 禁止无错误输出
-d, --debug 输入故障排除信息
virt-install 命令创建虚拟机
利用 qemu-img命令创建虚拟磁盘
注意: qemu-img create一定要确认对应路径下没有此文件,如果存在将覆盖原文件
[root@centos8 ~]#qemu-img create -f qcow2 /var/lib/libvirt/images/centos7.qcow2 20G
Formatting '/var/lib/libvirt/images/centos7.qcow2', fmt=qcow2 size=21474836480
cluster_size=65536 lazy_refcounts=off refcount_bits=16

#观察文件虚拟磁盘大小, 虚分配空间
[root@centos8 ~]#ll -h /var/lib/libvirt/images/centos7.qcow2
-rw-r--r-- 1 root root 193K Sep 13 21:25 /var/lib/libvirt/images/centos7.qcow2
利用 osinfo-query命令查看支持的OS版本
#查看支持的OS
[root@centos8 ~]#osinfo-query os| grep centos
centos-stream8             | CentOS Stream 8                                                                     | 8
        | http://centos.org/centos-stream/8
centos5.0                     | CentOS 5.0                                                                                 | 5.0
        | http://centos.org/centos/5.0
centos5.1                     | CentOS 5.1                                                                                 | 5.1
        | http://centos.org/centos/5.1
centos5.10                     | CentOS 5.10                                                                             |
5.10         | http://centos.org/centos/5.10
centos5.11                     | CentOS 5.11                                                                             |
5.11         | http://centos.org/centos/5.11
centos5.2                     | CentOS 5.2                                                                                 | 5.2
        | http://centos.org/centos/5.2
centos5.3                     | CentOS 5.3                                                                                 | 5.3
        | http://centos.org/centos/5.3
centos5.4                     | CentOS 5.4                                                                                 | 5.4
        | http://centos.org/centos/5.4
centos5.5                     | CentOS 5.5                                                                                 | 5.5
        | http://centos.org/centos/5.5
centos5.6                     | CentOS 5.6                                                                                 | 5.6
        | http://centos.org/centos/5.6


centos5.7                     | CentOS 5.7                                                                                 | 5.7
        | http://centos.org/centos/5.7
centos5.8                     | CentOS 5.8                                                                                 | 5.8
        | http://centos.org/centos/5.8
centos5.9                     | CentOS 5.9                                                                                 | 5.9
        | http://centos.org/centos/5.9
centos6.0                     | CentOS 6.0                                                                                 | 6.0
        | http://centos.org/centos/6.0
centos6.1                     | CentOS 6.1                                                                                 | 6.1
        | http://centos.org/centos/6.1
centos6.10                     | CentOS 6.10                                                                             |
6.10         | http://centos.org/centos/6.10
centos6.2                     | CentOS 6.2                                                                                 | 6.2
        | http://centos.org/centos/6.2
centos6.3                     | CentOS 6.3                                                                                 | 6.3
        | http://centos.org/centos/6.3
centos6.4                     | CentOS 6.4                                                                                 | 6.4
        | http://centos.org/centos/6.4
centos6.5                     | CentOS 6.5                                                                                 | 6.5
        | http://centos.org/centos/6.5
centos6.6                     | CentOS 6.6                                                                                 | 6.6
        | http://centos.org/centos/6.6
centos6.7                     | CentOS 6.7                                                                                 | 6.7
        | http://centos.org/centos/6.7
centos6.8                     | CentOS 6.8                                                                                 | 6.8
        | http://centos.org/centos/6.8
centos6.9                     | CentOS 6.9                                                                                 | 6.9
        | http://centos.org/centos/6.9
centos7.0                     | CentOS 7                                                                                     | 7
        | http://centos.org/centos/7.0
centos8                         | CentOS 8                                                                                     | 8
        | http://centos.org/centos/8
创建虚拟机光盘启动并手动安装
#创建默认NAT模式的虚拟机,并不自动打开virt-viewer连接console,需要手动打开virt-manager 连接,并手动安装系统
[root@centos8 ~]#virt-install --virt-type kvm --name centos7 --ram 1024 --vcpus 2 --cdrom=/data/isos/CentOS-7-x86_64-Minimal-2003.iso \
--disk path=/var/lib/libvirt/images/centos7.qcow2 \
--network network=default \
--graphics vnc,listen=0.0.0.0 \
--noautoconsole --os-variant=centos7.0

Starting install...
Domain installation still in progress. You can reconnect to
the console to complete the installation process

#打开virt-manager安装系统
[root@centos8 ~]#export DISPLAY=10.0.0.1:0.0
[root@centos8 ~]#virt-manager

#查看虚拟硬盘大小,注意到只要正在运行的虚拟对应的硬盘文件所有者和组为qemu,而虚拟机关机的为root
[root@centos8 ~]#ll /var/lib/libvirt/images/ -h
total 22G
-rw-r--r-- 1 qemu qemu 1.6G Sep 13 22:05 centos7.qcow2
-rw------- 1 root root 21G Sep 13 22:05 centos8.qcow2
#安装过程略
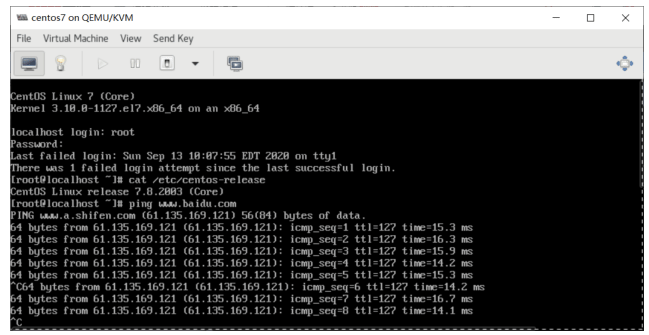
创建虚拟机从光盘启动并利用kickstart自动安装系统
- 准备 yum 仓库 和 kickstart 环境
[root@centos8 ~]#yum -y install httpd [root@centos8 ~]#systemctl enable --now httpd [root@centos8 ~]#mkdir -pv /var/www/html/centos/{6,7,8}/os/x86_64/ [root@centos8 ~]#mount /dev/sr0 /var/www/html/centos/8/os/x86_64/ [root@centos8 ~]#mkdir /var/www/html/ks/ [root@centos8 ~]#cat /var/www/html/ks/centos8.cfg #创建应答文件 ignoredisk --only-use=sda zerombr text reboot clearpart --all --initlabel selinux --disabled firewall --disabled url --url=http://10.0.0.8/centos/8/os/x86_64/ keyboard --vckeymap=us --xlayouts='us' lang en_US.UTF-8 bootloader --append="net.ifnames=0" --location=mbr --boot-drive=sda network --bootproto=dhcp --device=eth0 --ipv6=auto --activate network --hostname=centos8.me.org rootpw --iscrypted $6$j9YhzDUnQVnxaAk8$qv7rkMcPAEbV5yvwsP666DXWYadd3jYjkA9fpxAo9qYotjGGBUclCGoP1TRvgHBpqgc5n0RypMsPTQnVDcpO01 firstboot --enable skipx services --disabled="chronyd" timezone Asia/Shanghai --isUtc --nontp user --name=wang --password=6oUfb/02CWfLb5l8f$sgEZeR7c7DpqfpmFDH6huSmDbW1XQNR4qKl2EPns.gOXqlnAIgv9pTogtFVaDtEpMOC.SWXKYqxfVtd9MCwxb1 --iscrypted --gecos="wang" autopart --type=lvm %packages @^minimal-environment kexec-tools %end %addon com_redhat_kdump --enable --reserve-mb='auto' %end %anaconda pwpolicy root --minlen=6 --minquality=1 --notstrict --nochanges --notempty pwpolicy user --minlen=6 --minquality=1 --notstrict --nochanges --emptyok pwpolicy luks --minlen=6 --minquality=1 --notstrict --nochanges --notempty %end %post useradd tester echo me | passwd --stdin tester &> /dev/null %end - 创建虚拟机利用kickstart实现自动安装方法1
#创建虚拟机磁盘文件
[root@centos8 ~]#qemu-img create -f qcow2 /var/lib/libvirt/images/centos8-vm2.qcow2 20G

#创建虚拟机
[root@centos8 ~]#virt-install --virt-type kvm --name centos8-vm2 --ram 2048 --vcpus 2 --cdrom=/data/isos/CentOS-8.2.2004-x86_64-minimal.iso     --disk path=/var/lib/libvirt/images/centos8-vm2.qcow2 --network network=default --graphics vnc,listen=0.0.0.0
安装操作系统时,用tab键输入应答文件路径
ks=http://10.0.0.8/ks/centos8.cfg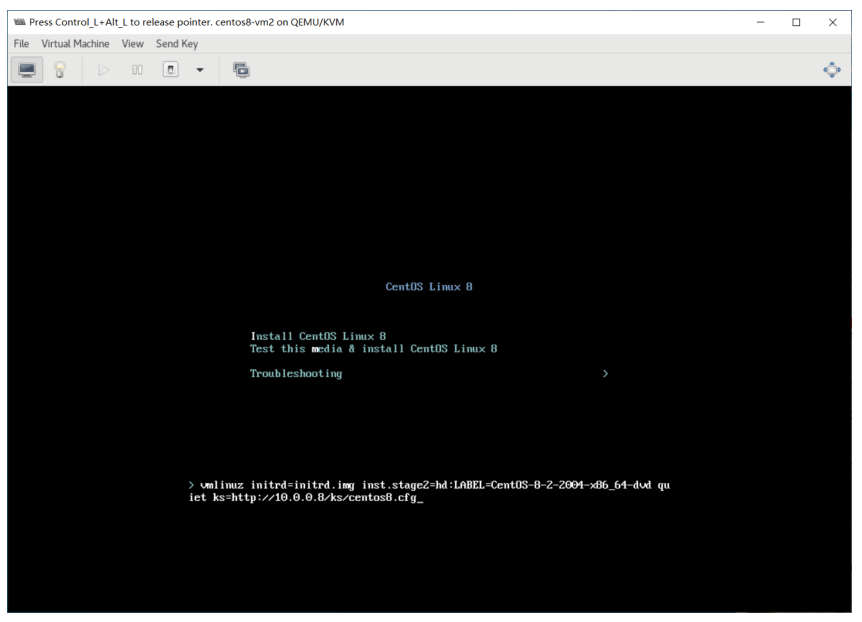
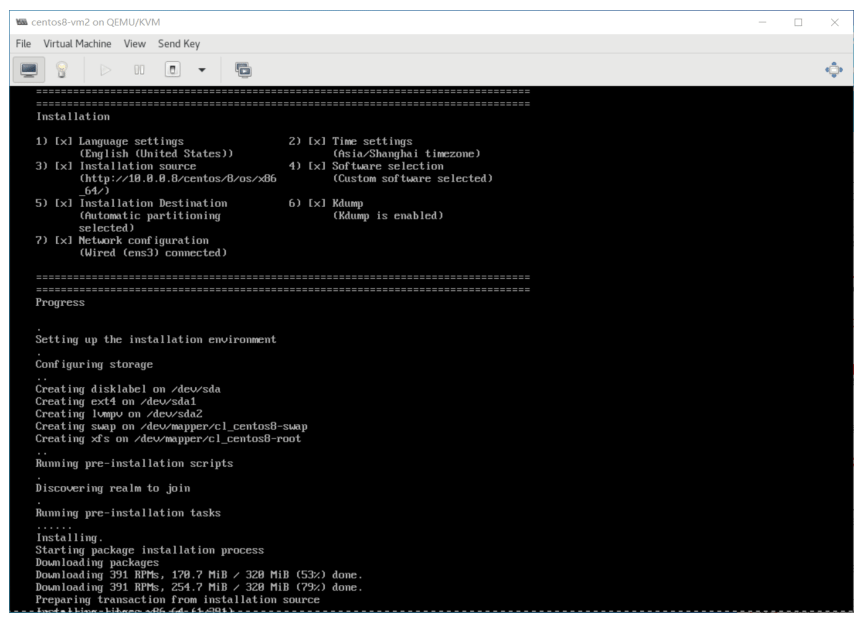
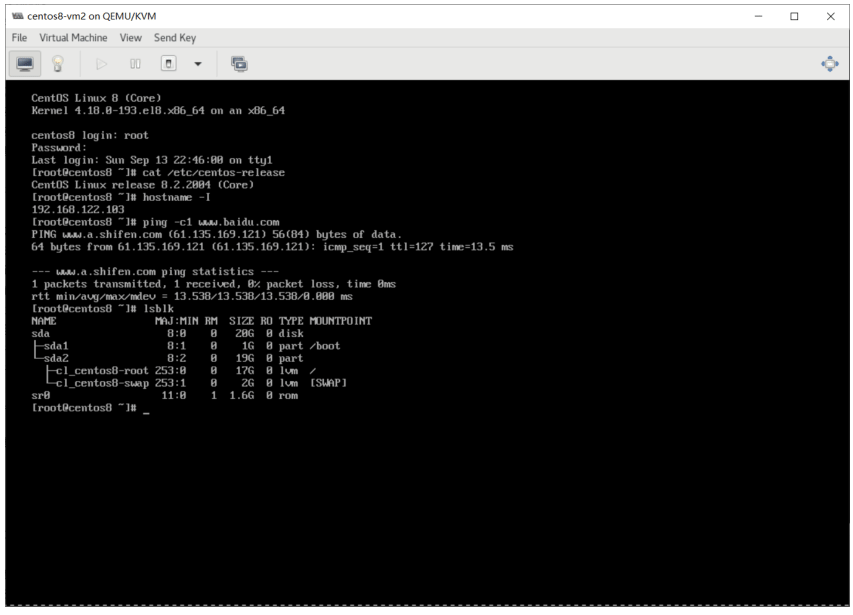
- 创建虚拟机利用kickstart实现自动安装方法2
利用virt-install的两项选项实现kickstart安装
virt-install
--location=/data/isos/CentOS-8.2.2004-x86_64-minimal.iso
--extra-args="ks=http://10.0.0.8/ks/centos8.cfg"
范例:
[root@centos8 ~]#qemu-img create -f qcow2 /var/lib/libvirt/images/centos8-vm3.qcow2 20G

[root@centos8 ~]#virt-install --virt-type kvm --name centos8-vm3 --ram 2048 --vcpus 2 \
                --disk path=/var/lib/libvirt/images/centos8-vm3.qcow2 \
                --network network=default --graphics vnc,listen=0.0.0.0 \
                --location=/data/isos/CentOS-8.2.2004-x86_64-minimal.iso --extra-args="ks=http://10.0.0.8/ks/centos8.cfg"
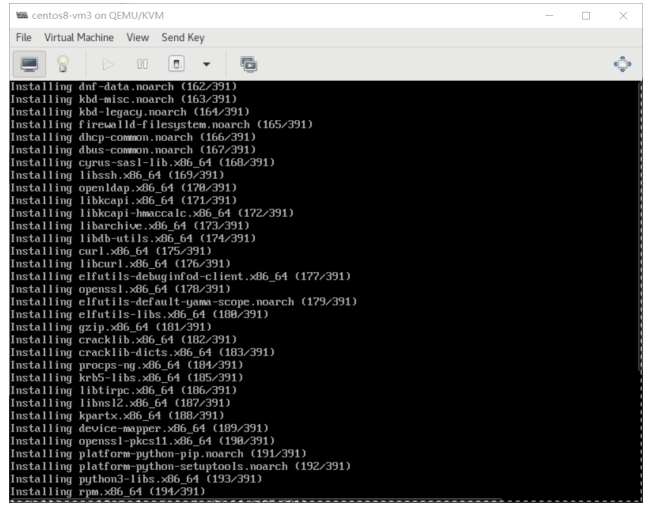
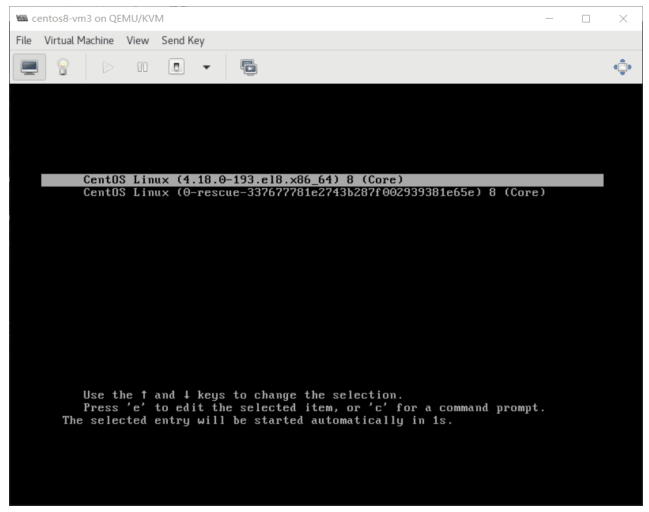
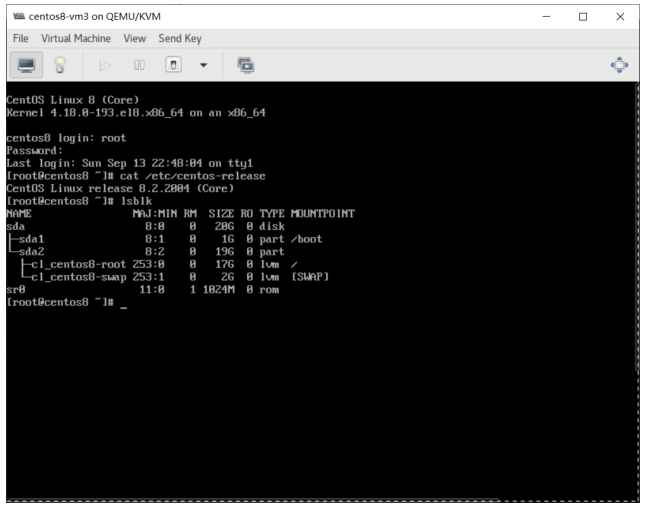
验证宿主机进程
#每个运行的虚拟机对应一个qemu-kvm进程
[root@centos8 ~]#ps aux|grep qemu-kvm
qemu                 6696     1.4     8.5 4021940 698296 ?         Sl     Sep21     0:45 /usr/libexec/qemu-kvm -name guest=centos8-2
qemu                 7591     5.2     7.3 4116424 600736 ?         Sl     00:21     0:26 /usr/libexec/qemu-kvm -name guest=centos8,

#进程树关系
[root@centos8 ~]#pstree -p |grep kvm
                    |-qemu-kvm(6696)-+-{qemu-kvm}(6709)
                    |                             |-{qemu-kvm}(6717)
                    |                             |-{qemu-kvm}(6718)
                    |                             |-{qemu-kvm}(6719)
                    |                             |-{qemu-kvm}(6721)
                    |                                 `-{qemu-kvm}(6722)
                    |-qemu-kvm(7591)-+-{qemu-kvm}(7605)
                    |                             |-{qemu-kvm}(7611)
                    |                             |-{qemu-kvm}(7612)
                    |                             |-{qemu-kvm}(7613)
                    |                             |-{qemu-kvm}(7615)
                    |                                 `-{qemu-kvm}(7616)
vnc 连接虚拟机
虚拟机安装过程中,宿主机可以看到打开了5900端口,如果有多个虚拟机会打开5901,5902等端口
虚拟机安装完成后,虚拟机启动状态时,也会宿主机自动打开5900以上的端口
[root@centos8 ~]#ss -ntl
State                     Recv-Q                     Send-Q         Local Address:Port         Peer    Address:Port
LISTEN                     0                                 1                                 0.0.0.0:5900                 0.0.0.0:*
LISTEN                     0                                 1                                 0.0.0.0:5901                 0.0.0.0:*
LISTEN                     0                                 32                 192.168.122.1:53
可以修改VNC端口的范围,默认5900-65535
[root@centos8 ~]#grep remote_display_port /etc/libvirt/qemu.conf
#remote_display_port_min = 5900
#remote_display_port_max = 65535
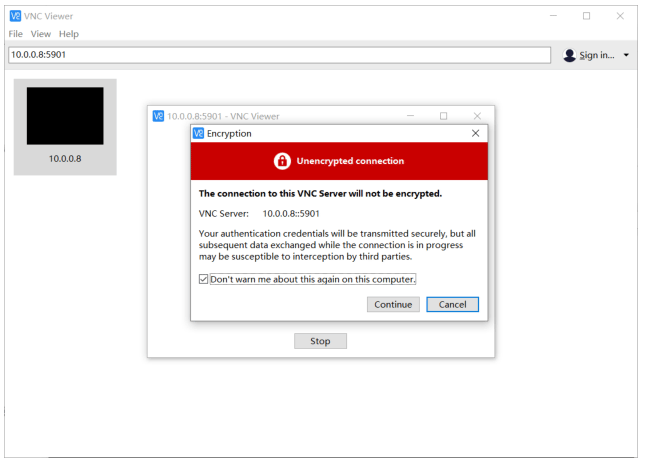
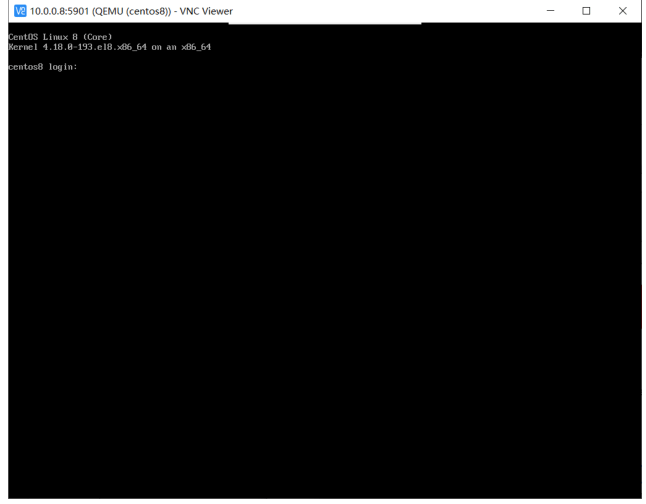
注意:
- 同时只能有一个VNC客户端连接虚拟机
- virt-viewer 连接虚拟机,会自动断开VNC客户端的连接
否则会下面提示错误

基于现有虚拟机磁盘为模版创建新的虚拟机
利用virt-manager实现
#基于已经安装好虚拟机磁盘文件,创建新的磁盘文件
[root@centos8 ~]#cp -a /var/lib/libvirt/images/centos7.qcow2  /var/lib/libvirt/images/centos7-2.qcow2
使用virt-manager创建虚拟机,导入现有的磁盘文件启动

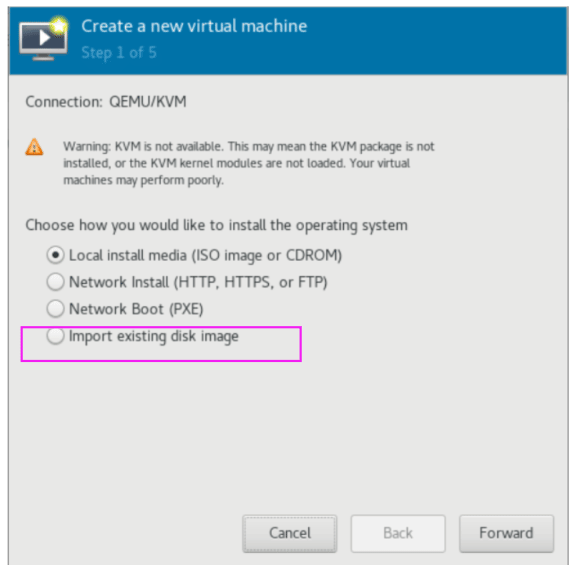
可以看到 /etc/libvirt/qemu 目录下多了一个虚拟机配置 文件
利用virt-install实现
[root@centos8 images]#pwd
/var/lib/libvirt/images
[root@centos8 images]#cp centos8.qcow2 centos8-2.qcow2

[root@centos8 images]#virt-install --virt-type kvm --name centos8-2 --ram 2048 --vcpus 2 --disk bus=virtio,path=/var/lib/libvirt/images/centos8-2.qcow2 --network --network network=default,model=virtio --graphics vnc,listen=0.0.0.0 --noautoconsole --autostart --boot hd

#运行工具,可以看到下面出现新的虚拟机
[root@centos8 images]#virt-manager
管理虚拟机
使用半虚拟化驱动 virtio
半虚拟化驱动virtio的工作原理
为了提高内存、硬盘、网络的性能,需要支持半虚拟化
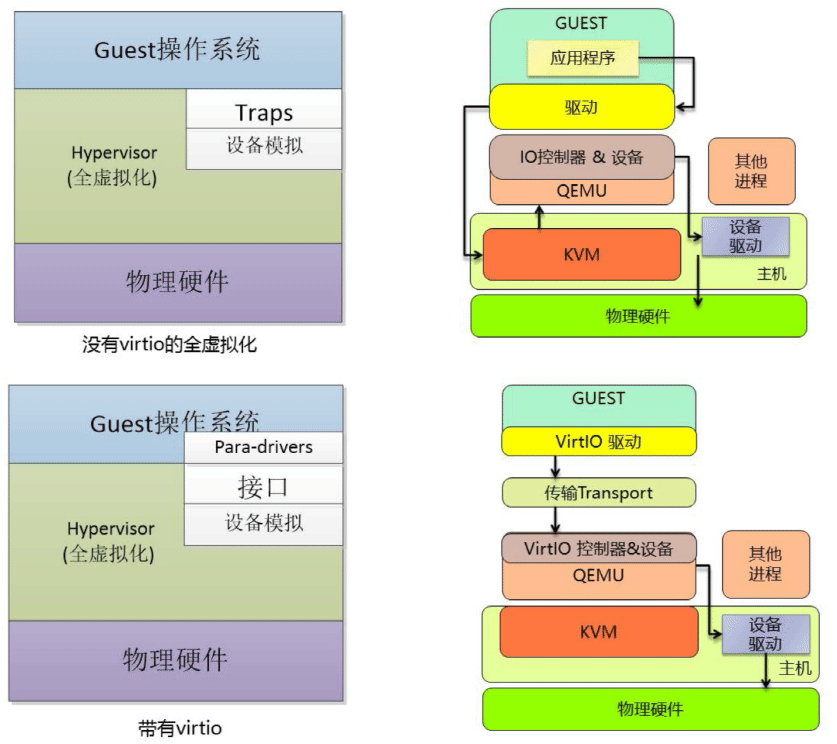
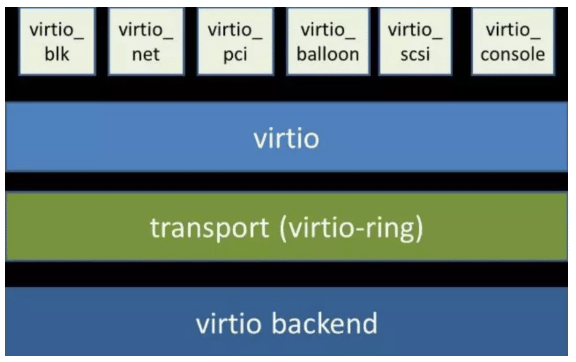
virtio 是一种 I/O 半虚拟化解决方案,是一套通用 I/O设备虚拟化的程序,是 对半虚拟化 Hypervisor中的一组通用 I/O设备的抽象,提供了一套上层应用与 各 Hypervisor虚拟化设备(KVM,Xen,VMware等)之间的通信框架和编程接口, 减少跨平台所带来的兼容性问题,大大提高驱动程序开发效率,windows 系统需 要单独安装virtio驱 动,linux系统自带virtio驱动。
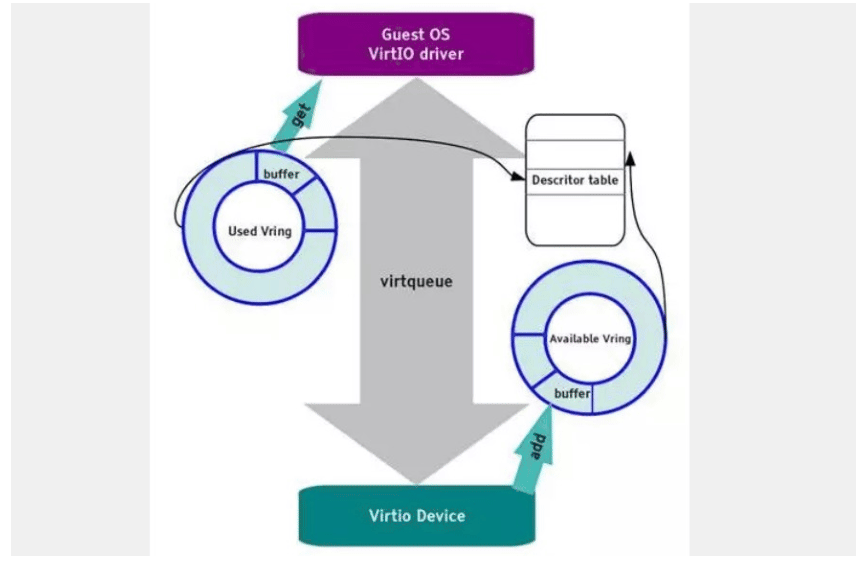
Virtio 使用 virtqueue 来实现 I/O 机制,每个 virtqueue 就是一个承载大量数据的队列,具体使用多少个队列取决于需求,例如,virtio网络驱动程序(virtio-net)使用两个队列(一个用于接受,另一个用于发送),而virtio块驱动程序(virtio-blk)仅使用一个队列
实现IO虚拟化主要有三种方式:全虚拟化、半虚拟化和透传,全虚拟化Guest OS 不会感知到自己是虚拟机,也无需修改Guest OS,但是它的效率比较低,半虚拟 化Guest OS知道自己是虚拟机,通过Frontend/Backend驱动模拟实现IO虚拟化, 透传就是直接分配物理设备给VM用,但是需要解决单个硬件在多个虚拟机共享使 用的问题。
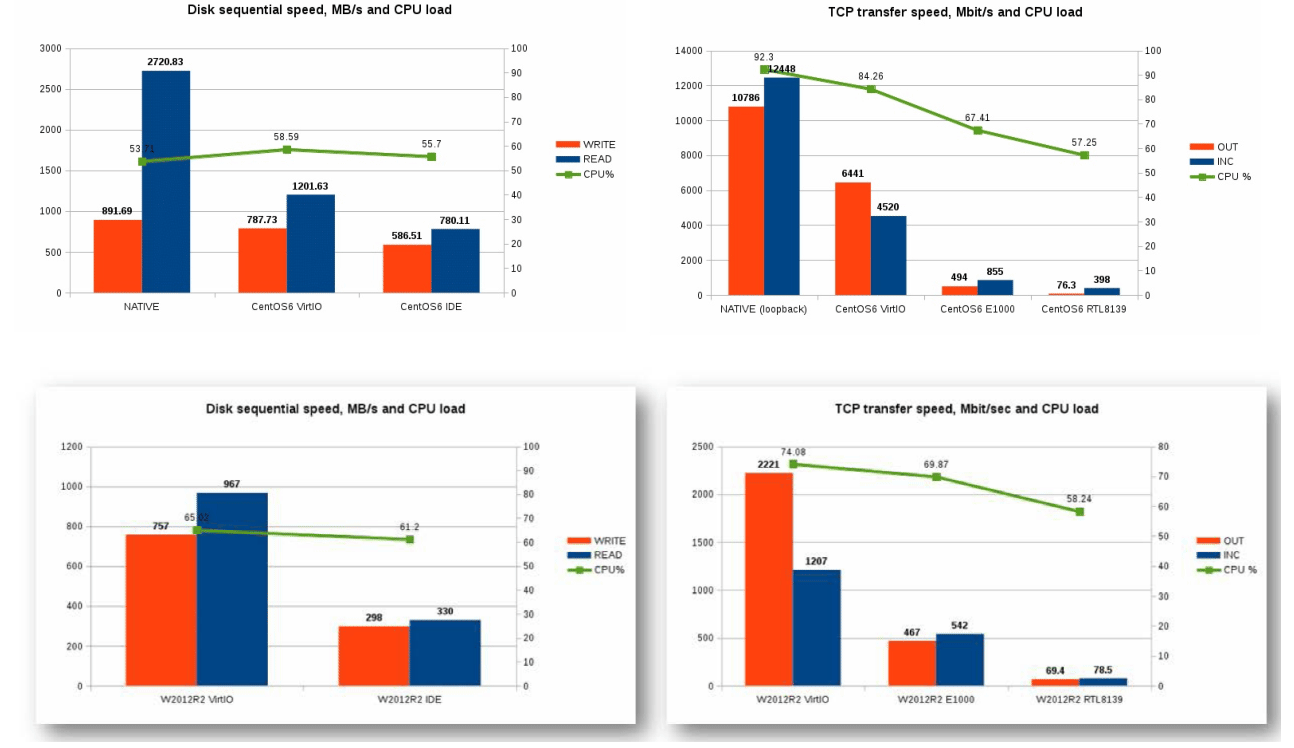
性能比较
半虚拟化设备统一接口virtio

通过统一的接口virtio以支持的多种硬件设备
- 不同的虚拟设备和不同的虚拟机可以有不同的前端驱动
- 不同的硬件设备可以有不同的后端驱动
- 两者之间的交互遵循virtio的标准
驱动获取
Linux 的 VirtIO 驱动
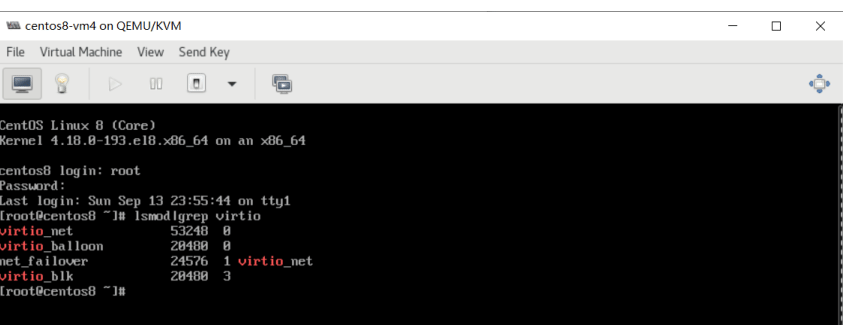
红帽RHEL 4.8之后自动加载和安装virtio驱动
lsmod |grep virtio
Windows 操作系统需要额外安装 virtio 的驱动
Linux 测试安装virtio驱动前后的虚拟机性能变化
默认虚拟机使用的是全虚拟化IDE磁盘,以下测试性能
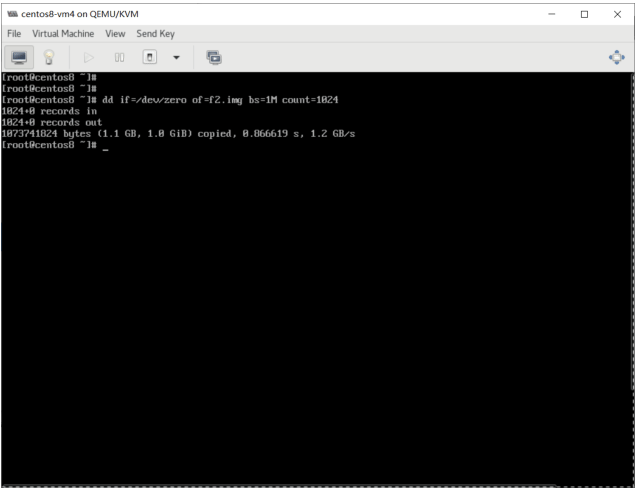
dd if=/dev/zero of =/f1.img bs=1M count=1024
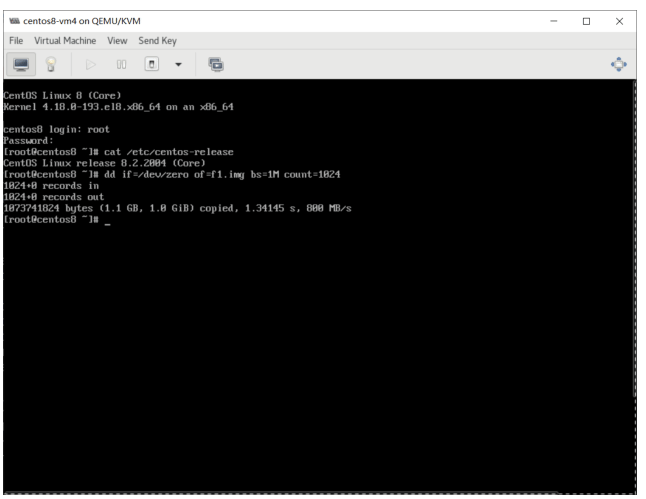
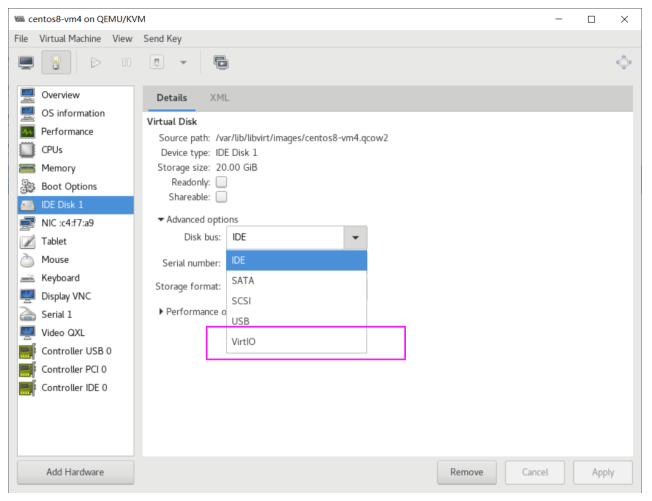
将硬盘默认的总线IDE修改为VirtIO
重新启动后,执行相同的操作,比较性能
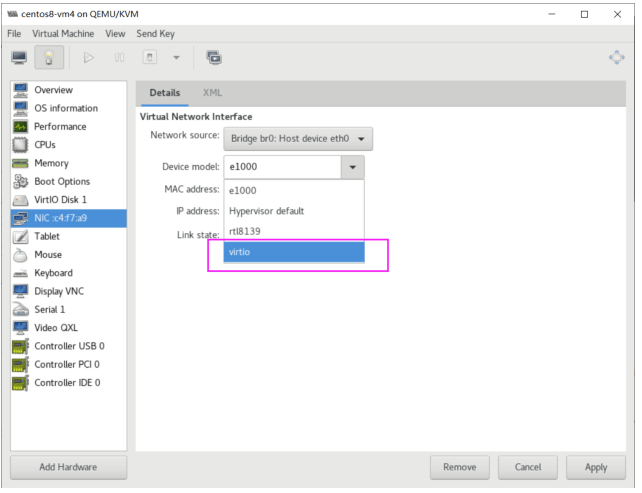
默认网卡为e1000,将之修改网卡驱动为virtIO
安装 Windows Server 虚拟机
下载并准备相关文件
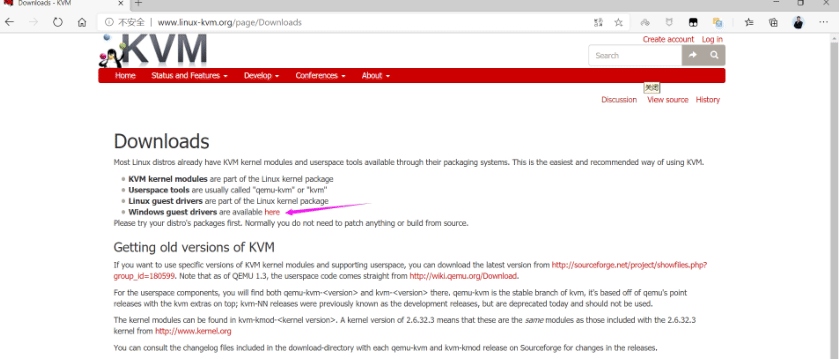
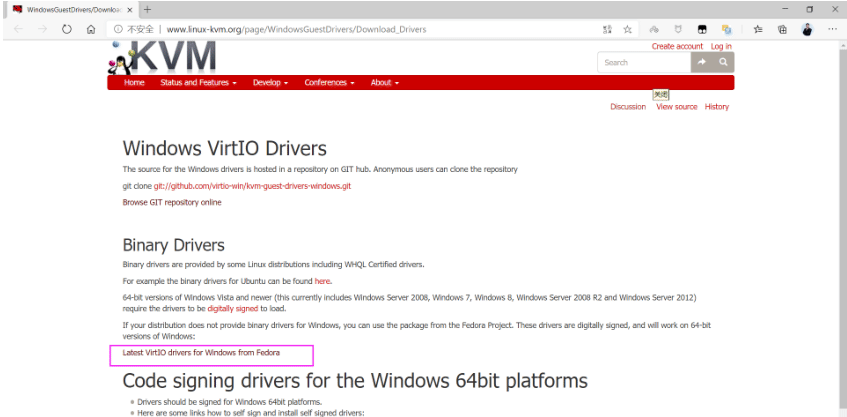
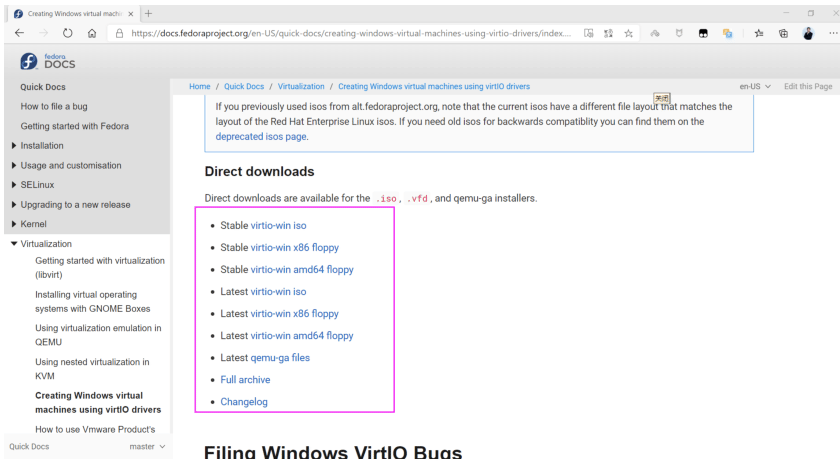
# virtio下载地址:
https://fedorapeople.org/groups/virt/virtio-win/direct-downloads/

# virtio 历史版本下载地址:
https://fedorapeople.org/groups/virt/virtio-win/direct-downloads/archive-virtio/

#这里下载兼容比较多的软盘文件  virtio-win-0.1.141_amd64.vfd

[root@centos8 ~]#ll /data/isos/
- CentOS-7-x86_64-Minimal-2003.iso
- CentOS-8.2.2004-x86_64-minimal.iso
- cn_windows_server_2008_r2_standard_enterprise_datacenter_and_web_with_sp1_vl_build_x64_dvd_617396.iso
- virtio-win-0.1.141_amd64.vfd
创建 Windows Server 2008 虚拟机
#创建磁盘文件
[root@centos8 ~]#qemu-img create -f qcow2 /var/lib/libvirt/images/Windows-2008_r2-x86_64.qcow2 200G

#查看支持的windows版本
[root@centos8 ~]#osinfo-query os| grep win
win1.0                             | Microsoft Windows 1.0                                                         | 1.0      | http://microsoft.com/win/1.0
win10                             | Microsoft Windows 10                                                             |10.0         | http://microsoft.com/win/10
win2.0                             | Microsoft Windows 2.0                                                         | 2.0        | http://microsoft.com/win/2.0
win2.1                             | Microsoft Windows 2.1                                                         | 2.1        | http://microsoft.com/win/2.1
win2k                             | Microsoft Windows 2000                                                         | 5.0        | http://microsoft.com/win/2k
win2k12                         | Microsoft Windows Server 2012                                         | 6.3        | http://microsoft.com/win/2k12
win2k12r2                     | Microsoft Windows Server 2012 R2                                     | 6.3        | http://microsoft.com/win/2k12r2
win2k16                         | Microsoft Windows Server 2016                                         |10.0         | http://microsoft.com/win/2k16
win2k19                         | Microsoft Windows Server 2019                                         |10.0         | http://microsoft.com/win/2k19
win2k3                             | Microsoft Windows Server 2003                                         | 5.2        | http://microsoft.com/win/2k3
win2k3r2                         | Microsoft Windows Server 2003 R2                                     | 5.2        | http://microsoft.com/win/2k3r2
win2k8                             | Microsoft Windows Server 2008                                         | 6.0        | http://microsoft.com/win/2k8
win2k8r2                         | Microsoft Windows Server 2008 R2                                     | 6.1        | http://microsoft.com/win/2k8r2
win3.1                             | Microsoft Windows 3.1                                                         | 3.1        | http://microsoft.com/win/3.1
win7                                 | Microsoft Windows 7                                                             | 6.1        | http://microsoft.com/win/7
win8                                 | Microsoft Windows 8                                                             | 6.2        | http://microsoft.com/win/8
win8.1                             | Microsoft Windows 8.1                                                         | 6.3        | http://microsoft.com/win/8.1
win95                             | Microsoft Windows 95                                                             | 4.0        | http://microsoft.com/win/95

win98                             | Microsoft Windows 98                                                             | 4.1        | http://microsoft.com/win/98
winme                             | Microsoft Windows Millennium Edition                             | 4.9        | http://microsoft.com/win/me
winnt3.1                         | Microsoft Windows NT Server 3.1                                     | 3.1        | http://microsoft.com/winnt/3.1
winnt3.5                         | Microsoft Windows NT Server 3.5                                     | 3.5        | http://microsoft.com/winnt/3.5
winnt3.51                     | Microsoft Windows NT Server 3.51                                     |3.51         | http://microsoft.com/winnt/3.51
winnt4.0                         | Microsoft Windows NT Server 4.0                                     | 4.0        | http://microsoft.com/winnt/4.0
winvista                         | Microsoft Windows Vista                                                     | 6.0        | http://microsoft.com/win/vista
winxp                             | Microsoft Windows XP                                                             | 5.1        | http://microsoft.com/win/xp

#创建 Windows 虚拟机
[root@centos8 ~]#virt-install --virt-type kvm --name Win_2008_r2-x86_64 --memory 3072 --vcpus=2 --os-variant=win2k8r2 --cdrom=/data/isos/cn_windows_server_2008_r2_standard_enterprise_datacenter_and_web_with_sp1_vl_build_x64_dvd_617396.iso --diskpath=/var/lib/libvirt/images/Windows-2008_r2-x86_64.qcow2,format=qcow2,bus=virtio --disk path=/data/isos/virtio-win-0.1.141_amd64.vfd,device=floppy --network bridge=virbr0,model=virtio --graphics vnc,listen=0.0.0.0 --noautoconsole --autostart

Starting install...
Domain installation still in progress. You can reconnect to
the console to complete the installation process.

[root@centos8 ~]#virt-manager
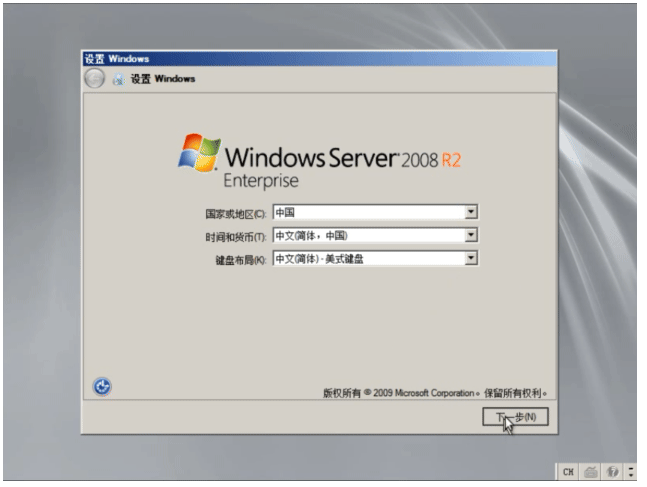
安装 Windows Server 2008
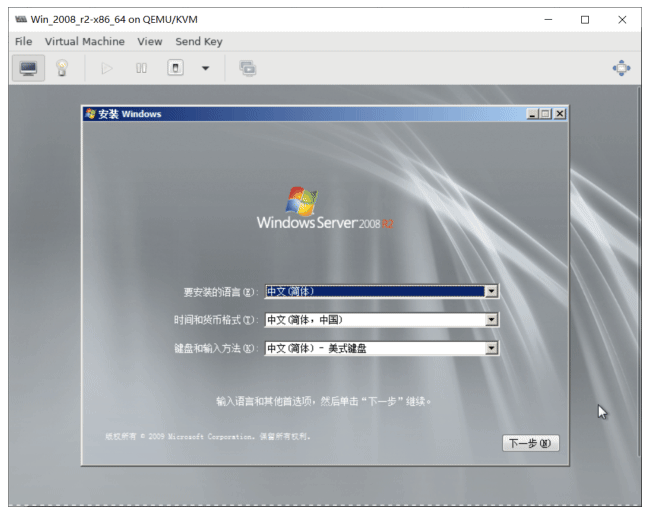
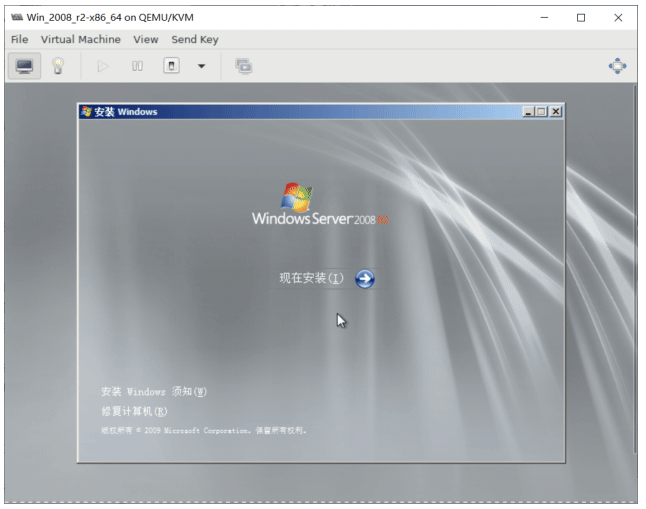
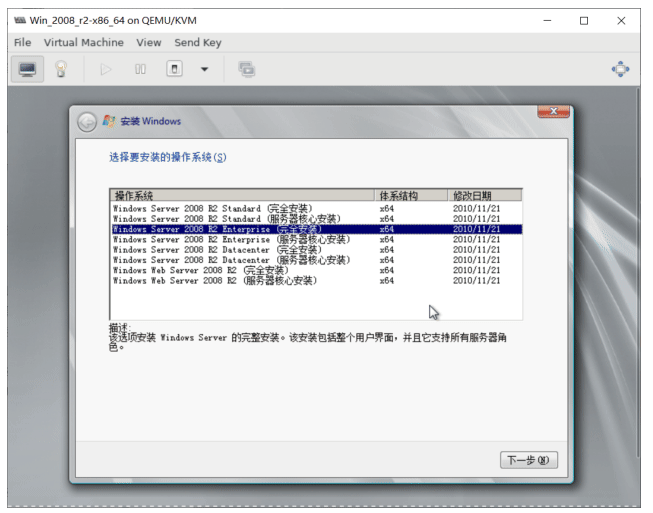
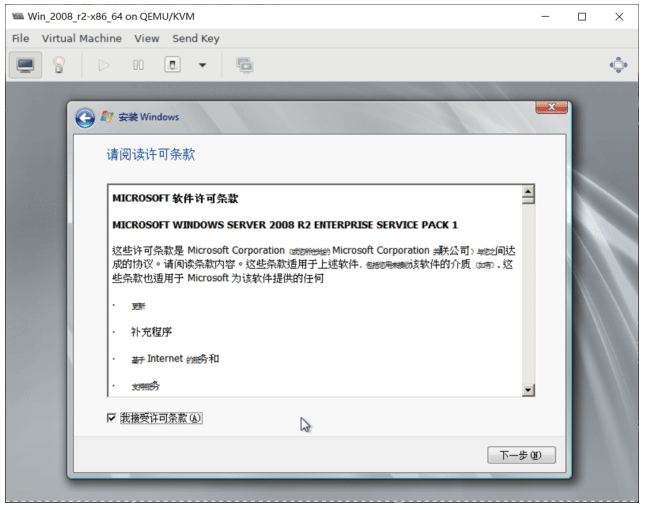
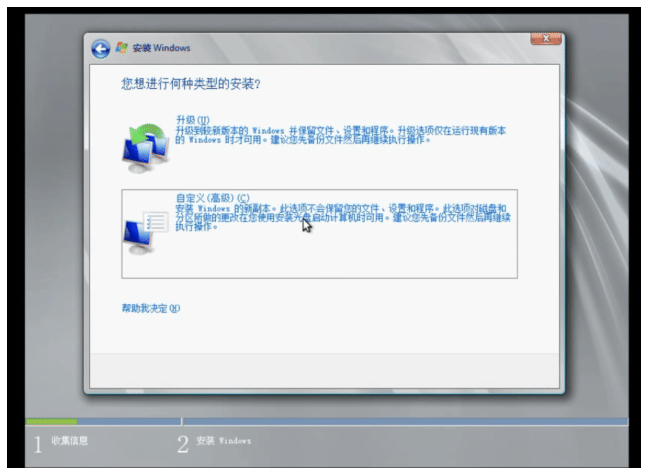
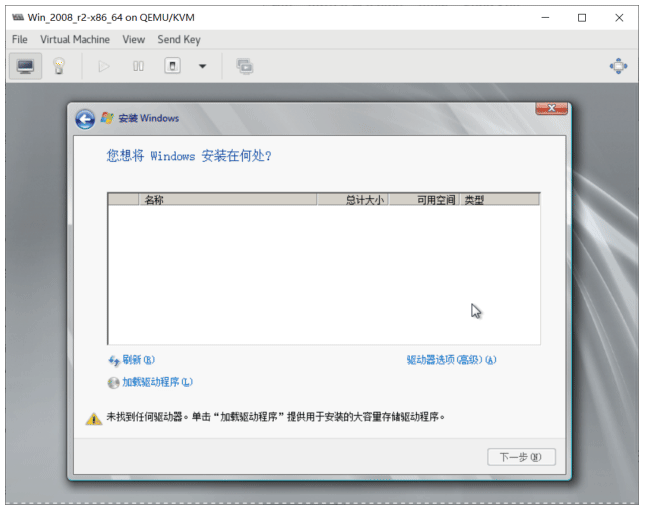
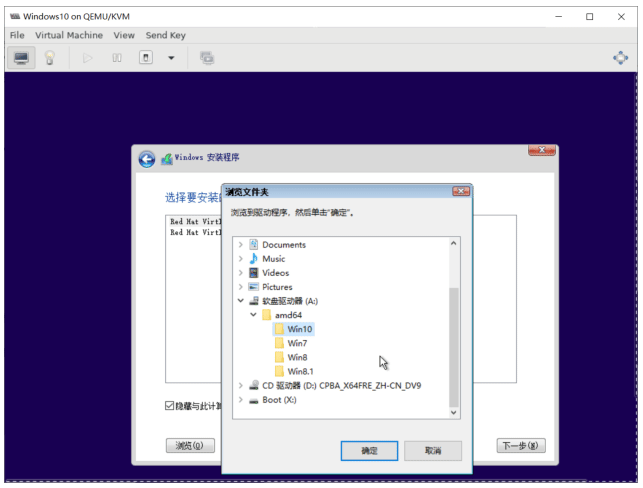
选择加载驱动,点浏览从软盘中加载
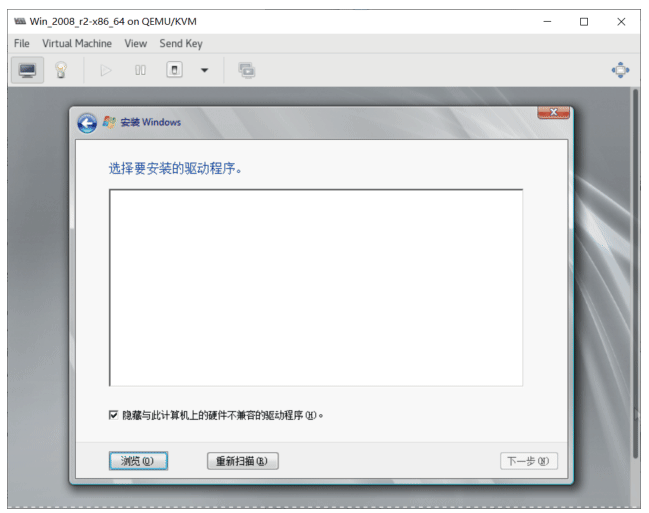
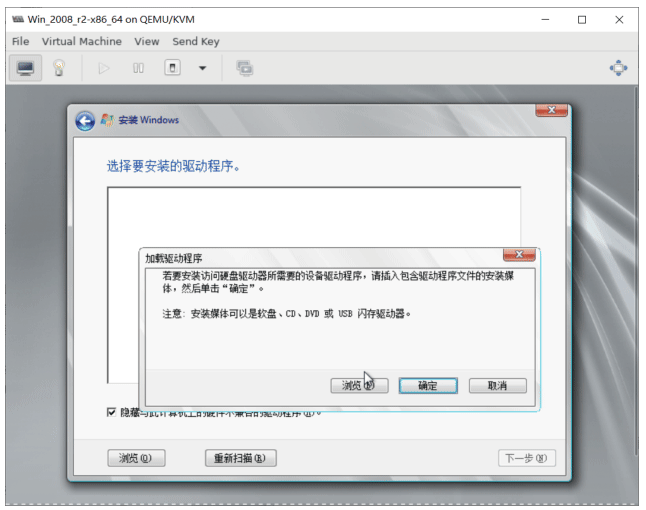
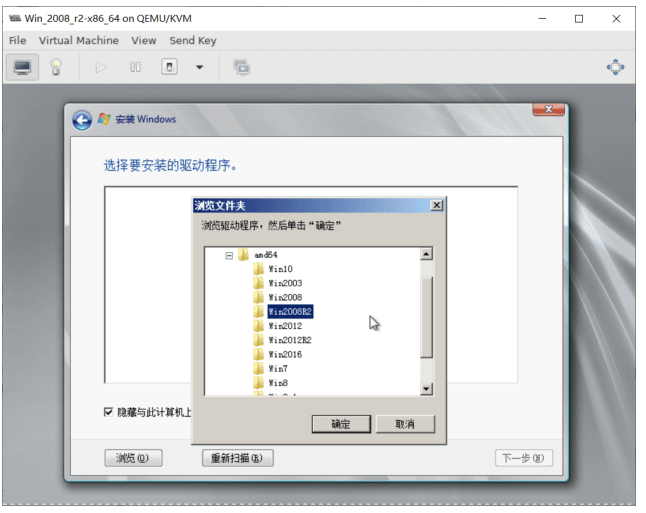
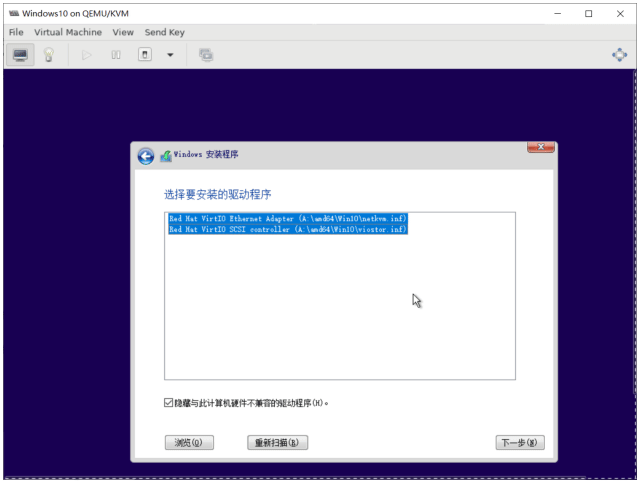
注意: 不要选中 GPU, 按住Ctrl键多选,选择其他2个
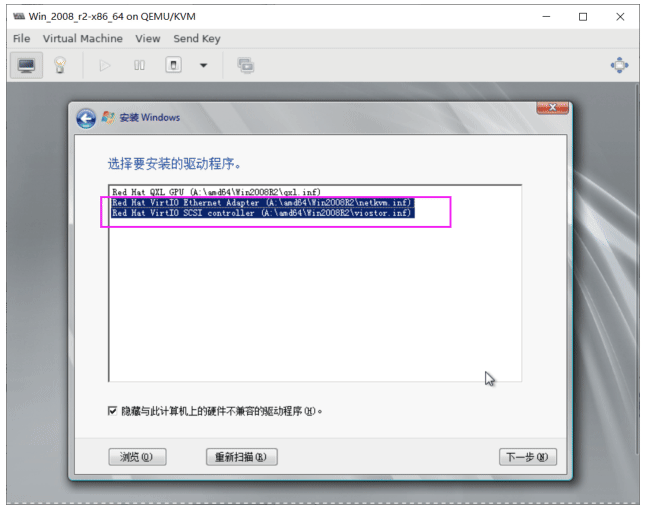
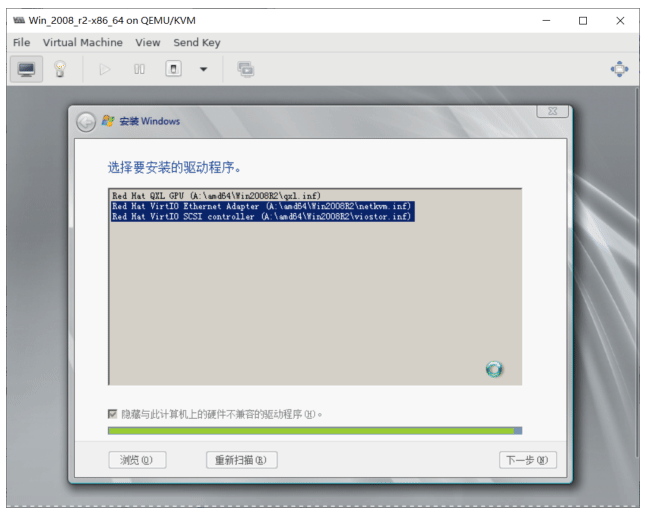
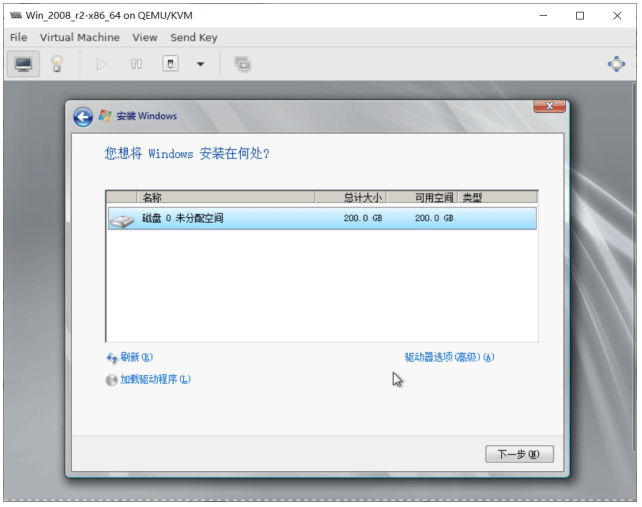
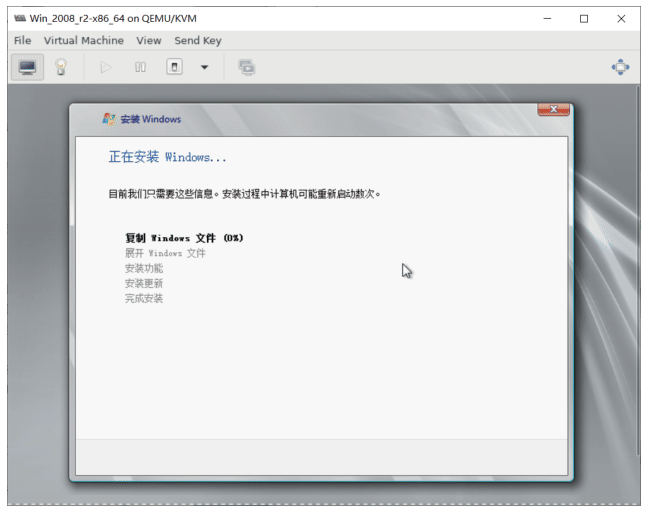
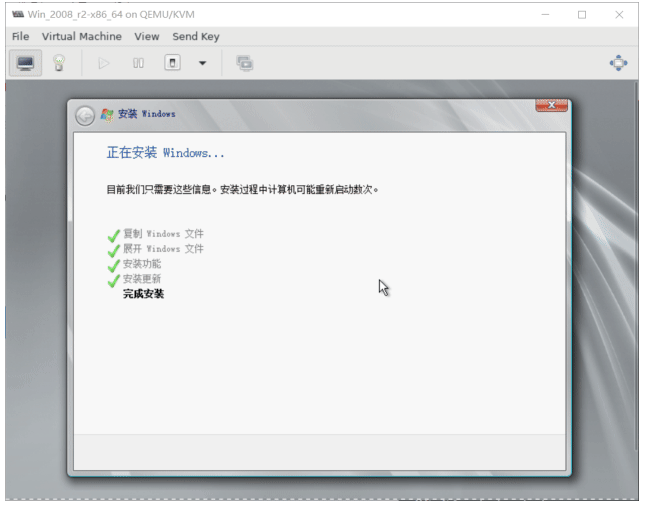
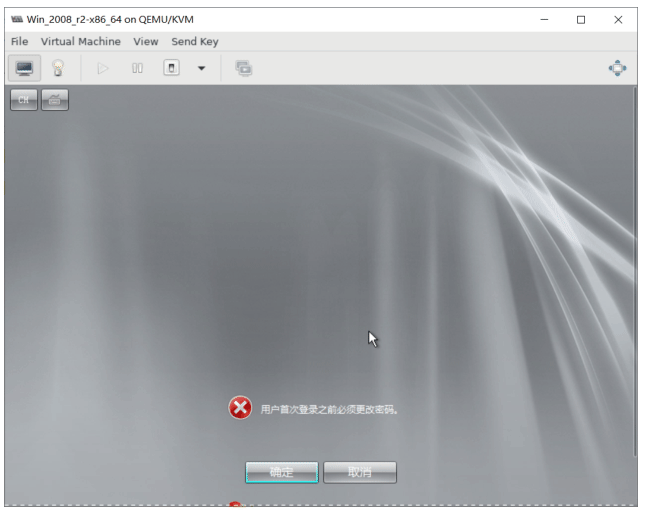
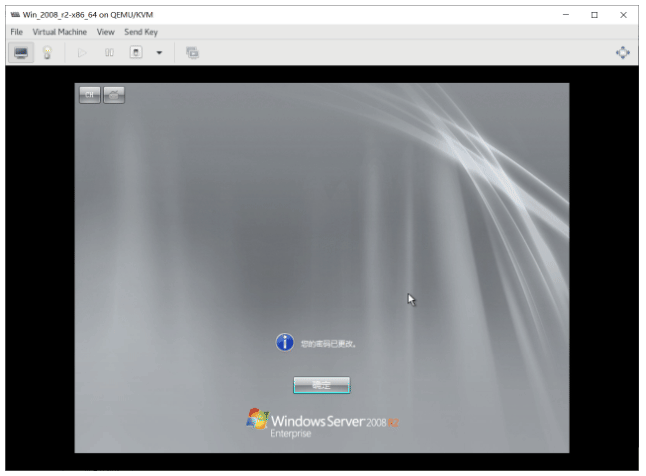
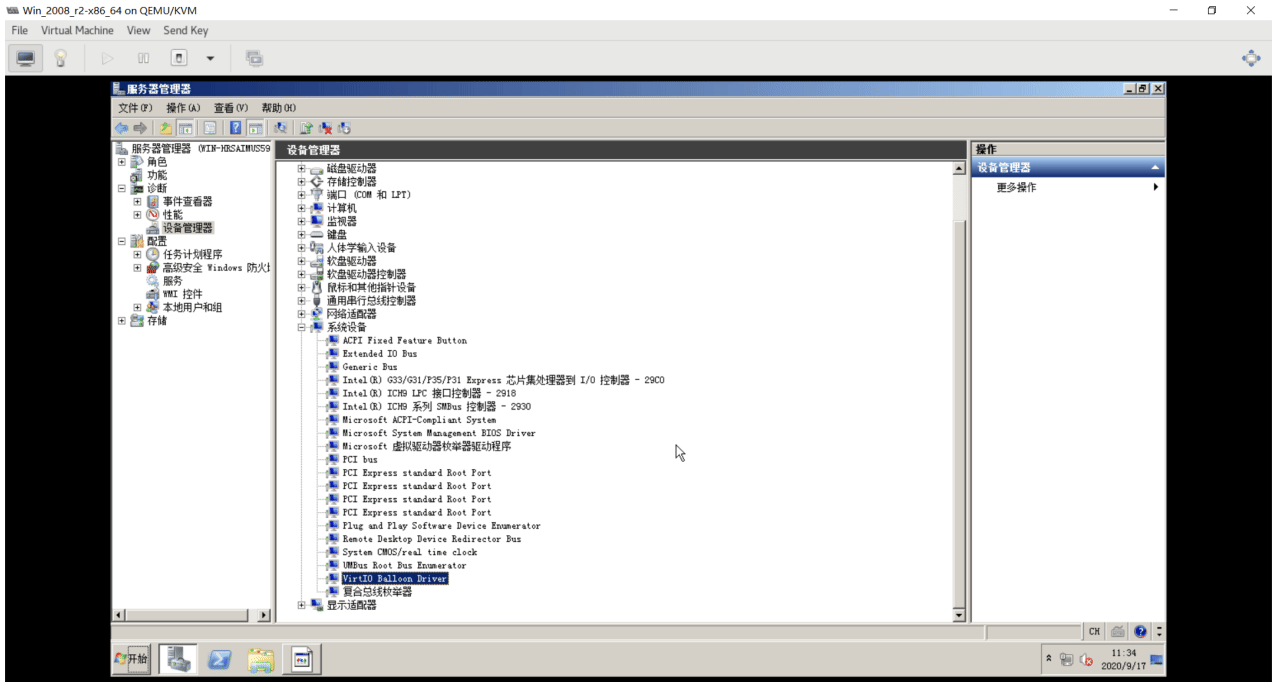
验证 Windows virtio 驱动
我的电脑右键属性–管理–诊断–打开设备管理器
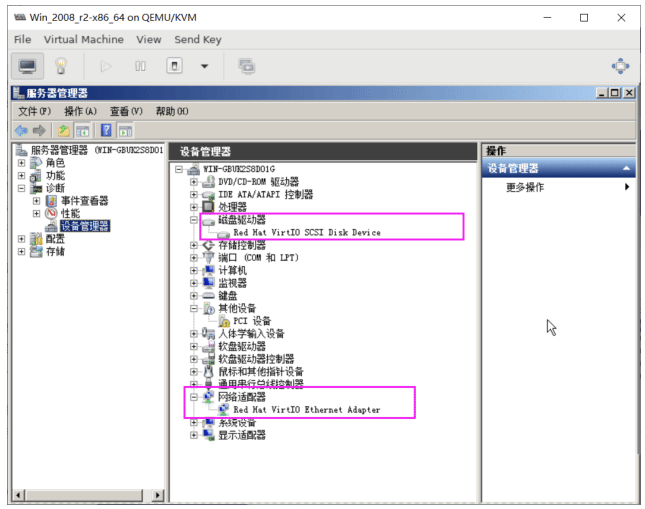
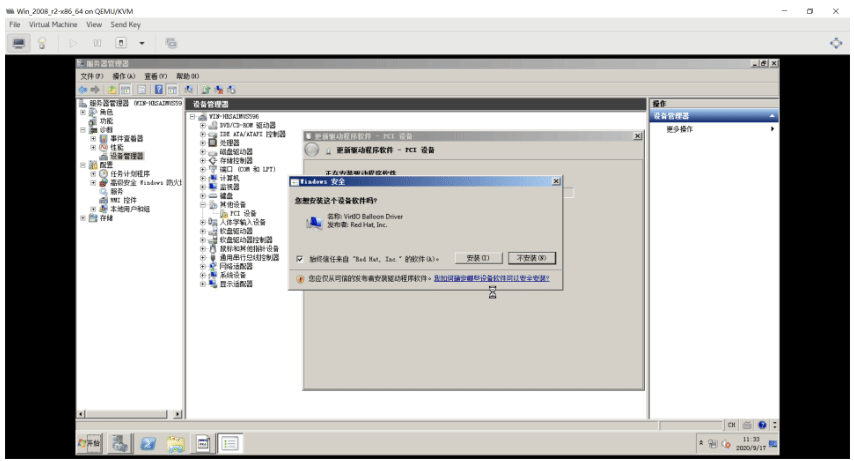
其中有个叹号的PCI设备,不被识别。需要安装pci驱动。
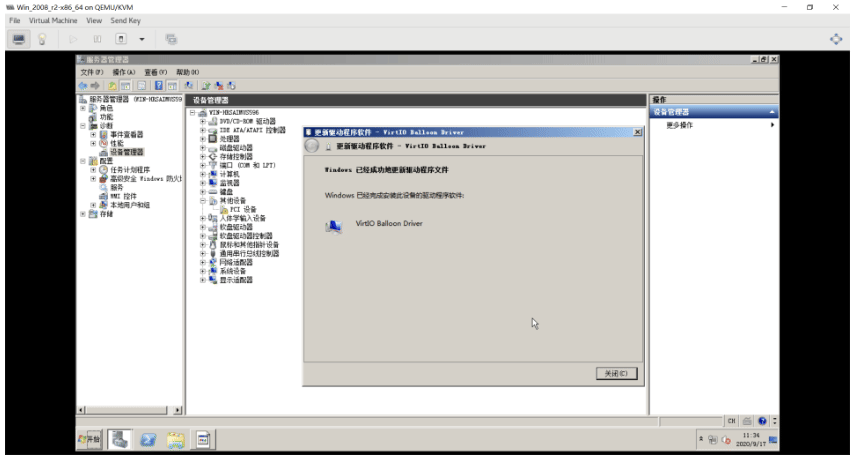
安装PCI 内存管理驱动
挂载virtio-win的光盘,进行安装驱动
这里下载virtio-win-0.1.185.iso驱动,并挂载到win2008的d盘
[root@centos8 ~]#ll /data/isos/
... ...
virtio-win-0.1.185.iso

#打开virt-manager磁盘挂载中选择挂载这个驱动文件
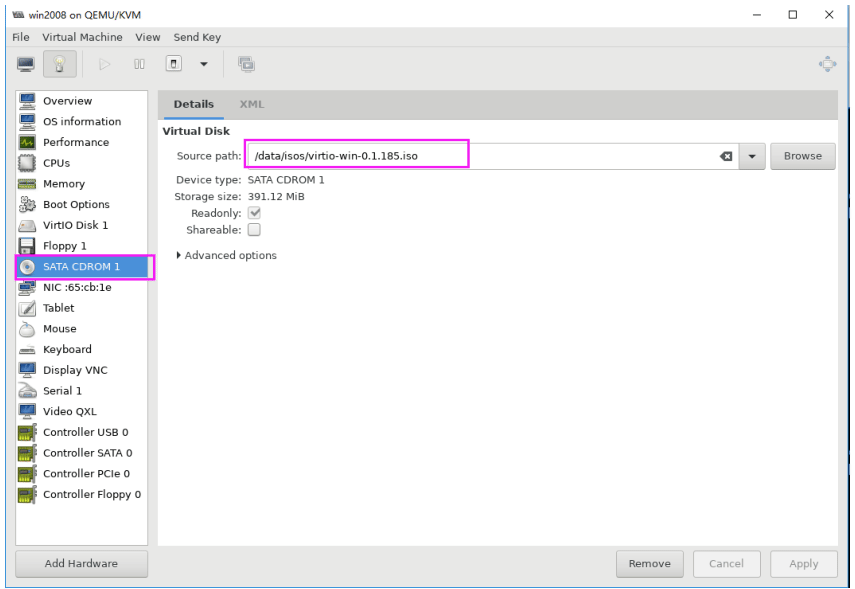
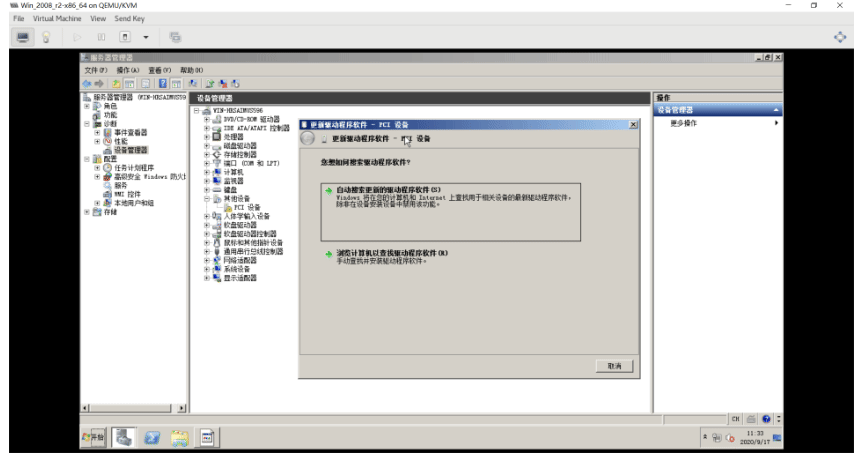
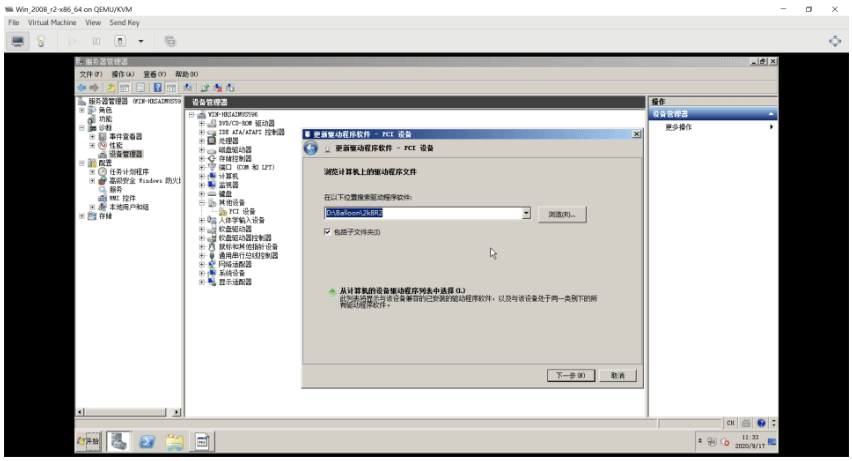
生成Windows Server 2008 镜像模版
利用sysprep工具,清除个性信息,下次Windows开机时, 会自动生成初始化个性信息
C:\Windows\System32\Sysprep\sysprep.exe 文件,双击可消除个性信息。
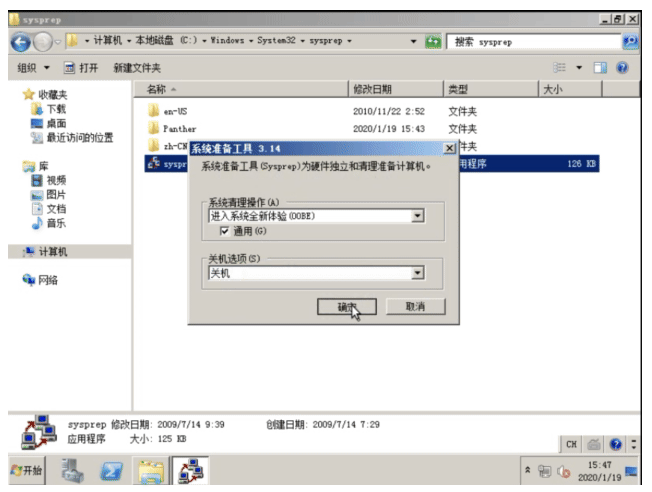
下次开机需要重新初始化
安装 Windows 10 虚拟机
[root@centos8 ~]#ll /data/isos/
total 11221160
-rw-r--r-- 1 qemu qemu 1085276160 Aug     9 16:38 CentOS-7-x86_64-Minimal-2003.iso
-rw-r--r-- 1 qemu qemu 1718616064 Aug     9 16:31 CentOS-8.2.2004-x86_64-minimal.iso
-rw-r--r-- 1 root root 5311711232 Aug 11 12:40 cn_windows_10_business_editions_version_1909_updated_jan_2020_x64_dvd_b3e1f3a6.iso
-rw-r--r-- 1 qemu qemu 3368962048 Aug 11 12:00  cn_windows_server_2008_r2_standard_enterprise_datacenter_and_web_with_sp1_vl_build_x64_dvd_617396.iso
-rw-r--r-- 1 qemu qemu         2949120 Aug 11 12:21 virtio-win-0.1.141_amd64.vfd
-rw-r--r-- 1 root root         2949120 Aug 11 12:34 virtio-win-0.1.185_amd64.vfd

[root@centos8 ~]#qemu-img create -f qcow2 /var/lib/libvirt/images/Windows10.qcow2 200G

[root@centos8 ~]#virt-install --virt-type kvm --name Windows10 --ram 3072 --vcpus=2 --os-variant=win10 --cdrom=/data/isos/cn_windows_10_business_editions_version_1909_updated_jan_2020_x64_dvd_b3e1f3a6.iso --diskpath=/var/lib/libvirt/images/Windows10.qcow2,format=qcow2,bus=virtio --diskpath=/data/isos/virtio-win-0.1.185_amd64.vfd,device=floppy --network bridge=virbr0,model=virtio --graphics vnc,listen=0.0.0.0 --noautoconsole --autostart

Starting install...
Domain installation still in progress. You can reconnect to
the console to complete the installation process.
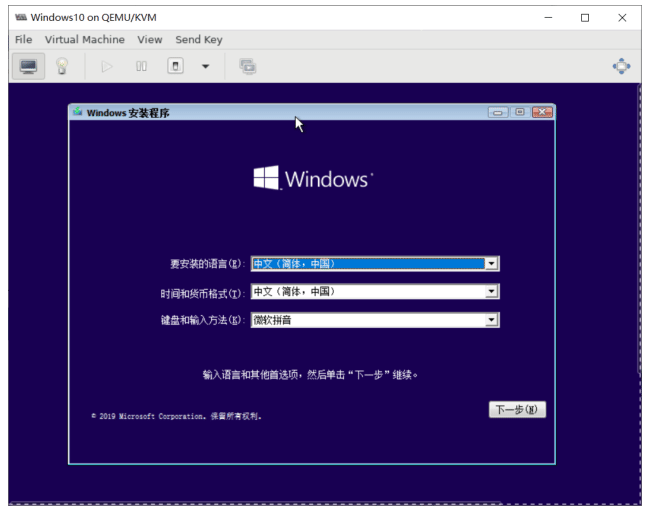
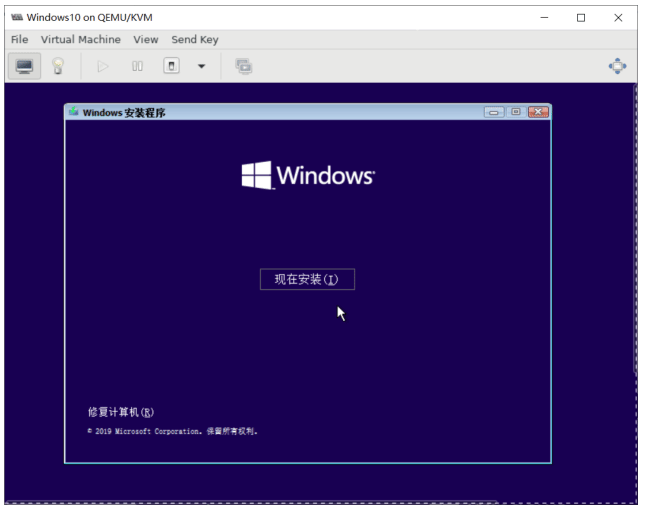
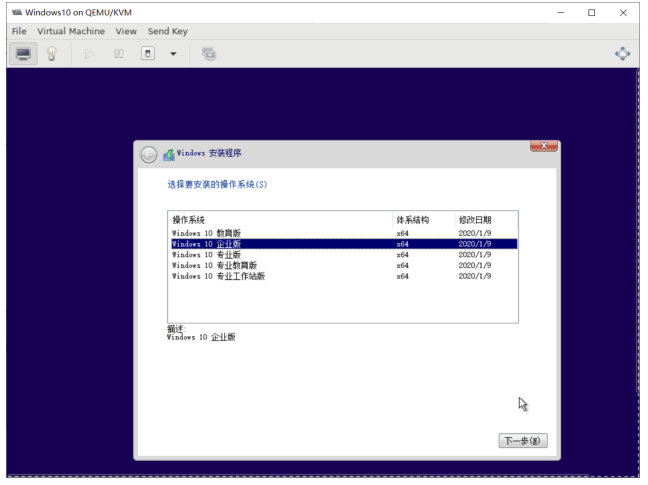
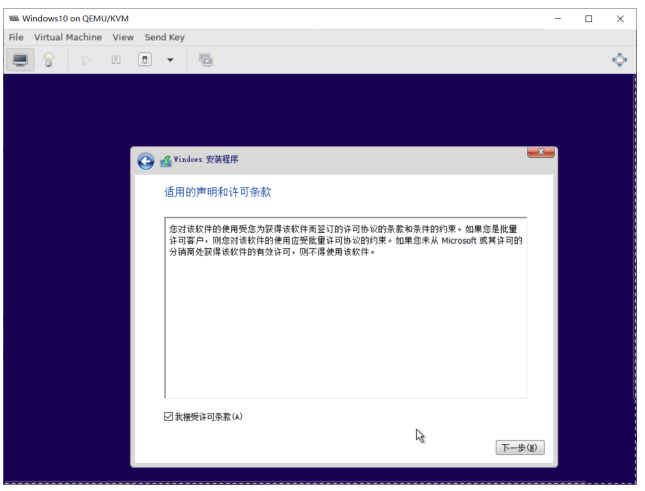
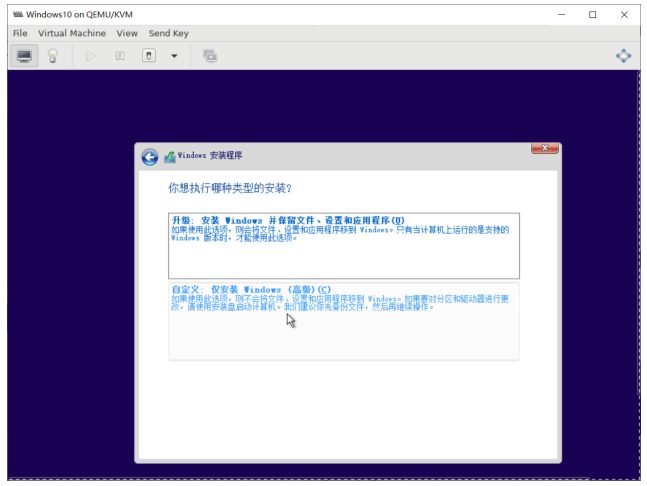
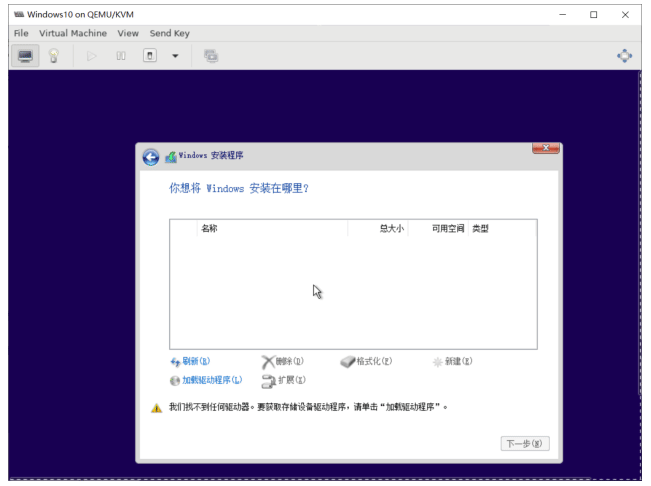
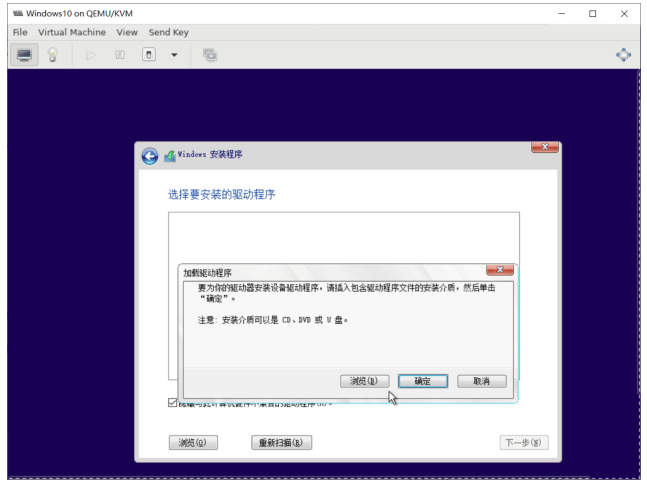
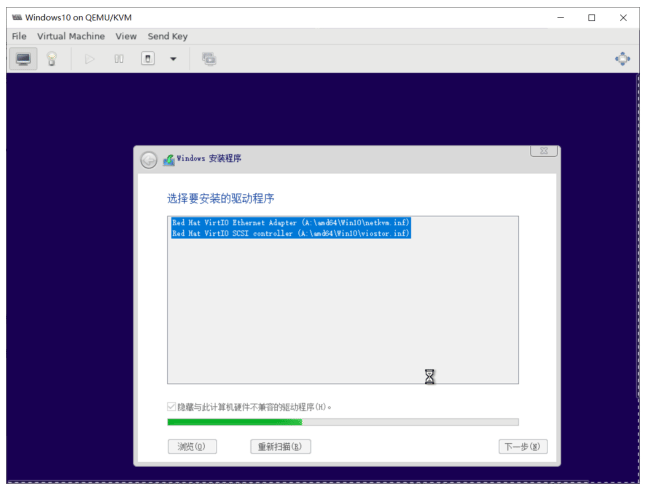
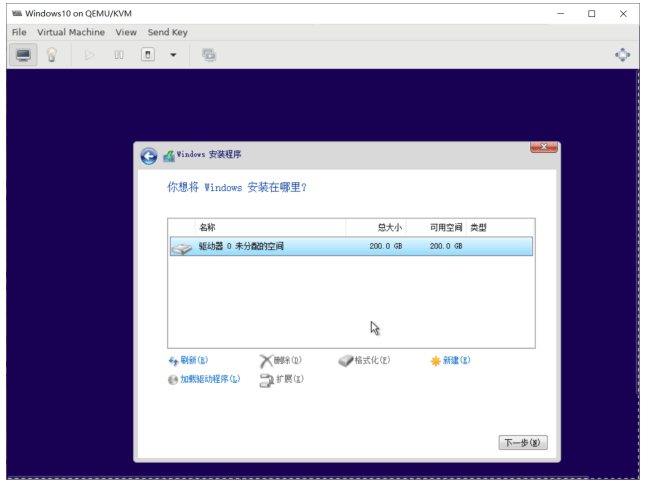
选择加载驱动来识别磁盘
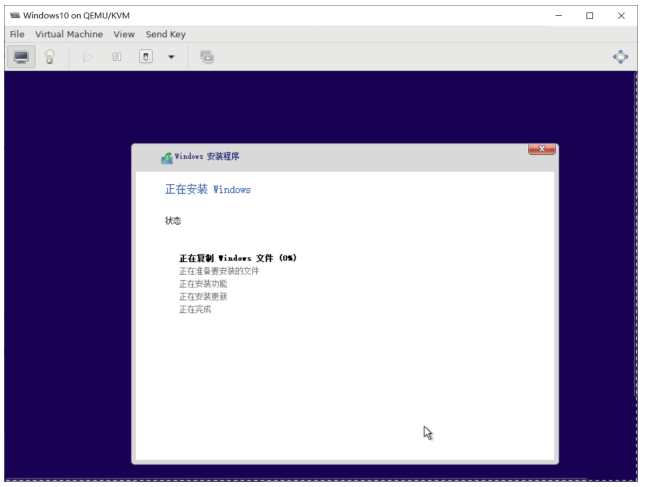
第一次启动,初始化会比较长时间
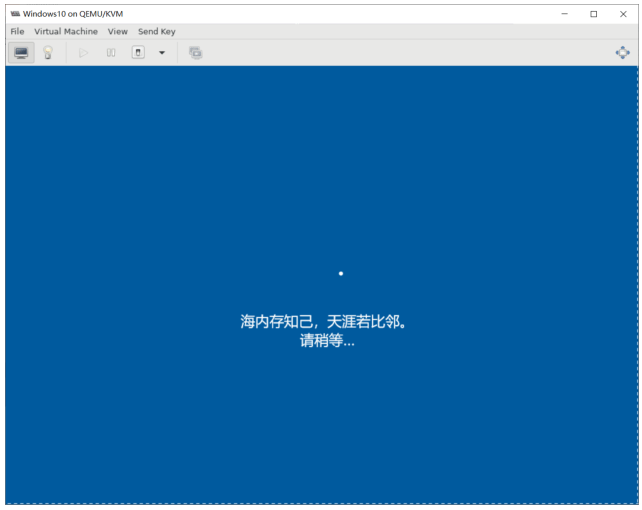
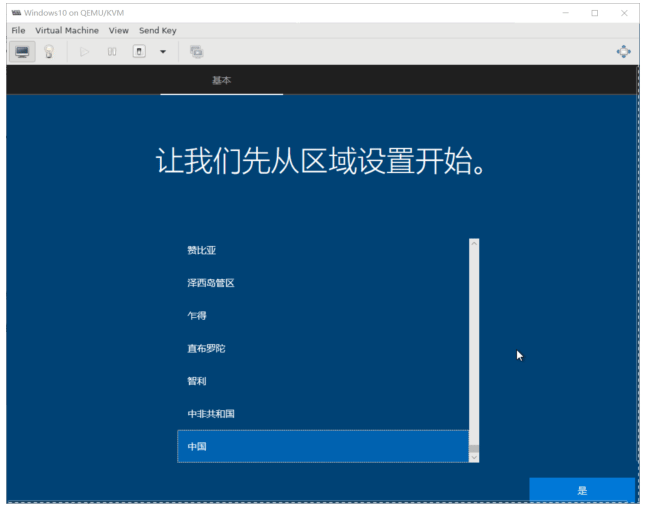
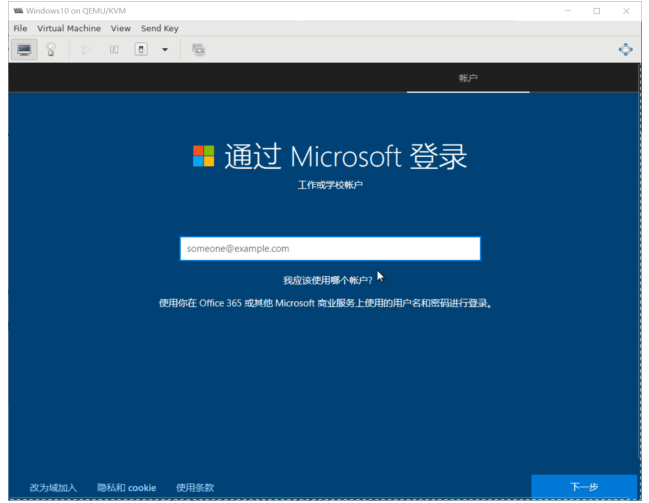
选择”改为域加入”
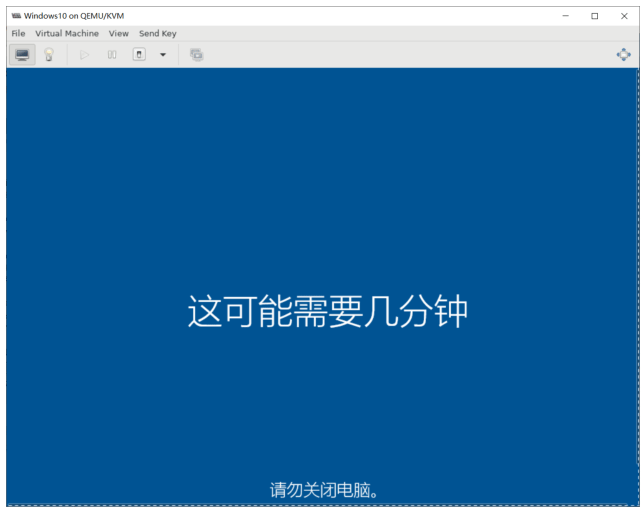
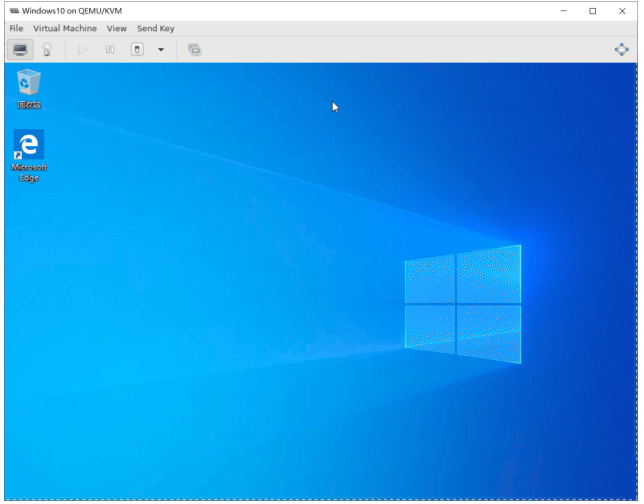
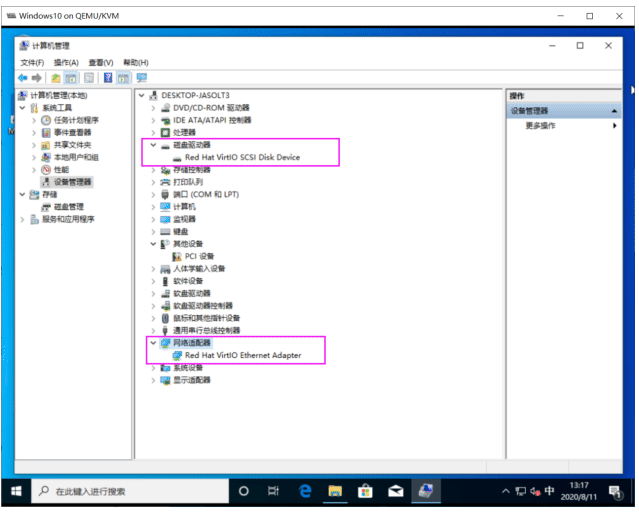
安装与配置 QEMU guest agent
QEMU guest agent 功能
如果VM中安装QEMU guest agent,Host就可以使用libivrt向VM发送命令,例如”冻结”、"释放"文件系统,虚拟CPU的热添加及移除等。
在安装QEMU guest agent后,通过libvirt来使用QEMU guest agent,可以对libvirt命令有如下的增强
virsh shutdown --mode=agent     #比--mode=acpi更加安全地关闭操作系统
virsh snapshot-create -quiesce     #在创建快照之前面,将缓存的内容刷入到磁盘
virsh domfsfreeze     #静默文件系统
virsh domfsthaw     #恢复静默的文件系统
virsh domfstrim         #让虚拟机trim文件系统
virsh domtime             #获得虚拟机的时间
virsh setvcpus             #配置虚拟机的vCPU
virsh domifaddr --source agent     #查询虚拟机的IP地址
virsh domfsinfo         #显示虚拟机的文件系统列表
virsh set-user-password #设置虚拟机用户的密码
安装 QEMU guest agent 安装方法
- RHEL/CentOS 中有相应的安装包。qemu-guest-agent-xxx.rpm
- Windows 需要手工安装
在 Linux 安装
[root@centos8 ~]#yum info qemu-guest-agent
Last metadata expiration check: 2:46:09 ago on Thu 17 Sep 2020 09:08:54 AM CST.
Available Packages
Name                 : qemu-guest-agent
Epoch             : 15
Version         : 2.12.0
Release         : 99.module_el8.2.0+320+13f867d7
Architecture : x86_64
Size                 : 216 k
Source             : qemu-kvm-2.12.0-99.module_el8.2.0+320+13f867d7.src.rpm
Repository     : AppStream
Summary         : QEMU guest agent
URL                 : http://www.qemu.org/
License         : GPLv2 and GPLv2+ and CC-BY
Description : qemu-kvm is an open source virtualizer that provides hardware
emulation for
                        : the KVM hypervisor.
                        :
                        : This package provides an agent to run inside guests, which
communicates
                        : with the host over a virtio-serial channel named
"org.qemu.guest_agent.0"
                        :
                        : This package does not need to be installed on the host OS.

[root@centos8 ~]#yum -y install qemu-guest-agent
在 Windows 安装 QEMU guest agent
这里下载virtio-win-0.1.185.iso驱动
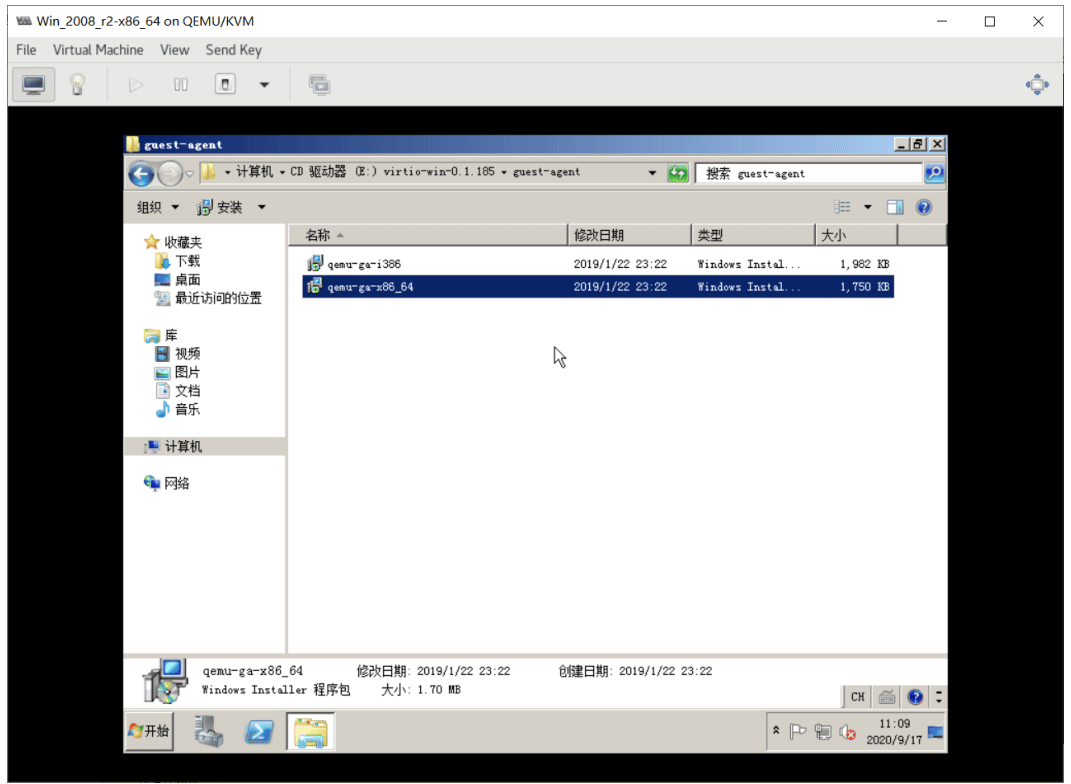

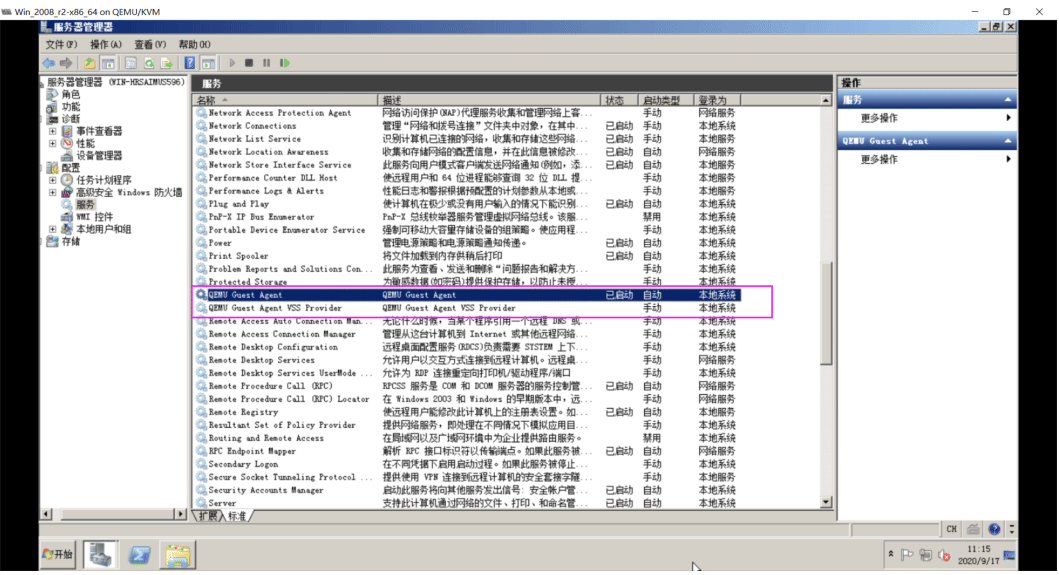
安装完毕后,可以服务管理中看到两个相关的服务
QEMU Guest Agent
QEMU Guest Agent VSS provider #实现卷影副本
安装和配置 SPICE agent
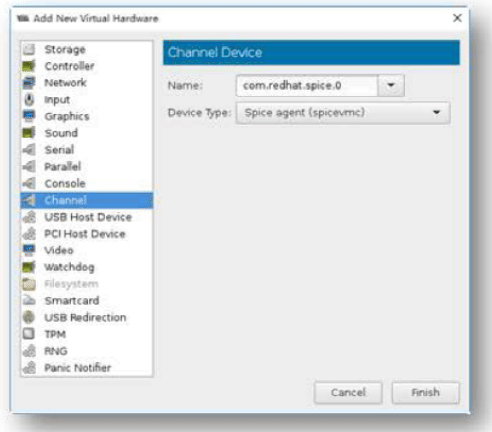
通过在VM操作系统中安装SPICE client,SPICE agent使virt-manager等图形应用程序更加流畅。例如:
- 在virt-manager中调整窗口尺寸,SPICE agent 自动调整X会话的分辨率
- 在Host与Guest之间复制与粘贴
- 防止鼠标拖尾等
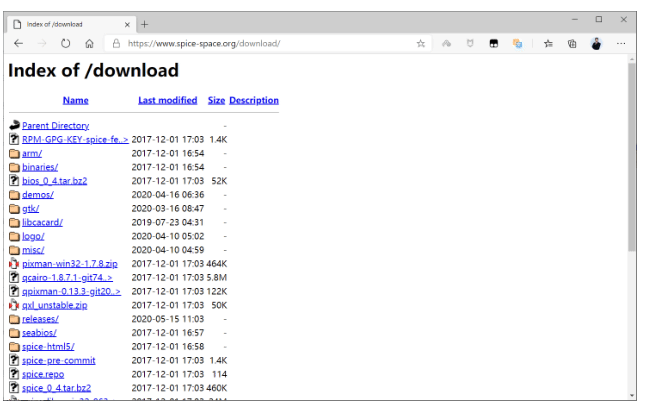
官方下载链接: http://www.spice-space.org/download/
libvirt 管理虚拟机
libvirt 架构
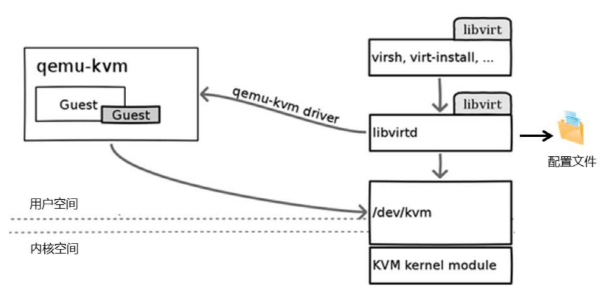
注意: 如果libvirtd服务意外关闭,将导致相关工具,如:virt-manager等无法和虚拟机连接,但虚拟机仍会正常运行
范例: libvirtd 服务功能
[root@centos8 ~]#virsh list
Id     Name                                                     State
----------------------------------------------------
2         centos8                                             running
3         Win_2008_r2-x86_64                         running
[root@centos8 ~]#systemctl stop libvirtd
[root@centos8 ~]#virsh list
error: failed to connect to the hypervisor
error: Failed to connect socket to '/var/run/libvirt/libvirt-sock': No such file
or directory

#virt-manager工具也无法连接虚拟机
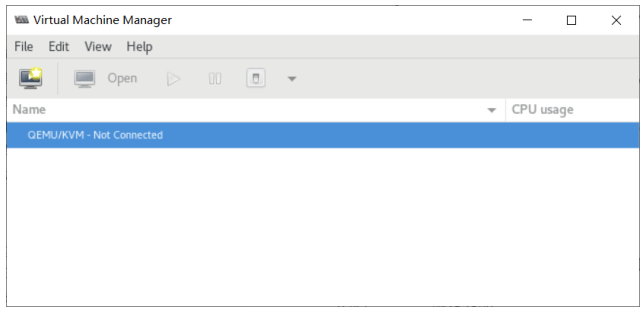
[root@centos8 ~]#systemctl start libvirtd
[root@centos8 ~]#virsh list
Id     Name                                                     State
----------------------------------------------------
2         centos8                                             running
3         Win_2008_r2-x86_64                         running
#virt-manager工具也恢复连接虚拟机
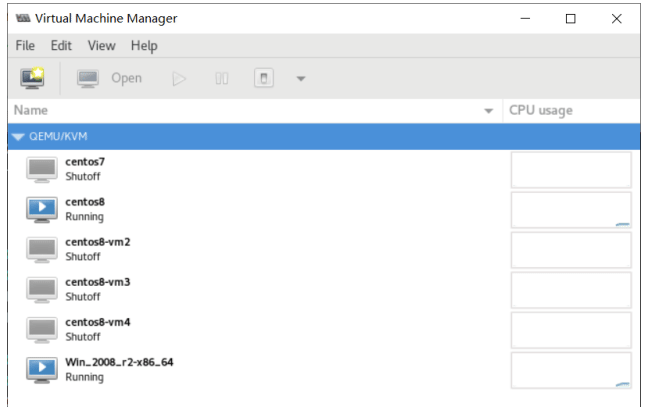
virt-manager 管理虚拟机
virt-manager是一个图形化工具,主要功能:
- 定义和创建虚拟机
- 硬件管理
- 性能监视
- 控制台
- 在线和离线迁移
- 虚拟机的保存和恢复、暂停和继续、关闭和启动
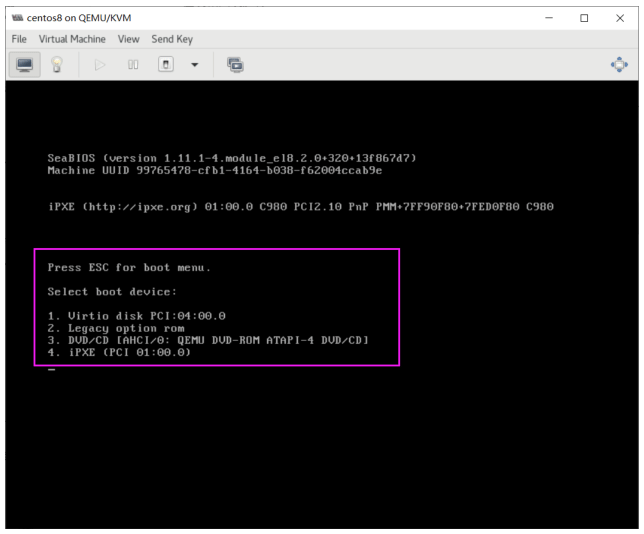
启动菜单
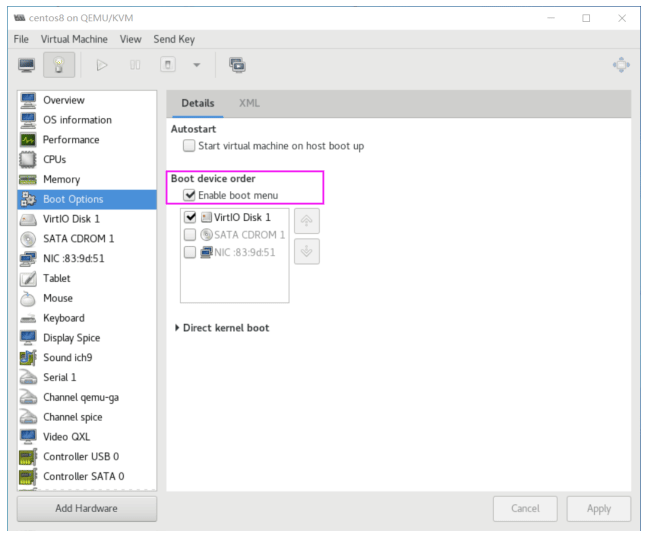
开机后,按提示按ESC键,会出下面启动菜单
设置跟随libvirtld服务开机启动
#virt-install
--autostart 引导主机时自动启动域。

#或者virt-manager设置中Boot Options中的Autostart
设置完开机启动后,可以看到文件关联
ls /etc/libvirt/qemu/autostart/

centos7-vm3.xml -> /etc/libvirt/qemu/centos7-vm3.xml
使用USB设备
添加USB设备
先在宿主机配置USB兼容性
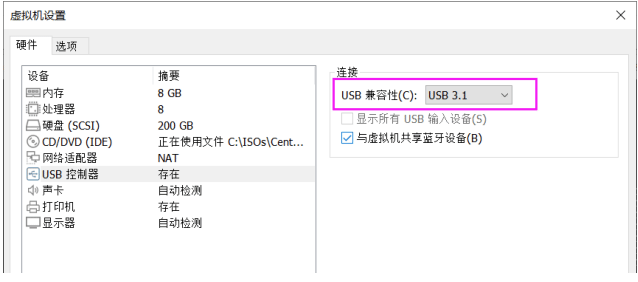
在宿主机接入U盘
[root@centos8 ~]#dmesg
[23687.183727] usb-storage 4-1:1.0: USB Mass Storage device detected
[23687.184183] scsi host3: usb-storage 4-1:1.0
[23687.184720] usbcore: registered new interface driver usb-storage
[23687.188873] usbcore: registered new interface driver uas
[23688.211730] scsi 3:0:0:0: Direct-Access         Kingston DataTraveler 3.0 PMAP
PQ: 0 ANSI: 6
[23688.214257] sd 3:0:0:0: Attached scsi generic sg2 type 0
[23688.216842] sd 3:0:0:0: [sdb] 60555264 512-byte logical blocks: (31.0 GB/28.9
GiB)
[23688.218094] sd 3:0:0:0: [sdb] Write Protect is off
[23688.218097] sd 3:0:0:0: [sdb] Mode Sense: 45 00 00 00
[23688.220335] sd 3:0:0:0: [sdb] Write cache: disabled, read cache: enabled,
doesn't support DPO or FUA
[23688.248203] sdb: sdb1
[23688.257440] sd 3:0:0:0: [sdb] Attached SCSI removable disk
打开virt-manager, 选择某个虚拟机的配置,加添硬件
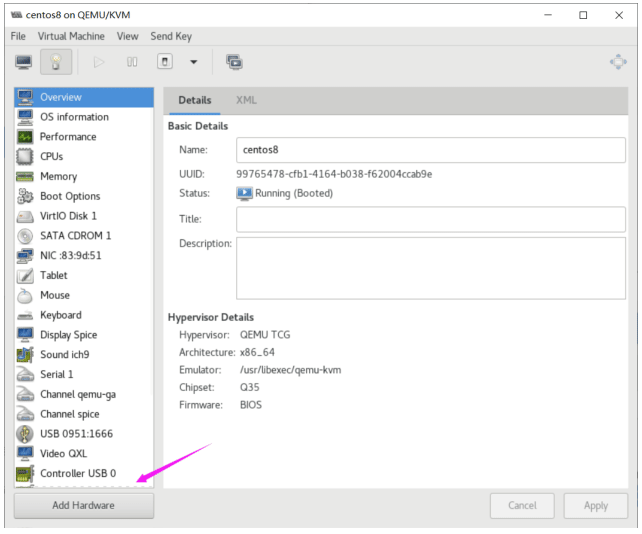
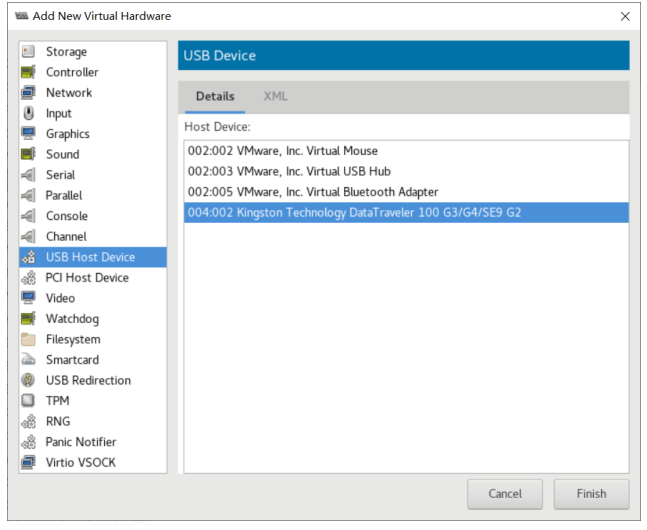
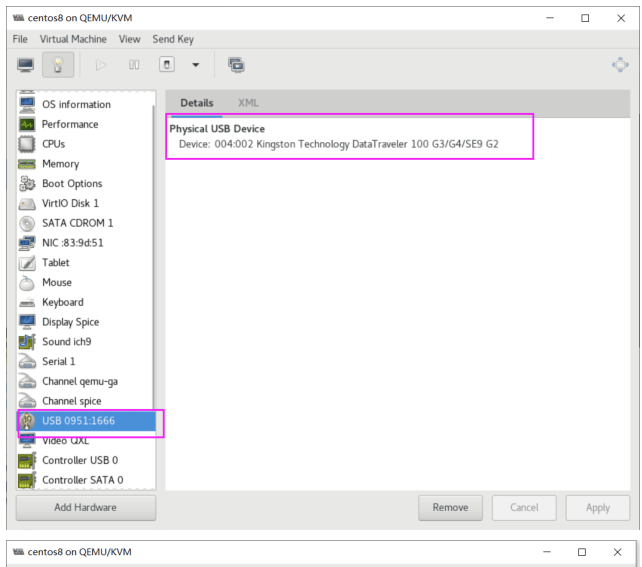
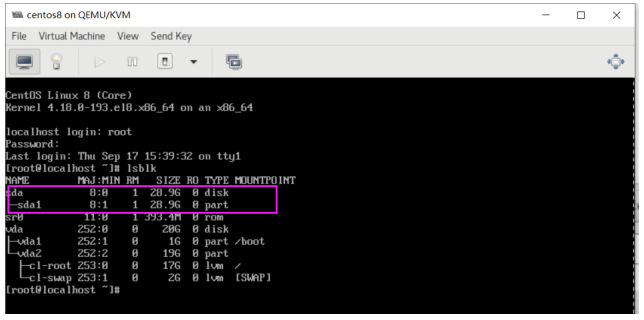
[root@localhost ~]#yum -y install usbutils
[root@localhost ~]# lsusb
Bus 002 Device 002: ID 0951:1666 Kingston Technology DataTraveler 100 G3/G4/SE9
G2
Bus 002 Device 001: ID 1d6b:0003 Linux Foundation 3.0 root hub
Bus 001 Device 002: ID 0627:0001 Adomax Technology Co., Ltd
Bus 001 Device 001: ID 1d6b:0002 Linux Foundation 2.0 root hub
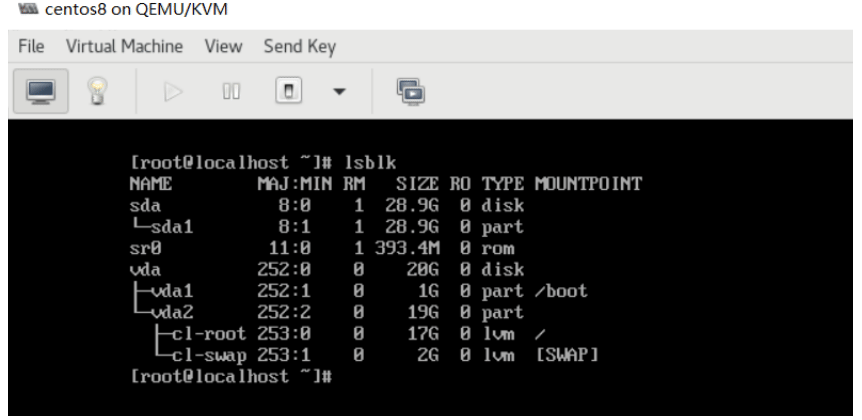
[root@localhost ~]# lsblk
NAME             MAJ:MIN RM     SIZE RO TYPE MOUNTPOINT
sda                     8:0         1     28.9G     0 disk
└─sda1                 8:1         1     28.9G     0 part
sr0                     11:0         1 393.4M     0 rom
vda                 252:0         0     20G     0 disk
├─vda1             252:1         0         1G     0 part /boot
└─vda2             252:2         0     19G     0 part
├─cl-root 253:0         0     17G     0 lvm /
└─cl-swap 253:1         0         2G     0 lvm [SWAP]
重定向USB设备
重定向指将客户端的物理设备重定向到虚拟机中
virt-manager–"Virtual Machine"–"Redirect USB device"


查看到新加的USB设备
远程管理KVM宿主机
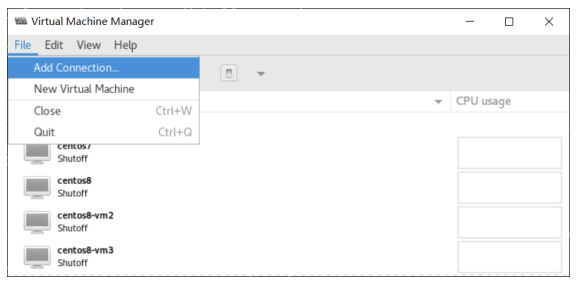
可以连接到远程的宿主机进行虚拟机的管理
export DISPLAY=10.0.0.1:0.0
virt-manager
File–Add Connection
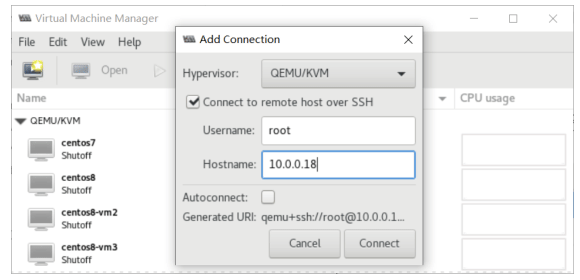
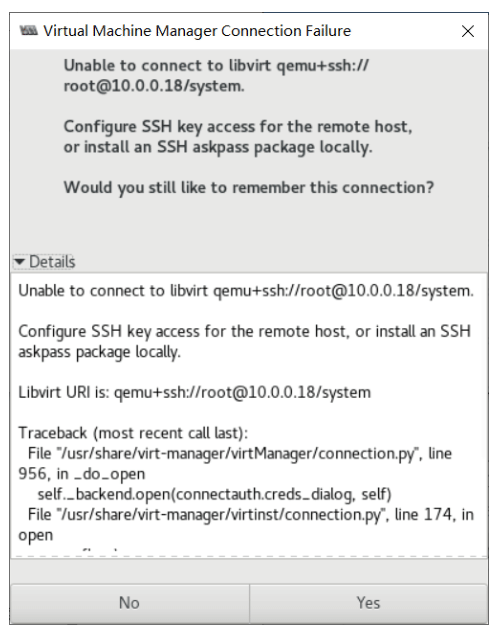
解决上面问题的方法
#方法1:在本机安装openssh-askpass包
[root@centos8 ~]#yum -y install openssh-askpass

#方法2:实现基于本机到远程主机的key验证
[root@centos8 ~]#ssh-copy-id 10.0.0.18
/usr/bin/ssh-copy-id: INFO: Source of key(s) to be installed:
"/root/.ssh/id_rsa.pub"
The authenticity of host '10.0.0.18 (10.0.0.18)' can't be established.
ECDSA key fingerprint is SHA256:divKS+okAaeOzwWk/rHnrmZXWo3DUBPkkAnbofk+rbA.
Are you sure you want to continue connecting (yes/no/[fingerprint])? yes
/usr/bin/ssh-copy-id: INFO: attempting to log in with the new key(s), to filter
out any that are already installed
/usr/bin/ssh-copy-id: INFO: 1 key(s) remain to be installed -- if you are
prompted now it is to install the new keys
[email protected]'s password:
Number of key(s) added: 1
Now try logging into the machine, with:     "ssh '10.0.0.18'"

and check to make sure that only the key(s) you wanted were added.
再次连接成功
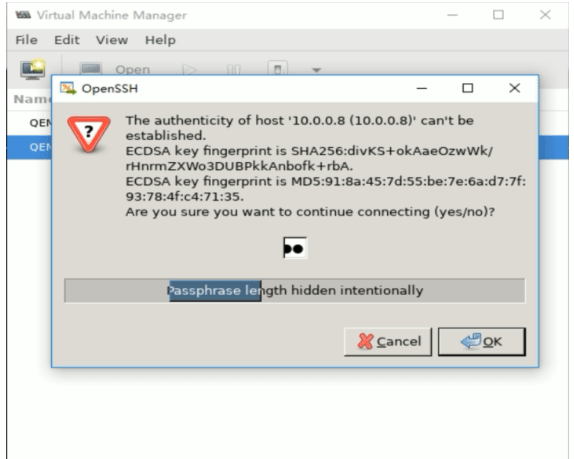
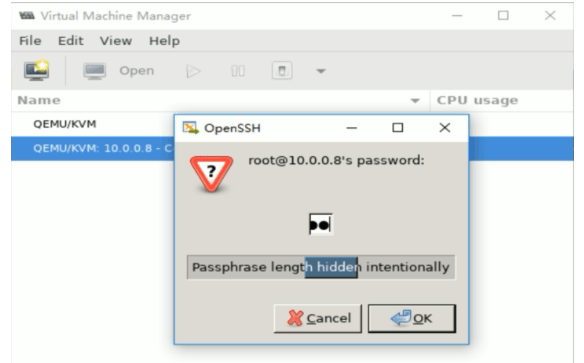
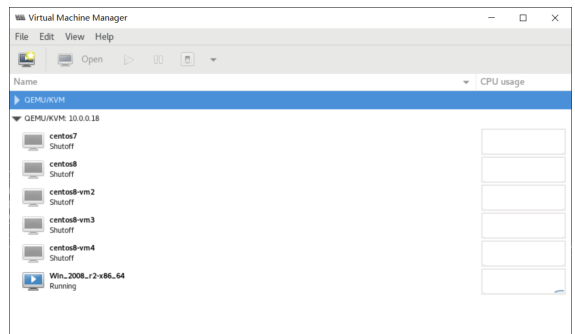
虚拟机的性能监控
先选择需要监控的项目
Edit –Preferences–Polling
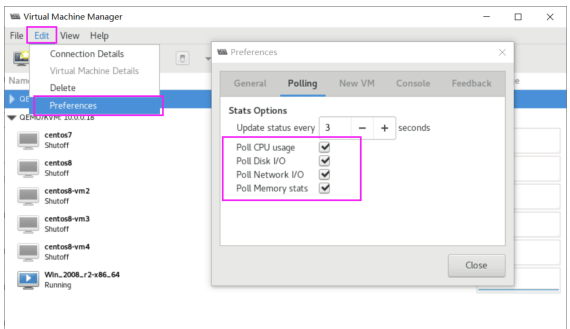
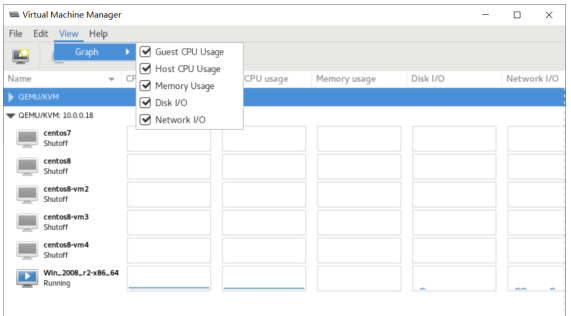
根据上面的项目,选择对应显示的项目(可选项由前一页的项目决定)
dd if=/dev/vda of=/dev/null
virsh 命令行工具
virsh 命令说明
virsh是使用libvirt managementAPI构建的管理工具,相比virt-manager可以提高效率 virsh的名称的含义是virtualization shell
两种工作模式
- 交互模式
- 非交互模式
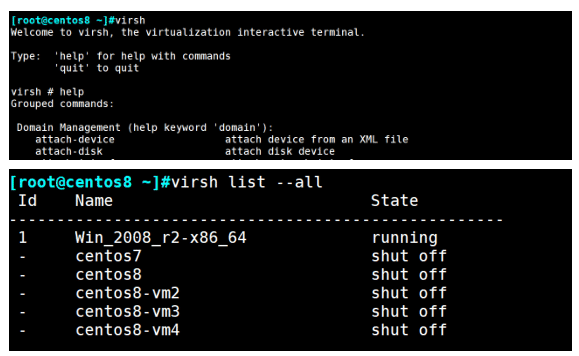
virsh 主要功能
[root@centos8 ~]#virsh help
Domain Management (help keyword 'domain'):
Domain Monitoring (help keyword 'monitor'):
Host and Hypervisor (help keyword 'host'):
Interface (help keyword 'interface'):
Network Filter (help keyword 'filter'):
Networking (help keyword 'network'):
Node Device (help keyword 'nodedev'):
Secret (help keyword 'secret'):
Snapshot (help keyword 'snapshot'):
Storage Pool (help keyword 'pool'):
Storage Volume (help keyword 'volume'):
Virsh itself (help keyword 'virsh'):
virsh 命令格式
[root@centos8 ~]#virsh --help
virsh [options]... [<command_string>]
virsh [options]... <command> [args...]
options:
        -c | --connect=URI         hypervisor connection URI
        -d | --debug=NUM             debug level [0-4]
        -e | --escape <char>         set escape sequence for console
        -h | --help                         this help
        -k | --keepalive-interval=NUM
                                                    keepalive interval in seconds, 0 for disable
        -K | --keepalive-count=NUM
                                                    number of possible missed keepalive messages
        -l | --log=FILE                 output logging to file
        -q | --quiet                     quiet mode
        -r | --readonly                 connect readonly
        -t | --timing                     print timing information
        -v                                         short version
        -V                                         long version
                --version[=TYPE]     version, TYPE is short or long (default short)
virsh 子命令说明
help                                     #打印基本帮助信息
attach-device                      #使用XML文件中的设备定义在虚拟机中添加设备
attach-disk                          #在虚拟机中附加新磁盘设备
attach-interface                  #在虚拟机中附加新网络接口
create                                   #从 XML 配置文件生成虚拟机并启动新虚拟机
define                                   #为虚拟机输出XML配置文件
destroy                                #强制虚拟机停止
detach-device                     #从虚拟机中分离设备,使用同样的XML 描述作为命令attach-device
detach-disk                        #从虚拟机中分离磁盘设备
detach-interface                #从虚拟机中分离网络接口
domblkstat                        #显示正在运行的虚拟机的块设备统计
domid                                #显示虚拟机ID
domifstat                           #显示正在运行的虚拟机的网络接口统计
dominfo                             #显示虚拟机信息
domname                          #显示虚拟机名称
domstate                           #显示虚以机状态
domuuid                            #显示虚拟机UUID
dumpxml                            #输出虚拟机 XML配置文件
list                                       #列出所有虚拟机
migrate                               #将虚拟机迁移到另一台主机中
nodeinfo                              #有关管理程序的输出信息
quit                                     #退出这个互动终端
reboot                                #重新启动虚拟机
restore                               #恢复以前保存在文件中的虚拟机
resume                                #恢复暂停的虚拟机
save                                     #将虚拟机当前状态保存到某个文件中
setmaxmem                        #为管理程序设定内存上限
setmem                               #为虚拟机设定分配的内存
setvcpus                             #修改为虚拟机分配的虚拟CPU数目
shutdown                          #关闭某个虚拟机
start                                     #启动未激活的虚拟机
suspend                             #暂停虚拟机
undefine                            #删除与虚拟机关联的所有文件
vepuinfo                            #显示虚以机的虚拟CPU信息
vcpupin                             #控制虚拟机的虚拟CPU亲和性
version                              #版本
查看子命令帮助
virsh help COMMAND
范例: 查看子命令 list 命令用法
[root@centos8 ~]#virsh help list
NAME
    list - list domains
SYNOPSIS
    list [--inactive] [--all] [--transient] [--persistent] [--with-snapshot] [--
without-snapshot] [--state-running] [--state-paused] [--state-shutoff] [--state-
other] [--autostart] [--no-autostart] [--with-managed-save] [--without-managed-
save] [--uuid] [--name] [--table] [--managed-save] [--title]
DESCRIPTION
    Returns list of domains.
OPTIONS
        --inactive             list inactive domains   列出不活动的虚拟机
        --all                     list inactive & active domains  列出所有
        --transient         list transient domains
        --persistent         list persistent domains
        --with-snapshot list domains with existing snapshot
        --without-snapshot list domains without a snapshot
        --state-running list domains in running state
        --state-paused     list domains in paused state
        --state-shutoff list domains in shutoff state
        --state-other     list domains in other states
        --autostart         list domains with autostart enabled   查看开机自启动的虚拟机
        --no-autostart     list domains with autostart disabled
        --with-managed-save list domains with managed save state
        --without-managed-save list domains without managed save
        --uuid                     list uuid's only
        --name                     list domain names only
        --table                 list table (default)
        --managed-save     mark inactive domains with managed save state
        --title                 show domain title
启动和关闭虚拟机
#查看当前启动的虚拟机
[root@centos8 ~]#virsh list
Id     Name                                                     State
----------------------------------------------------
1         Win_2008_r2-x86_64                         running

#查看所有虚拟机
[root@centos8 ~]#virsh list --all
Id     Name                                                     State
----------------------------------------------------
1         Win_2008_r2-x86_64                         running
-         centos7                                             shut off
-         centos8                                             shut off
-         centos8-vm2                                     shut off
-         centos8-vm3                                     shut off
-         centos8-vm4                                     shut off

#启动
[root@centos8 ~]#virsh start centos8
Domain centos8 started
[root@centos8 ~]#virsh list
Id     Name                                                     State
----------------------------------------------------
1         Win_2008_r2-x86_64                         running
2         centos8                                             running

#正常关机
[root@centos8 ~]#virsh shutdown 1
Domain 1 is being shutdown
[root@centos8 ~]#virsh list
Id     Name                                                     State
----------------------------------------------------
1         Win_2008_r2-x86_64                         running
2         centos8                                             running

#强制关机
[root@centos8 ~]#virsh destroy 1
Domain 1 destroyed
[root@centos8 ~]#virsh list
Id     Name                                                     State
----------------------------------------------------
2         centos8                                             running

[root@centos8 ~]#virsh shutdown 2
Domain 2 is being shutdown
[root@centos8 ~]#virsh list
Id     Name                                                     State
----------------------------------------------------
在virt-manager 中可以看到关机状态
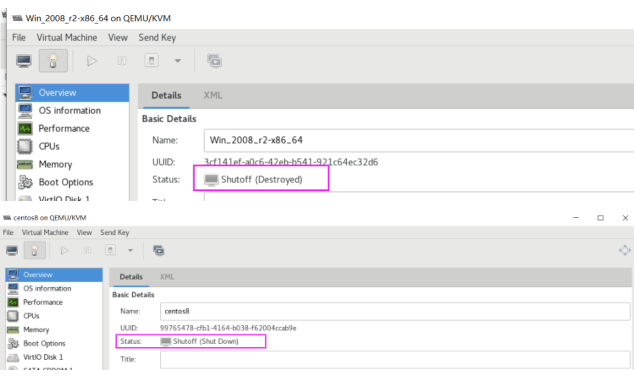
查看虚拟机UUID,通过UUID启动关闭虚拟机
[root@centos8 ~]#virsh list
Id     Name                                                     State
----------------------------------------------------
1         centos8                                             running
#查看虚拟机的UUID
[root@centos8 ~]#virsh domuuid 1
99765478-cfb1-4164-b038-f62004ccab9e
[root@centos8 ~]#virsh destroy 99765478-cfb1-4164-b038-f62004ccab9e
Domain 99765478-cfb1-4164-b038-f62004ccab9e destroyed
[root@centos8 ~]#virsh list
Id     Name                                                     State
----------------------------------------------------
[root@centos8 ~]#virsh list --all
Id     Name                                                     State
----------------------------------------------------
-         centos7                                             shut off
-         centos8                                             shut off
-         centos8-vm2                                     shut off
-         centos8-vm3                                     shut off
-         centos8-vm4                                     shut off
-         Win_2008_r2-x86_64                         shut off

[root@centos8 ~]#virsh domuuid centos8
99765478-cfb1-4164-b038-f62004ccab9e

[root@centos8 ~]#virsh start 99765478-cfb1-4164-b038-f62004ccab9e
Domain centos8 started
[root@centos8 ~]#virsh list
Id     Name                                                     State
----------------------------------------------------
2         centos8                                             running
[root@centos8 ~]#virsh domuuid centos8
99765478-cfb1-4164-b038-f62004ccab9e
暂停和恢复虚拟机
[root@centos8 ~]#virsh list
Id     Name                                                     State
----------------------------------------------------
1         centos8                                             running
[root@centos8 ~]#virsh suspend centos8
Domain centos8 suspended
[root@centos8 ~]#virsh list
Id     Name                                                     State
----------------------------------------------------
1         centos8                                             paused

#虚拟机暂停后,宿主机中还存有相关的进程
[root@centos8 ~]#ps aux|grep kvm
qemu                 1699 36.9 16.0 4439296 1309300 ?         Sl     10:10     5:28
/usr/libexec/qemu-kvm -name guest=centos8,debug-threads=on -S -object
secret,id=masterKey0,format=raw,file=/var/lib/libvirt/qemu/domain-
......
[root@centos8 ~]#virsh resume 1
Domain 1 resumed
[root@centos8 ~]#virsh list
Id     Name                                                     State
----------------------------------------------------
1         centos8                                             running
配置虚拟机开机自动启动
[root@centos8 ~]#virsh list --all
Id     Name                                                     State
----------------------------------------------------
1         Win_2008_r2-x86_64                         running
-         centos7                                             shut off
-         centos8                                             shut off
-         centos8-vm2                                     shut off
-         centos8-vm3                                     shut off
-         centos8-vm4                                     shut off

[root@centos8 ~]#virsh autostart centos8
Domain centos8 marked as autostarted

[root@centos8 ~]#ll /etc/libvirt/qemu/autostart/
total 0
lrwxrwxrwx 1 root root 29 Sep 17 18:53 centos8.xml ->
/etc/libvirt/qemu/centos8.xml
lrwxrwxrwx 1 root root 40 Sep 17 09:18 Win_2008_r2-x86_64.xml ->
/etc/libvirt/qemu/Win_2008_r2-x86_64.xml
[root@centos8 ~]#virsh list
Id     Name                                                     State
----------------------------------------------------
1         Win_2008_r2-x86_64                         running

[root@centos8 ~]#virsh autostart 1 --disable
Domain 1 unmarked as autostarted
[root@centos8 ~]#ll /etc/libvirt/qemu/autostart/
total 0
lrwxrwxrwx 1 root root 29 Sep 17 18:53 centos8.xml ->
/etc/libvirt/qemu/centos8.xml
[root@centos8 ~]#reboot
[root@centos8 ~]#virsh list
Id     Name                                                     State
----------------------------------------------------
1         centos8                                             running
在virt-manager工具中也可以配置开机自启动
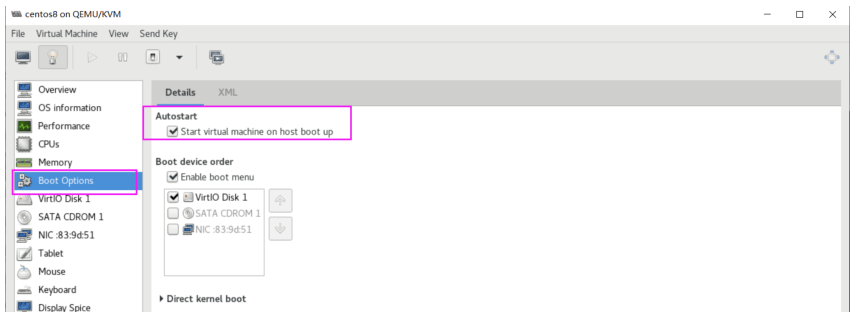
查看虚拟机配置
[root@centos8 ~]#virsh list --all
Id     Name                                                     State
----------------------------------------------------
2         centos8                                             running
-         centos7                                             shut off
-         centos8-vm2                                     shut off
-         centos8-vm3                                     shut off
-         centos8-vm4                                     shut off
-         Win_2008_r2-x86_64                         shut off

#每个虚拟机配置都存放在/etc/libvirt/qemu目录下的xml文件中
[root@centos8 ~]#ls /etc/libvirt/qemu/ -l
total 32
drwxr-xr-x 2 root root     25 Sep 17 18:54 autostart
-rw------- 1 root root 3618 Sep 17 15:14 centos7.xml
-rw------- 1 root root 3673 Sep 13 22:43 centos8-vm2.xml
-rw------- 1 root root 3601 Sep 13 22:42 centos8-vm3.xml
-rw------- 1 root root 3379 Sep 14 00:15 centos8-vm4.xml
-rw------- 1 root root 6024 Sep 17 15:47 centos8.xml
drwx------ 3 root root     42 Sep 13 19:03 networks
-rw------- 1 root root 5369 Sep 17 11:31 Win_2008_r2-x86_64.xml

#查看指定虚拟机的配置,以下命令相当于查看 /etc/libvirt/qemu/centos8.xml
[root@centos8 ~]#virsh dumpxml centos8
<domain type='qemu' id='2'>
<name>centos8</name>
<uuid>99765478-cfb1-4164-b038-f62004ccab9e</uuid>
<metadata>
    <libosinfo:libosinfo
xmlns:libosinfo="http://libosinfo.org/xmlns/libvirt/domain/1.0">
        <libosinfo:os id="http://centos.org/centos/8"/>
    </libosinfo:libosinfo>
</metadata>
<memory unit='KiB'>2097152</memory>
<currentMemory unit='KiB'>2097152</currentMemory>
<vcpu placement='static'>2</vcpu>
<resource>
    <partition>/machine</partition>
</resource>
<os>
    <type arch='x86_64' machine='pc-q35-rhel7.6.0'>hvm</type>
     <boot dev='hd'/>
    <bootmenu enable='yes'/>
</os>
<features>
    <acpi/>
    <apic/>
    <vmport state='off'/>
</features>
<clock offset='utc'>
    <timer name='rtc' tickpolicy='catchup'/>
    <timer name='pit' tickpolicy='delay'/>
    <timer name='hpet' present='no'/>
</clock>
<on_poweroff>destroy</on_poweroff>
<on_reboot>restart</on_reboot>
<on_crash>destroy</on_crash>
<pm>
    <suspend-to-mem enabled='no'/>
    <suspend-to-disk enabled='no'/>
</pm>
<devices>
    <emulator>/usr/libexec/qemu-kvm</emulator>
    <disk type='file' device='disk'>
        <driver name='qemu' type='qcow2'/>
        <source file='/var/lib/libvirt/images/centos8.qcow2'/>
        <backingStore/>
        <target dev='vda' bus='virtio'/>
        <alias name='virtio-disk0'/>
        <address type='pci' domain='0x0000' bus='0x04' slot='0x00'
function='0x0'/>
    </disk>
    <disk type='file' device='cdrom'>
        <driver name='qemu' type='raw'/>
        <source file='/data/isos/virtio-win-0.1.185.iso'/>
        <backingStore/>
        <target dev='sda' bus='sata'/>
        <readonly/>
        <alias name='sata0-0-0'/>
        <address type='drive' controller='0' bus='0' target='0' unit='0'/>
    </disk>
    <controller type='usb' index='0' model='qemu-xhci' ports='15'>
        <alias name='usb'/>
        <address type='pci' domain='0x0000' bus='0x02' slot='0x00'
function='0x0'/>
    </controller>
    <controller type='sata' index='0'>
        <alias name='ide'/>
        <address type='pci' domain='0x0000' bus='0x00' slot='0x1f'
function='0x2'/>
    </controller>
    <controller type='pci' index='0' model='pcie-root'>
        <alias name='pcie.0'/>
    </controller>
    <controller type='pci' index='1' model='pcie-root-port'>
        <model name='pcie-root-port'/>
        <target chassis='1' port='0x10'/>
        <alias name='pci.1'/>
         <address type='pci' domain='0x0000' bus='0x00' slot='0x02' function='0x0'
multifunction='on'/>
    </controller>
    <controller type='pci' index='2' model='pcie-root-port'>
        <model name='pcie-root-port'/>
        <target chassis='2' port='0x11'/>
        <alias name='pci.2'/>
        <address type='pci' domain='0x0000' bus='0x00' slot='0x02'
function='0x1'/>
    </controller>
    <controller type='pci' index='3' model='pcie-root-port'>
        <model name='pcie-root-port'/>
        <target chassis='3' port='0x12'/>
        <alias name='pci.3'/>
        <address type='pci' domain='0x0000' bus='0x00' slot='0x02'
function='0x2'/>
    </controller>
    <controller type='pci' index='4' model='pcie-root-port'>
        <model name='pcie-root-port'/>
        <target chassis='4' port='0x13'/>
        <alias name='pci.4'/>
        <address type='pci' domain='0x0000' bus='0x00' slot='0x02'
function='0x3'/>
    </controller>
    <controller type='pci' index='5' model='pcie-root-port'>
        <model name='pcie-root-port'/>
        <target chassis='5' port='0x14'/>
        <alias name='pci.5'/>
        <address type='pci' domain='0x0000' bus='0x00' slot='0x02'
function='0x4'/>
    </controller>
    <controller type='pci' index='6' model='pcie-root-port'>
        <model name='pcie-root-port'/>
        <target chassis='6' port='0x15'/>
        <alias name='pci.6'/>
        <address type='pci' domain='0x0000' bus='0x00' slot='0x02'
function='0x5'/>
    </controller>
    <controller type='pci' index='7' model='pcie-root-port'>
        <model name='pcie-root-port'/>
        <target chassis='7' port='0x16'/>
        <alias name='pci.7'/>
        <address type='pci' domain='0x0000' bus='0x00' slot='0x02'
function='0x6'/>
    </controller>
    <controller type='virtio-serial' index='0'>
        <alias name='virtio-serial0'/>
        <address type='pci' domain='0x0000' bus='0x03' slot='0x00'
function='0x0'/>
    </controller>
    <interface type='network'>
        <mac address='52:54:00:83:9d:51'/>
        <source network='default' bridge='virbr0'/>
        <target dev='vnet0'/>
        <model type='virtio'/>
        <alias name='net0'/>
        <address type='pci' domain='0x0000' bus='0x01' slot='0x00'
function='0x0'/>
     </interface>
    <serial type='pty'>
        <source path='/dev/pts/0'/>
        <target type='isa-serial' port='0'>
            <model name='isa-serial'/>
        </target>
        <alias name='serial0'/>
    </serial>
    <console type='pty' tty='/dev/pts/0'>
        <source path='/dev/pts/0'/>
        <target type='serial' port='0'/>
        <alias name='serial0'/>
    </console>
    <channel type='unix'>
        <source mode='bind' path='/var/lib/libvirt/qemu/channel/target/domain-2-
centos8/org.qemu.guest_agent.0'/>
        <target type='virtio' name='org.qemu.guest_agent.0' state='disconnected'/>
        <alias name='channel0'/>
        <address type='virtio-serial' controller='0' bus='0' port='1'/>
    </channel>
    <channel type='spicevmc'>
        <target type='virtio' name='com.redhat.spice.0' state='disconnected'/>
        <alias name='channel1'/>
        <address type='virtio-serial' controller='0' bus='0' port='2'/>
    </channel>
    <input type='tablet' bus='usb'>
        <alias name='input0'/>
        <address type='usb' bus='0' port='1'/>
    </input>
    <input type='mouse' bus='ps2'>
        <alias name='input1'/>
    </input>
    <input type='keyboard' bus='ps2'>
        <alias name='input2'/>
    </input>
    <graphics type='spice' port='5900' autoport='yes' listen='127.0.0.1'>
        <listen type='address' address='127.0.0.1'/>
        <image compression='off'/>
    </graphics>
    <sound model='ich9'>
        <alias name='sound0'/>
        <address type='pci' domain='0x0000' bus='0x00' slot='0x1b'
function='0x0'/>
    </sound>
    <video>
        <model type='qxl' ram='65536' vram='65536' vgamem='16384' heads='1'
primary='yes'/>
        <alias name='video0'/>
        <address type='pci' domain='0x0000' bus='0x00' slot='0x01'
function='0x0'/>
    </video>
    <redirdev bus='usb' type='spicevmc'>
        <alias name='redir0'/>
        <address type='usb' bus='0' port='2'/>
    </redirdev>
    <redirdev bus='usb' type='spicevmc'>
        <alias name='redir1'/>
        <address type='usb' bus='0' port='3'/>
    </redirdev>
    <redirdev bus='usb' type='spicevmc'>
        <alias name='redir2'/>
        <address type='usb' bus='0' port='4'/>
    </redirdev>
    <memballoon model='virtio'>
        <alias name='balloon0'/>
        <address type='pci' domain='0x0000' bus='0x05' slot='0x00'
function='0x0'/>
    </memballoon>
    <rng model='virtio'>
        <backend model='random'>/dev/urandom</backend>
        <alias name='rng0'/>
        <address type='pci' domain='0x0000' bus='0x06' slot='0x00'
function='0x0'/>
    </rng>
</devices>
<seclabel type='dynamic' model='dac' relabel='yes'>
    <label>+107:+107</label>
    <imagelabel>+107:+107</imagelabel>
</seclabel>
</domain>
删除虚拟机配置
[root@centos8 ~]#virsh list --all
Id     Name                                                     State
----------------------------------------------------
2         centos8                                             running
-         centos7                                             shut off
-         centos8-vm2                                     shut off
-         centos8-vm3                                     shut off
-         centos8-vm4                                     shut off
-         Win_2008_r2-x86_64                         shut off

#删除虚拟机配置,但不删除磁盘文件
[root@centos8 ~]#virsh undefine centos8-vm4
Domain centos8-vm4 has been undefined
[root@centos8 ~]#virsh list --all
Id     Name                                                     State
----------------------------------------------------
2         centos8                                             running
-         centos7                                             shut off
-         centos8-vm2                                     shut off
-         centos8-vm3                                     shut off
-         Win_2008_r2-x86_64                         shut off

#对应虚拟机xml的配置文件被删除
[root@centos8 ~]#ll /etc/libvirt/qemu/
total 28
drwxr-xr-x 2 root root     25 Sep 17 18:54 autostart
-rw------- 1 root root 3618 Sep 17 15:14 centos7.xml
-rw------- 1 root root 3673 Sep 13 22:43 centos8-vm2.xml
-rw------- 1 root root 3601 Sep 13 22:42 centos8-vm3.xml
-rw------- 1 root root 6024 Sep 17 15:47 centos8.xml
drwx------ 3 root root     42 Sep 13 19:03 networks
-rw------- 1 root root 5369 Sep 17 11:31 Win_2008_r2-x86_64.xml
#对应的磁盘文件并没有删除
[root@centos8 ~]#ls /var/lib/libvirt/images/
centos7.qcow2 centos8.qcow2 centos8-vm2.qcow2 centos8-vm3.qcow2 centos8-
vm4.qcow2 Windows-2008_r2-x86_64.qcow2
存储管理
KVM存储模式
通过存储池来简介存储的管理
基于文件系统的存储
- dir: Filesystem Directory 需要有挂载点的文件系统
fs: Pre-Formatted Block Device
无需挂载的文件系统,如:位于SAN存储的文件系统,可支持多个主机同时访问,而本地文件系统不支持
- netfs: Network Exported Directory 网络文件系统,比如:NFS,SAMBA等
基于设备的存储 无需文件系统,性能更好,但可管理性差,无法实现快照
- Disk: Physical Disk Device
- Iscsi: isCSI Target
- logical:LVM Volume Group
虚拟磁盘类型
固定Fixed
在配置时,指定磁盘大小
不管在虚拟磁盘上实际存储多少数据,都将占用相同大小宿主机的磁盘空间
动态Dynamic
初始空间占用小
随着空间的使用逐渐增长到最大容量,但是只根据需求使用更多的空间
差异Differencing
因为创建是差异磁盘,所以只保存变更的数据
例如,将操作系统安装在父盘,然后创建差异化磁盘来执行进一步配置
虚拟镜像文件格式
镜像文件储存在主机文件系统中。它可以储存在本地文件系统中,如 ext4 或 xfs;或网络文件系统中,如 NFS 。例如 libguestfs 这样的工具,能管理、备份及监控文件。KVM 上的磁盘镜像格式包括:
- raw
此为默认磁盘格式,但并是一种真正的磁盘格式,而是代表虚拟机所使用的原始 镜像,它并不存储元数据,因此可作为保证虚拟机兼容性的候选方案。然而,也 正因为它不存储元数据,因此不支持某些高级特往,比如快照和压缩等格式简单, 容易转换为其他的格式。
如果主机文件系统允许,raw 文件可以是预分配(pre-allocated)或稀疏 (sparse)。稀疏文件根据需求分配主机磁盘空间,因此它是一种精简配置形式 (thin provisioning)。预分配文件的所有空间需要被预先分配,但它比稀疏 文件性能好。当对磁盘I/O 性能要求非常高,而且通常不需要通过网络传输镜像 文件时,可以使用raw文件
优点 : 性能好
缺点 : 空间占用大,功能较少,生产不推荐使用
- cow : copy-on-write格式,昙花一现
- qcow : QEMU早期的copy-on-write格式,过渡性方案
qcow2 qcow2
镜像文件提供许多高级磁盘镜像特征,如快照、压缩及加密。它们可以用来代表通过模板镜像创建的虚拟机。因为只有虚拟机写入的扇区部分才会分配在镜像中,所以 qcow2 文件的网络传输效率较高。RHEL 7.0 及更新版本支持 qcow2 v3 镜像文件格式
按需进行分配磁盘空间,不管文件系统是否支持
支持快照
支持zlib的磁盘压缩
支持AES的加密
优点 : 空间节约,功能丰富
缺点 :性能较差,生产推荐使用
- vmdk( Virtual Machine Disk ): VMware环境当中默认使用的磁盘格式
- vhd \vhdx ( Virtual Hard Disk ):微软默认采用的文件格式
- vdi : VirtualBox 采用的文件格式
查看支持格式
查看帮助:
qemu-img --help
范例: 查看KVM支持的磁盘格式
[root@centos8 ~]#qemu-img --help|grep Support
Supported formats: blkdebug blkreplay blkverify copy-on-read file ftp ftps
gluster host_cdrom host_device http https iscsi iser luks nbd null-aio null-co
nvme qcow2 quorum raw rbd ssh throttle vhdx vmdk vpc
使用qemu-img管理虚拟磁盘文件
qemu-img 概述
qemu-img 是一个功能强大的磁盘镜像管理工具
qemu-img 包括以下子命令
check       #检查完整性
create      #创建镜像
commit   #提交更改
compare  #比较
convert    #转换
info          #获得信息
map         #映射
snapshot #快照管理
rebase     #在已有的镜像的基础上创建新的镜像
resize      #调整大小
amend    #修订镜像格式选项
qemu-img –help
创建虚拟磁盘文件
create [-q] [--object objectdef] [-f fmt] [-b backing_file] [-F backing_fmt] [-u] [-o options] filename [size]
创建默认配置的磁盘
#默认为raw格式稀疏文件
[root@centos8 ~]#qemu-img create vm1.img 1g
Formatting 'vm1.img', fmt=raw size=1073741824
[root@centos8 ~]#file vm1.img
vm1.img: data

#显示文件大小
[root@centos8 ~]#ll -h vm1.img
-rw-r--r-- 1 root root 1.0G Sep 20 12:17 vm1.img

#实际文件只占4k空间
[root@centos8 ~]#du -h vm1.img
4.0K vm1.img

#显示文件信息
[root@centos8 ~]#qemu-img info vm1.img
image: vm1.img
file format: raw
virtual size: 1.0G (1073741824 bytes)
disk size: 4.0K
查看不同磁盘文件格式支持选项
[root@centos8 ~]#qemu-img create -f raw -o ?
Supported options:
size                         Virtual disk size

[root@centos8 ~]#qemu-img create -f qcow2 -o ?
Supported options:
size                         Virtual disk size
compat                     Compatibility level (0.10 or 1.1)
backing_file         File name of a base image
backing_fmt         Image format of the base image
encryption             Encrypt the image with format 'aes'. (Deprecated in favor of
encrypt.format=aes)
encrypt.format     Encrypt the image, format choices: 'aes', 'luks'
encrypt.key-secret ID of secret providing qcow AES key or LUKS passphrase
encrypt.cipher-alg Name of encryption cipher algorithm
encrypt.cipher-mode Name of encryption cipher mode
encrypt.ivgen-alg Name of IV generator algorithm
encrypt.ivgen-hash-alg Name of IV generator hash algorithm
encrypt.hash-alg Name of encryption hash algorithm
encrypt.iter-time Time to spend in PBKDF in milliseconds
cluster_size         qcow2 cluster size
preallocation     Preallocation mode (allowed values: off, metadata, falloc,
full)
lazy_refcounts     Postpone refcount updates
refcount_bits     Width of a reference count entry in bits
qcow2 格式选项
backing_file #指定后端镜像文件。
backing_fmt #设置后端镜像的镜像格式。
cluster_size #设置镜像中的簇大小,取值在512到2M之间,默认值为64K。
preallocation #设置镜像文件空间的预分配模式
encryption #用于设置加密
创建raw格式非稀疏文件
[root@centos8 ~]#dd if=/dev/zero of=vm2.img bs=1M count=1024
1024+0 records in
1024+0 records out
1073741824 bytes (1.1 GB, 1.0 GiB) copied, 3.20332 s, 335 MB/s

[root@centos8 ~]#qemu-img info vm2.img
image: vm2.img
file format: raw
virtual size: 1.0G (1073741824 bytes)
disk size: 1.0G
[root@centos8 ~]#ls -hl vm2.img
-rw-r--r-- 1 root root 1.0G Sep 20 12:31 vm2.img
[root@centos8 ~]#du -h vm2.img
1.0G vm2.img
创建raw格式稀疏文件
[root@centos8 ~]#dd if=/dev/zero of=vm3.img bs=1M count=0 seek=1024
0+0 records in
0+0 records out
0 bytes copied, 9.2173e-05 s, 0.0 kB/s
[root@centos8 ~]#qemu-img info vm3.img
image: vm3.img
file format: raw
virtual size: 1.0G (1073741824 bytes)
disk size: 0

[root@centos8 ~]#ll -h vm3.img
-rw-r--r-- 1 root root 1.0G Sep 20 12:34 vm3.img
[root@centos8 ~]#du -h vm3.img
0 vm3.img
raw文件复制的格式控制
#复制非稀疏文件,默认也为非稀疏文件
[root@centos8 ~]#cp vm2.img vm2.img.bak
[root@centos8 ~]#du -h vm2.img.bak
1.0G vm2.img.bak
[root@centos8 ~]#ll -h vm2.img.bak
-rw-r--r-- 1 root root 1.0G Sep 20 12:38 vm2.img.bak
[root@centos8 ~]#qemu-img info vm2.img.bak
image: vm2.img.bak
file format: raw
virtual size: 1.0G (1073741824 bytes)
disk size: 1.0G

#复制稀疏文件,默认仍为稀疏文件
[root@centos8 ~]#cp vm3.img vm3.img.bak
[root@centos8 ~]#ll -h vm3.img.bak
-rw-r--r-- 1 root root 1.0G Sep 20 12:36 vm3.img.bak
[root@centos8 ~]#du -h vm3.img.bak
0 vm3.img.bak
[root@centos8 ~]#qemu-img info vm3.img.bak
image: vm3.img.bak
file format: raw
virtual size: 1.0G (1073741824 bytes)
disk size: 0

#指定将非稀疏文件复制为稀疏格式格式
[root@centos8 ~]#cp --sparse=always vm2.img vm2.img.bak2
[root@centos8 ~]#qemu-img info vm2.img
image: vm2.img
file format: raw
virtual size: 1.0G (1073741824 bytes)
disk size: 1.0G
[root@centos8 ~]#qemu-img info vm2.img.bak2
image: vm2.img.bak2
file format: raw
virtual size: 1.0G (1073741824 bytes)
disk size: 0

#指定将稀疏文件复制为非稀疏格式格式
[root@centos8 ~]#cp --sparse=never vm3.img vm3.img.bak2
[root@centos8 ~]#qemu-img info vm3.img
image: vm3.img
file format: raw
virtual size: 1.0G (1073741824 bytes)
disk size: 0
[root@centos8 ~]#qemu-img info vm3.img.bak2
image: vm3.img.bak2
file format: raw
virtual size: 1.0G (1073741824 bytes)
disk size: 1.0G
检查虚拟磁盘
对于关机状态的虚拟机磁盘,可以检查文件错误
[root@centos8 ~]#virsh list
Id     Name                                                     State
----------------------------------------------------
2         centos8                                             running
[root@centos8 ~]#qemu-img check /var/lib/libvirt/images/centos8.qcow2
qemu-img: Could not open '/var/lib/libvirt/images/centos8.qcow2': Failed to get
shared "write" lock
Is another process using the image [/var/lib/libvirt/images/centos8.qcow2]?

[root@centos8 ~]#virsh suspend centos8
Domain centos8 suspended
[root@centos8 ~]#virsh list
Id     Name                                                     State
----------------------------------------------------
2         centos8                                             paused

[root@centos8 ~]#qemu-img check /var/lib/libvirt/images/centos8.qcow2
qemu-img: Could not open '/var/lib/libvirt/images/centos8.qcow2': Failed to get
shared "write" lock
Is another process using the image [/var/lib/libvirt/images/centos8.qcow2]?

[root@centos8 ~]#qemu-img check /var/lib/libvirt/images/centos7.qcow2
No errors were found on the image.
25572/327680 = 7.80% allocated, 1.44% fragmented, 0.00% compressed clusters
Image end offset: 1676869632
磁盘预分配策略
raw 文件的预分配策略和文件系统是否支持有关,而qcow2则无关
预分配策略
off
此为缺省策略,即不使用预分配策略,预分配后的虚拟磁盘占用空间很小,不属于稀疏映像类型,生成的磁盘文件很小
metadata
只预分配元数据(metadata),预分配后的磁盘文件属于稀疏映像类型,相当于vmware中的磁盘置备选项: Thin Provision(精简配置)
falloc
分配文件的块并标识它们的状态为未初始化,即只分配空间,但不置零. 预分配后的虚拟磁盘属于非稀疏映像类型,相对full模式来说,创建虚拟磁盘的速度要快很多,相当于vmware中的磁盘置备选项:厚置备延迟置零
full
分配所有磁盘空间并置零,预分配后的虚拟磁盘属于非稀疏映像类型,创建最慢,相当于vmware中的磁盘置备选项: 厚置备置零
范例: 创建预分配置策略
[root@centos8 ~]#qemu-img create -f qcow2 test1.qcow2 1g
Formatting 'test1.qcow2', fmt=qcow2 size=1073741824 cluster_size=65536
lazy_refcounts=off refcount_bits=16

[root@centos8 ~]#qemu-img info test1.qcow2
image: test1.qcow2
file format: qcow2
virtual size: 1.0G (1073741824 bytes)
disk size: 196K
cluster_size: 65536
Format specific information:
    compat: 1.1
    lazy refcounts: false
    refcount bits: 16
    corrupt: false

#指定关闭预分配
[root@centos8 ~]#qemu-img create -f qcow2 test2.qcow2 1g -o preallocation=off
Formatting 'test2.qcow2', fmt=qcow2 size=1073741824 cluster_size=65536
preallocation=off lazy_refcounts=off refcount_bits=16
[root@centos8 ~]#qemu-img info test2.qcow2
image: test2.qcow2
file format: qcow2
virtual size: 1.0G (1073741824 bytes)
disk size: 196K
cluster_size: 65536
Format specific information:
    compat: 1.1
    lazy refcounts: false
    refcount bits: 16
    corrupt: false


#指定预分配metadata
[root@centos8 ~]#qemu-img create -f qcow2 test3.qcow2 1g -o preallocation=metadata
Formatting 'test3.qcow2', fmt=qcow2 size=1073741824 cluster_size=65536
preallocation=metadata lazy_refcounts=off refcount_bits=16

[root@centos8 ~]#qemu-img info test3.qcow2
image: test3.qcow2
file format: qcow2
virtual size: 1.0G (1073741824 bytes)
disk size: 836K
cluster_size: 65536
Format specific information:
    compat: 1.1
    lazy refcounts: false
    refcount bits: 16
    corrupt: false

#指定预分配falloc
[root@centos8 ~]#qemu-img create -f qcow2 test4.qcow2 1g -o preallocation=falloc
Formatting 'test4.qcow2', fmt=qcow2 size=1073741824 cluster_size=65536
preallocation=falloc lazy_refcounts=off refcount_bits=16
[root@centos8 ~]#qemu-img info test4.qcow2
image: test4.qcow2
file format: qcow2
virtual size: 1.0G (1073741824 bytes)
disk size: 1.0G  #占用1g
cluster_size: 65536
Format specific information:
    compat: 1.1
    lazy refcounts: false
    refcount bits: 16
    corrupt: false

#指定预分配full
[root@centos8 ~]#qemu-img create -f qcow2 test5.qcow2 1g -o preallocation=full
Formatting 'test5.qcow2', fmt=qcow2 size=1073741824 cluster_size=65536
preallocation=full lazy_refcounts=off refcount_bits=16
[root@centos8 ~]#qemu-img info test5.qcow2
image: test5.qcow2
file format: qcow2
virtual size: 1.0G (1073741824 bytes)
disk size: 1.0G
cluster_size: 65536
Format specific information:
    compat: 1.1
    lazy refcounts: false
    refcount bits: 16
    corrupt: false

#文件系统显示大小
[root@centos8 ~]#ll -h test*.qcow2
-rw-r--r-- 1 root root 193K Sep 20 13:31 test1.qcow2
-rw-r--r-- 1 root root 193K Sep 20 13:32 test2.qcow2
-rw-r--r-- 1 root root 1.1G Sep 20 13:35 test3.qcow2
-rw-r--r-- 1 root root 1.1G Sep 20 13:36 test4.qcow2
-rw-r--r-- 1 root root 1.1G Sep 20 13:37 test5.qcow2

#查看真实大小
[root@centos8 ~]#du -h test*.qcow2
196K test1.qcow2
196K test2.qcow2
836K test3.qcow2
1.1G test4.qcow2
1.1G test5.qcow2
后备差异虚拟磁盘
后备差异虚拟磁盘介绍
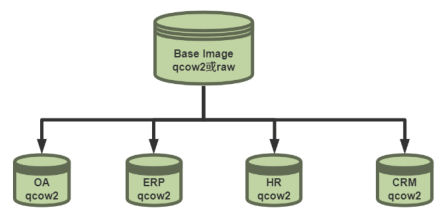
有很多虚拟机中磁盘的内容有很多相同的部分,可以使用后备差异虚拟磁盘节约磁盘的占用
先创建一个镜像磁盘,并在磁盘中安装相同的应用配置,用此磁盘文件做为为模版,在此基础上建立多个后备差异虚拟磁盘文件,再分别分配给需求不同的虚拟机使用,后备差异虚拟磁盘相当于Vmware中的链接克隆
后备差异虚拟磁盘特点
- 存储与基础镜像(父)磁盘的变化
- 基础镜像(父)磁盘不会改变
- 差异磁盘隔离变化
- 多个差异磁盘可以使用相同的基础镜像(父)磁盘
优点: 标准化基础镜像,节省空间
缺点: 增加了开销,较差的性能
创建后备差异虚拟磁盘并用virt-install启动虚拟机
创建后备差异虚拟磁盘命令
qemu-img create -f qcow2     -o backing_file=base.qcow2(或者raw)     diff.qcow2
#注意:模版镜像文件可以是raw或qcow2,但是后备差异磁盘文件必须是qcow2格式
范例:
#创建后备差异虚拟磁盘
[root@centos8 images]#pwd
/var/lib/libvirt/images
[root@centos8 images]# qemu-img create -f qcow2 -o backing_file=centos8.qcow2 centos8-test1.qcow2
Formatting 'centos8-test1.qcow2', fmt=qcow2 size=21474836480
backing_file=centos8.qcow2 cluster_size=65536 lazy_refcounts=off
refcount_bits=16

[root@centos8 images]#qemu-img info centos8-test1.qcow2
image: centos8-test1.qcow2
file format: qcow2
virtual size: 20G (21474836480 bytes)
disk size: 196K
cluster_size: 65536
backing file: centos8.qcow2
Format specific information:
    compat: 1.1
    lazy refcounts: false
    refcount bits: 16
    corrupt: false

[root@centos8 images]#qemu-img info centos8.qcow2
image: centos8.qcow2
file format: qcow2
virtual size: 20G (21474836480 bytes)
disk size: 20G
cluster_size: 65536
Format specific information:
    compat: 1.1
    lazy refcounts: true
    refcount bits: 16
    corrupt: false

[root@centos8 images]#ll -h centos8*
-rw------- 1 qemu qemu 21G Sep 20 13:10 centos8.qcow2
-rw-r--r-- 1 qemu qemu 193K Sep 20 14:08 centos8-test1.qcow2
[root@centos8 ~]#virsh list --all
Id     Name                                                     State
----------------------------------------------------
-         centos7                                             shut off
-         centos8                                             shut off

#基于已安装系统的磁盘文件直接启动虚拟机
#注意模版镜像磁盘对应的虚拟机需要是关机状态才可以创建新的虚拟机
[root@centos8 images]#virt-install --import --name=centos8-test1 --vcpus=1 --ram=2048 --disk path=/var/lib/libvirt/images/centos8-test1.qcow2 --network network=default --graphics vnc,listen=0.0.0.0 --os-type=linux --os-variant=centos8
WARNING Graphics requested but DISPLAY is not set. Not running virt-viewer.
WARNING No console to launch for the guest, defaulting to --wait -1
Starting install...
Domain installation still in progress.
Waiting for installation to complete.

[root@centos8 ~]#virsh list
Id     Name                                                     State
----------------------------------------------------
5         centos8-test1                                 running
[root@centos8 images]#ll -h centos8*
-rw------- 1 qemu qemu 21G Sep 20 13:10 centos8.qcow2
-rw-r--r-- 1 qemu qemu 32M Sep 20 14:06 centos8-test1.qcow2
创建后备差异虚拟磁盘并用virt-manager启动虚拟机
[root@centos8 images]#pwd
/var/lib/libvirt/images
[root@centos8 images]# qemu-img create -f qcow2 -o backing_file=centos8.qcow2 centos8-test2.qcow2
Formatting 'centos8-test2.qcow2', fmt=qcow2 size=21474836480
backing_file=centos8.qcow2 cluster_size=65536 lazy_refcounts=off
refcount_bits=16
[root@centos8 images]#qemu-img info centos8-test2.qcow2
image: centos8-test2.qcow2
file format: qcow2
virtual size: 20G (21474836480 bytes)
disk size: 196K
cluster_size: 65536
backing file: centos8.qcow2
Format specific information:
    compat: 1.1
    lazy refcounts: false
    refcount bits: 16
    corrupt: false

[root@centos8 images]#ll centos8-test2.qcow2 -h
-rw-r--r-- 1 root root 193K Sep 20 15:33 centos8-test2.qcow2
[root@centos8 images]#virt-manager

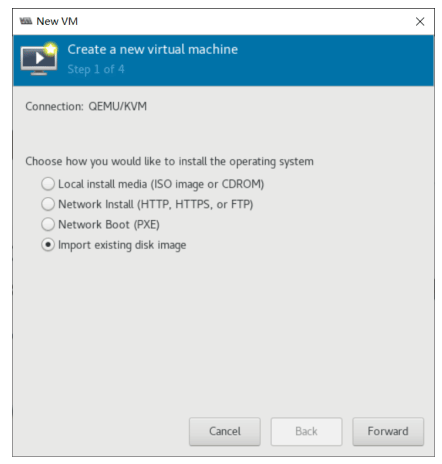
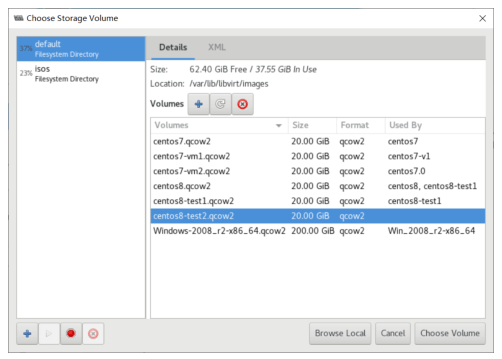
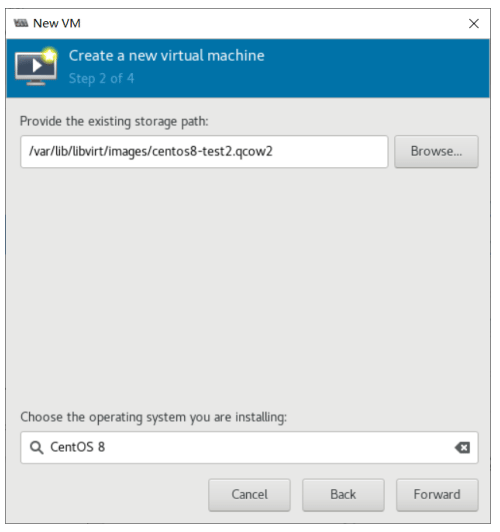
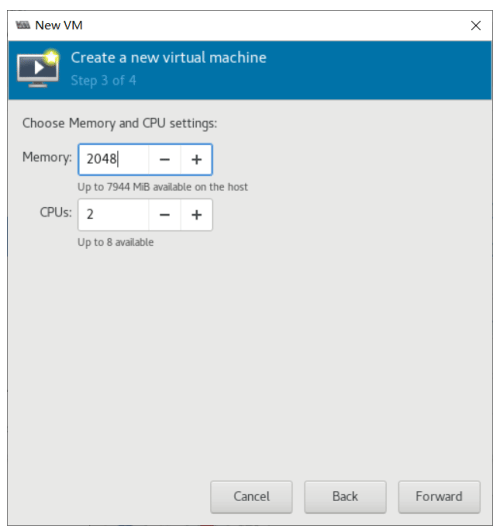
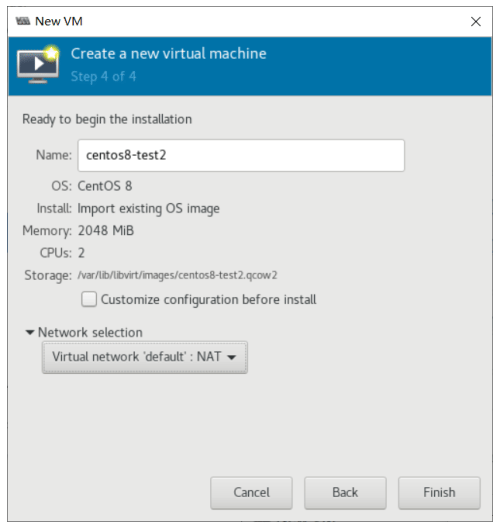
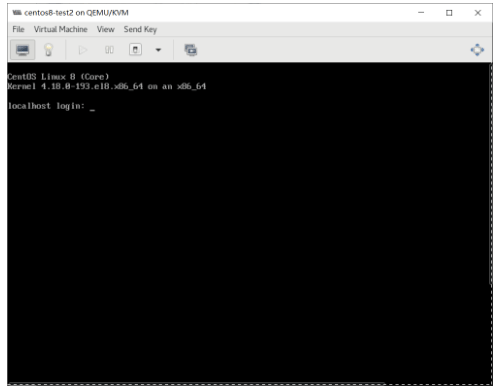
后备差异虚拟磁盘依赖关系
[root@centos8 images]#virsh list
Id     Name                                                     State
----------------------------------------------------
[root@centos8 images]#mv centos8.qcow2 centos8.qcow2.bak

#如果没有基础镜像文件,将无法启动使用后备差异虚拟磁盘的虚拟机
[root@centos8 images]#virsh start centos8-test1
error: Failed to start domain centos8-test1
error: Cannot access backing file '/var/lib/libvirt/images/centos8.qcow2' of
storage file '/var/lib/libvirt/images/centos8-test1.qcow2' (as uid:107,
gid:107): No such file or directory

#恢复基础镜像文件,再次启动虚拟机成功
[root@centos8 images]#mv centos8.qcow2.bak centos8.qcow2
[root@centos8 images]#virsh start centos8-test1
Domain centos8-test1 started
[root@centos8 images]#virsh list
Id     Name                                                     State
----------------------------------------------------
10     centos8-test1                                 running
虚拟磁盘格式转换
qemu-img 可以将不同格式的虚拟磁盘文件进行格式转化
语法格式
qemu-img convert [--object objectdef] [--image-opts] [--target-image-opts] [-U] [-C] [-c] [-p] [-q] [-n] [-f fmt] [-t cache] [-T src_cache] [-O output_fmt] [-B backing_file] [-o options] [-s snapshot_id_or_name] [-l snapshot_param] [-S sparse_size] [-m num_coroutines] [-W] filename [filename2 [...]] output_filename
范例: 将vmdk转化为raw 和qcow2格式
[root@centos8 ~]#qemu-img info CentOS8.2.vmdk
image: CentOS8.2.vmdk
file format: vmdk
virtual size: 200G (214748364800 bytes)
disk size: 1.6G
cluster_size: 65536
Format specific information:
    cid: 2898578192
    parent cid: 4294967295
    create type: monolithicSparse
    extents:
            [0]:
                    virtual size: 214748364800
                    filename: CentOS8.2.vmdk
                    cluster size: 65536
                    format:

#默认转化为raw格式
[root@centos8 ~]#qemu-img convert CentOS8.2.vmdk CentOS8.2.img

#比较大小
[root@centos8 ~]#ll -h CentOS8.2.vmdk CentOS8.2.img
-rw-r--r-- 1 root root 1.6G Sep 20 16:00 CentOS8.2.vmdk
-rw-r--r-- 1 root root 200G Sep 20 16:10 CentOS8.2.img

[root@centos8 ~]#du -h CentOS8.2.vmdk CentOS8.2.img
1.6G CentOS8.2.vmdk
1.5G CentOS8.2.img
[root@centos8 ~]#qemu-img info CentOS8.2.img
image: CentOS8.2.img
file format: raw
virtual size: 200G (214748364800 bytes)
disk size: 1.4G

[root@centos8 ~]#mv CentOS8.2.img /var/lib/libvirt/images/

[root@centos8 ~]#virt-install --import --name=centos8-test2 --vcpus=1 --ram=2048 --disk bus=scsi,path=/var/lib/libvirt/images/CentOS8.2.img --network network=default --graphics vnc,listen=0.0.0.0 --os-type=linux --os-variant=centos8 --noautoconsole --boot hd

#转化为qcow2格式
[root@centos8 ~]#qemu-img convert -f vmdk -O qcow2 CentOS8.2.vmdk CentOS8.2.qcow2

#比较大小
[root@centos8 ~]#ll -h CentOS8.2.vmdk CentOS8.2.qcow2
-rw-r--r-- 1 root root 1.6G Sep 20 16:00 CentOS8.2.vmdk
-rw-r--r-- 1 root root 1.6G Sep 20 16:12 CentOS8.2.qcow2
[root@centos8 ~]#du -h CentOS8.2.vmdk CentOS8.2.qcow2
1.6G CentOS8.2.vmdk
1.6G CentOS8.2.qcow2

[root@centos8 ~]#qemu-img info CentOS8.2.qcow2
image: CentOS8.2.qcow2
file format: qcow2
virtual size: 200G (214748364800 bytes)
disk size: 1.5G
cluster_size: 65536
Format specific information:
    compat: 1.1
    lazy refcounts: false
    refcount bits: 16
    corrupt: false

[root@centos8 ~]#mv CentOS8.2.qcow2 /var/lib/libvirt/images/
[root@centos8 ~]#virt-install --import --name=centos8-test3 --vcpus=1 --ram=2048 --disk bus=scsi,path=/var/lib/libvirt/images/CentOS8.2.qcow2 --network network=default --graphics vnc,listen=0.0.0.0 --os-type=linux --os-variant=centos8 --noautoconsole --boot hd
调整虚拟磁盘大小
虚拟磁盘文件创建后,还可以调整虚拟磁盘大小 语法格式
qemu-img resize [--shrink] filename [+l -]size
- 操作之前,一定要做好数据备份
- 增加文件大小后,需要在客户机中使用fdisk、parted等分区工具进行相应的操作才能真正让客户机使用到增加后的镜像空间。
- 缩小镜像之前,要在客户机中保证里面的文件系统有空余空间,否则会数据丢失。另外xfs文件系统不支持缩减
- qcow2不支持缩小镜像的操作
范例: 扩展虚拟磁盘
[root@centos8 ~]#qemu-img info /var/lib/libvirt/images/centos8.qcow2
image: /var/lib/libvirt/images/centos8.qcow2
file format: qcow2
virtual size: 20G (21474836480 bytes)
disk size: 20G
cluster_size: 65536
Format specific information:
    compat: 1.1
    lazy refcounts: true
    refcount bits: 16
    corrupt: false

#增加10G空间
[root@centos8 ~]#qemu-img resize /var/lib/libvirt/images/centos8.qcow2 +10G
Image resized.

[root@centos8 ~]#qemu-img info /var/lib/libvirt/images/centos8.qcow2
image: /var/lib/libvirt/images/centos8.qcow2
file format: qcow2
virtual size: 30G (32212254720 bytes)
disk size: 20G
cluster_size: 65536
Format specific information:
    compat: 1.1
    lazy refcounts: true
    refcount bits: 16
    corrupt: false
#启动虚拟机后,还需要使用fdisk等工具进行空间的继续管理才能使用
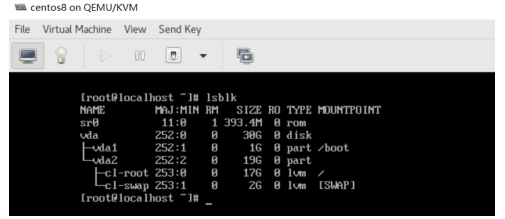
范例: 缩减虚拟磁盘
[root@centos8 images]#qemu-img info centos7.qcow2
image: centos7.qcow2
file format: qcow2
virtual size: 20G (21474836480 bytes)
disk size: 1.6G
cluster_size: 65536
Format specific information:
    compat: 1.1
    lazy refcounts: false
    refcount bits: 16
    corrupt: false

[root@centos8 images]#qemu-img resize --shrink /var/lib/libvirt/images/centos7.qcow2 -2G
Image resized.
[root@centos8 images]#qemu-img info centos7.qcow2
image: centos7.qcow2
file format: qcow2
virtual size: 18G (19327352832 bytes)
disk size: 1.6G
cluster_size: 65536
Format specific information:
    compat: 1.1
    lazy refcounts: false
    refcount bits: 16
    corrupt: false
磁盘快照管理
快照Snapshot介绍
快照分类
磁盘快照
对磁盘数据进行快照
主要用于虚拟机备份等场合
内存快照
对虚拟机的内存/设备信息进行保存
该机制同时用于休眠恢复,迁移等场景
主要使用virsh save ( qemu migrate to file)实现,只能对运行的虚拟机进行
检查点Checkpoint快照
同时保存虚拟机的磁盘快照和内存快照
用于将虚拟机恢复到某个时间点
可以保证数据的一致性
磁盘快照分类
按快照信息保存分为:
内置快照∶快照数据和base磁盘数据放在同一个qcow2文件中
外置快照︰快照数据单独的另一个qcow2文件存放
按虚拟机状态可以分为:
关机态快照︰数据可以保证一致性
运行态快照∶数据无法保证一致性,类似与系统crash后的磁盘数据。使用是可能需要fsck等操作。
按磁盘数量可以分为:
单盘:单盘快照不涉及原子性
多盘:涉及原子性。主要分两个方面:1.是所有盘快照点相同2.所有盘要么都快照成功,要么都快照 失败。主要依赖于qemu的transaction实现
qemu-img 管理磁盘快照
命令格式
qemu-img snapshot [--object objectdef] [--image-opts] [-U] [-q] [-l | -a snapshot | -c snapshot | -d snapshot] filename

Parameters to snapshot subcommand:
  'snapshot' is the name of the snapshot to create, apply or delete
  '-a' applies a snapshot (revert disk to saved state)
  '-c' creates a snapshot
  '-d' deletes a snapshot
  '-l' lists all snapshots in the given image
范例:
#查看块设备
[root@centos8 ~]#virsh domblklist centos7
Target         Source
------------------------------------------------
hda             /var/lib/libvirt/images/centos7.qcow2
hdb                 -

#查看快照,如果没有快照,则无显示信息
[root@centos8 ~]#qemu-img snapshot -l /var/lib/libvirt/images/centos7.qcow2

#创建快照
[root@centos8 ~]#qemu-img snapshot -c centos7-s1 /var/lib/libvirt/images/centos7.qcow2

#查看快照
[root@centos8 ~]#qemu-img snapshot -l /var/lib/libvirt/images/centos7.qcow2
Snapshot list:
ID             TAG                                 VM SIZE                             DATE             VM CLOCK
1                 centos7-s1                                 0 2020-09-20 17:39:59     00:00:00.000

#查看快照信息
[root@centos8 ~]#qemu-img info /var/lib/libvirt/images/centos7.qcow2
image: /var/lib/libvirt/images/centos7.qcow2
file format: qcow2
virtual size: 20G (21474836480 bytes)
disk size: 1.6G
cluster_size: 65536
Snapshot list:
ID             TAG                                 VM SIZE                             DATE             VM CLOCK
1                 centos7-s1                                 0 2020-09-20 17:39:59     00:00:00.000
Format specific information:
    compat: 1.1
    lazy refcounts: false
    refcount bits: 16
    corrupt: false

#删除文件,模拟破坏
#关机后才能还原快照修复故障
[root@centos8 ~]#qemu-img snapshot -a centos7-s1 /var/lib/libvirt/images/centos7.qcow2

#启动虚拟机
virsh start centos8
查看文件恢复

#关机后才能删除快照
[root@centos8 ~]#qemu-img snapshot -d centos7-s1
/var/lib/libvirt/images/centos7.qcow2
[root@centos8 ~]#qemu-img snapshot -l /var/lib/libvirt/images/centos7.qcow2
管理虚拟机快照
[root@centos8 ~]#virsh snapshot-list centos8
Name                                 Creation Time                         State
------------------------------------------------------------

#创建虚拟机快照
[root@centos8 ~]#virsh snapshot-create centos8
Domain snapshot 1600593611 created

[root@centos8 ~]#virsh snapshot-list centos8
Name                                 Creation Time                         State
------------------------------------------------------------
1600593611                     2020-09-20 17:20:11 +0800 shutoff

使用virsh 命令还原快照
[root@centos8 ~]#virsh list
Id     Name                                                     State
----------------------------------------------------

#先关机后再还原快照
[root@centos8 ~]#virsh snapshot-revert centos8 --snapshotname 1600593611 --running
[root@centos8 ~]#virsh list
Id     Name                                                     State
----------------------------------------------------
23     centos7                                             running

#删除快照
[root@centos8 ~]#virsh snapshot-delete centos8 --snapshotname 1600593611
Domain snapshot 1600593611 deleted
[root@centos8 ~]#virsh snapshot-list centos8
Name                                 Creation Time                         State
------------------------------------------------------------
[root@centos8 ~]#
virt-manager 管理快照
虚拟机配置–View–Snapshot
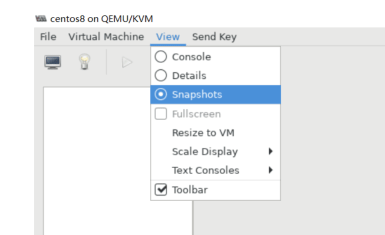
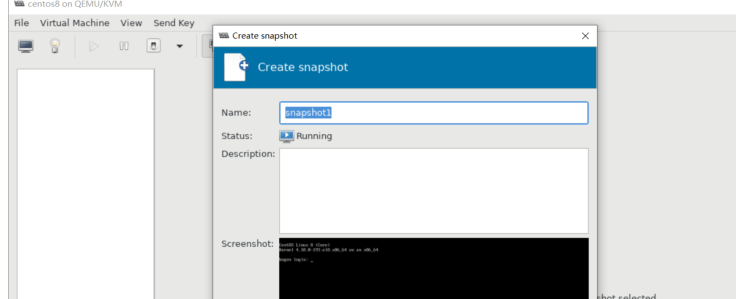
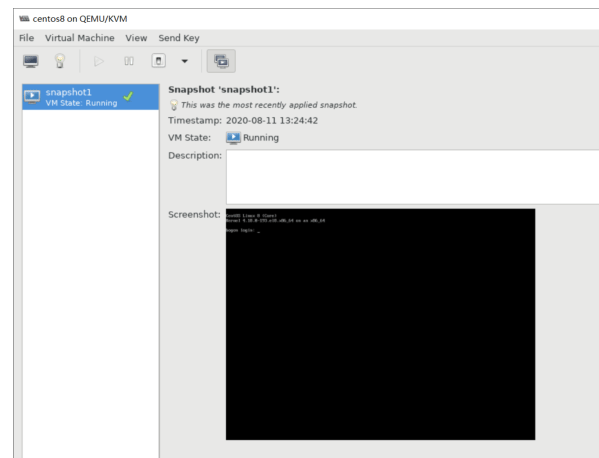
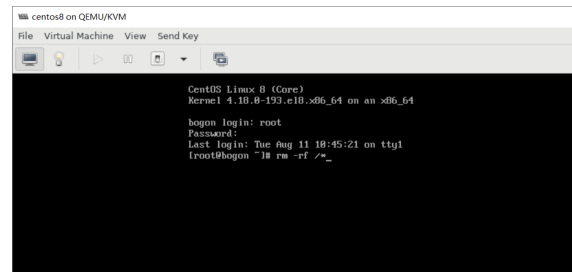
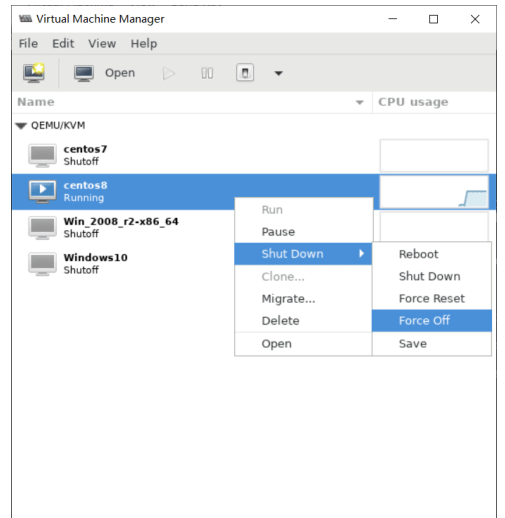
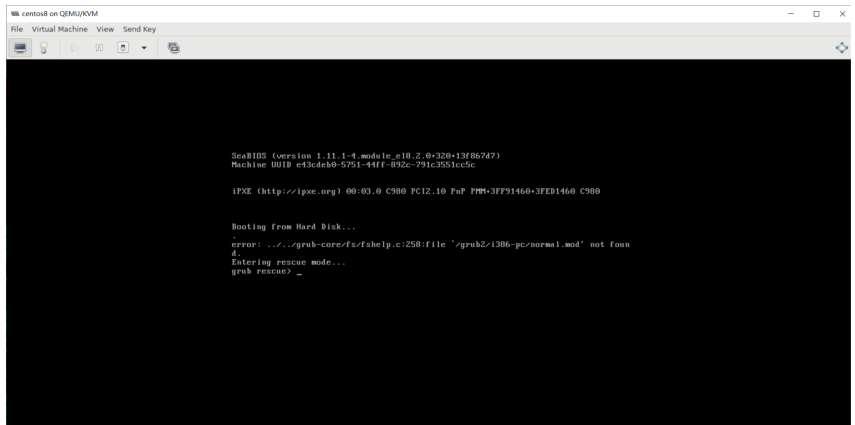
还原快照
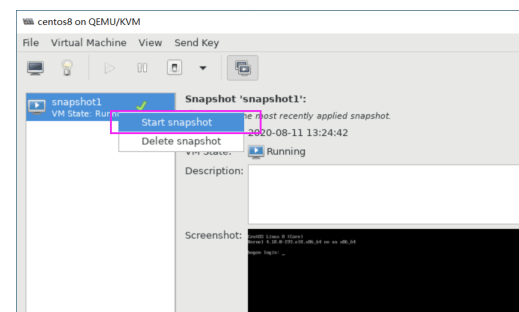

[root@centos8 ~]#ll /var/lib/libvirt/qemu/snapshot/centos8/
total 8
-rw------- 1 root root 5802 Aug 11 13:28 snapshot1.xml
存储池管理
存储池介绍
存储池基本概念
Libvirt可以以存储池的形式对存储进行统一管理、简化操作
对于虚拟机操作,存储池和卷并不是必需的,一个存储池中可以有多个存储卷
支持以下存储池
dir: Filesystem Directory
disk: Physical Disk Device
fs: Pre-Formatted Block Device
gluster: Gluster FileSystem
iscsi: iSCSI Target
logical: LVM Volume Group
mpath: Multipath Device Enumerator
netfs: Network Export Directory
rbd:RADOS Block Device/Ceph
scsi: SCSI Host Adapter
sheepdog: Sheepdog Filesystem #分布式文件系统
virt-manager 可以创建和管理存储池
菜单栏–Edit–Connection Details
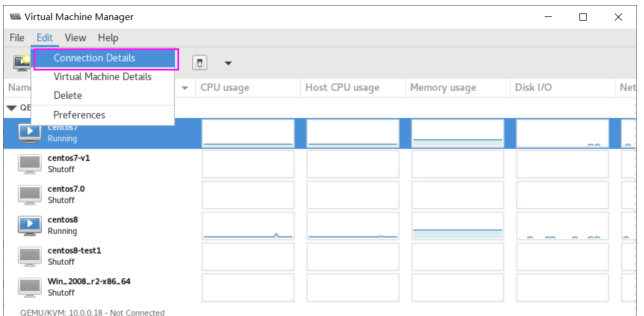
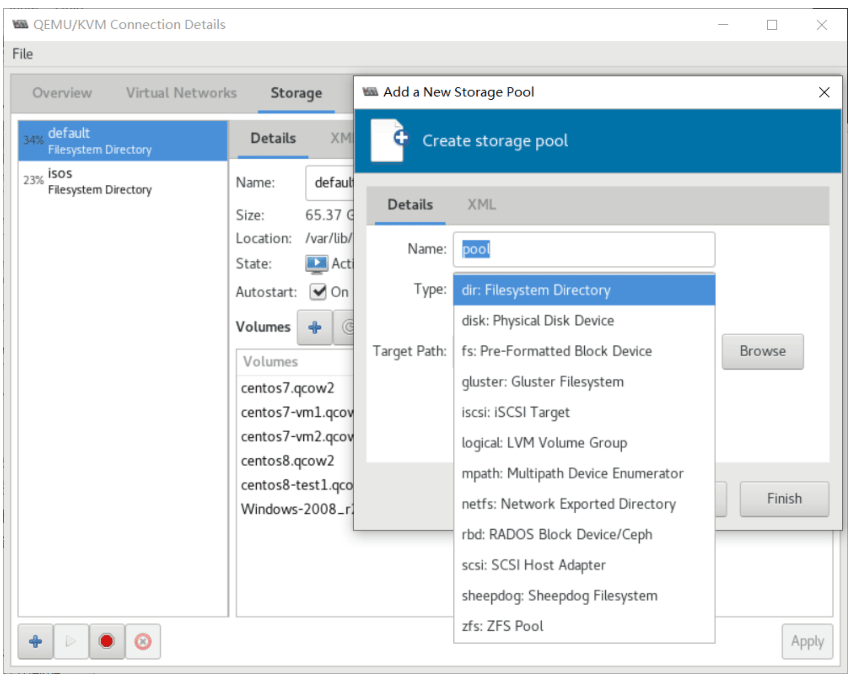
virsh中的存储池相关命令
find-storage-pool-sources-as       #通过参数查找存储池源find potential storage poolsources
find-storage-pool-sources          #通过XML文档查找存储池源找到潜在存储池源
pool-autostart                     #自动启动某个池
pool-build                         #建立池
pool-create-as                     #在一组变量中定义池
pool-create                        #从一个XML文件中创建一个池
pool-define-as                     #从一组变量中创建一个池
pool-define                        #在一个XML文件中定义(但不启动)一个池或修改已经有池
pool-delete                        #删除池
pool-destroy                       #销毁(停止)池
pool-dumpxml                       #将池信息保存到XML文件中的
pool-edit                          #为存储池编辑XML配置
pool-info                          #存储池信息
pool-list                          #列出池
pool-name                          #把一个池名称转换为池UUID
pool-refresh                       #刷新池
pool-start                         #启动一个(以前定义的)非活跃的池
pool-undefine                      #取消定义一个不活跃的池
pool-uuid                          #将池UUID转换为池名称
命令帮助
virsh COMMAND --help
范例:
[root@centos8 ~]#virsh pool-list --help
NAME
    pool-list - list pools
SYNOPSIS
    pool-list [--inactive] [--all] [--transient] [--persistent] [--autostart] [-
-no-autostart] [--type <string>] [--details] [--uuid] [--name]
DESCRIPTION
    Returns list of pools.
OPTIONS
        --inactive             list inactive pools
        --all                     list inactive & active pools
        --transient         list transient pools
        --persistent         list persistent pools
        --autostart         list pools with autostart enabled
        --no-autostart     list pools with autostart disabled
        --type <string> only list pool of specified type(s) (if supported)
        --details             display extended details for pools
        --uuid                     list UUID of active pools only
        --name                     list name of active pools only
显示存储池信息
存储池相关配置文件都在下面目录存放
/etc/libvirt/storage/
范例: 显示存储池
[root@centos8 ~]#virsh pool-list
Name                                 State         Autostart
-------------------------------------------
default                         active         yes
isos                                 active         yes
[root@centos8 ~]#virsh pool-list --uuid
b164fec8-1861-4f07-86ae-5023ea17f925
a707038c-c21b-4570-bdef-d94c00554daa

#通过存储池的名称查找UUID
[root@centos8 ~]#virsh pool-uuid default
b164fec8-1861-4f07-86ae-5023ea17f925

#通过UUID查找存储池的名称
[root@centos8 ~]#virsh pool-name b164fec8-1861-4f07-86ae-5023ea17f925
default

[root@centos8 ~]#virsh pool-info default
Name:                     default
UUID:                     b164fec8-1861-4f07-86ae-5023ea17f925
State:                 running
Persistent:         yes
Autostart:             yes
Capacity:             99.95 GiB
Allocation:         34.58 GiB
Available:             65.37 GiB

#每个存储池对应的配置文件
[root@centos8 ~]#ll /etc/libvirt/storage/
total 8
drwxr-xr-x 2 root root     41 Sep 13 19:28 autostart
-rw------- 1 root root 538 Sep 13 19:05 default.xml
-rw------- 1 root root 519 Sep 13 19:28 isos.xml

#开机加载存储池
[root@centos8 ~]#ll /etc/libvirt/storage/autostart/
total 0
lrwxrwxrwx 1 root root 32 Sep 13 19:05 default.xml ->/etc/libvirt/storage/default.xml
lrwxrwxrwx 1 root root 29 Sep 13 19:28 isos.xml -> /etc/libvirt/storage/isos.xml

[root@centos8 ~]#cat /etc/libvirt/storage/default.xml
<!--
WARNING: THIS IS AN AUTO-GENERATED FILE. CHANGES TO IT ARE LIKELY TO BE
OVERWRITTEN AND LOST. Changes to this xml configuration should be made using:
virsh pool-edit default
or other application using the libvirt API.
-->
<pool type='dir'>
<name>default</name>
<uuid>b164fec8-1861-4f07-86ae-5023ea17f925</uuid>
<capacity unit='bytes'>0</capacity>
<allocation unit='bytes'>0</allocation>
<available unit='bytes'>0</available>
<source>
</source>
<target>
    <path>/var/lib/libvirt/images</path>
</target>
</pool>

[root@centos8 ~]#cat /etc/libvirt/storage/isos.xml
<!--
WARNING: THIS IS AN AUTO-GENERATED FILE. CHANGES TO IT ARE LIKELY TO BE
OVERWRITTEN AND LOST. Changes to this xml configuration should be made using:
virsh pool-edit isos
or other application using the libvirt API.
-->
<pool type='dir'>
<name>isos</name>
<uuid>a707038c-c21b-4570-bdef-d94c00554daa</uuid>
<capacity unit='bytes'>0</capacity>
<allocation unit='bytes'>0</allocation>
<available unit='bytes'>0</available>
<source>
</source>
<target>
    <path>/data/isos</path>
</target>
</pool>
基于目录的存储池
创建存储池
#目录需要事先创建,否则虽然可以创建存储池,但无法直接启动,后期也可以先创建存储池,再使用 pool-build 自动创建目录
[root@centos8 ~]#mkdir /data/vm_images

#基于安装考虚可以设置权限
[root@centos8 ~]#chmod 700 /data/vm_images

#查看帮助
[root@centos8 ~]#virsh pool-define-as --help

#创建存储池
[root@centos8 ~]#virsh pool-define-as vm_images dir --target /data/vm_images
Pool vm_images defined

[root@centos8 ~]#virsh pool-list
Name                                 State         Autostart
-------------------------------------------
default                         active         yes
isos                                 active         yes
[root@centos8 ~]#virsh pool-list --all
Name                                 State         Autostart
-------------------------------------------
default                         active         yes
isos                                 active         yes
vm_images                     inactive     no

#激活存储池
[root@centos8 ~]#virsh pool-start vm_images
Pool vm_images started
[root@centos8 ~]#virsh pool-list
Name                                 State         Autostart
-------------------------------------------
default                         active         yes
isos                                 active         yes
vm_images                     active         no

#激活存储池,并开机启动
[root@centos8 ~]#virsh pool-autostart vm_images
Pool vm_images marked as autostarted

[root@centos8 ~]#virsh pool-list
Name                                 State         Autostart
-------------------------------------------
default                         active         yes
isos                                 active         yes
vm_images                     active         yes
[root@centos8 ~]#ll /etc/libvirt/storage/
total 12
drwxr-xr-x 2 root root     62 Sep 20 18:44 autostart
-rw------- 1 root root 538 Sep 13 19:05 default.xml
-rw------- 1 root root 519 Sep 13 19:28 isos.xml
-rw------- 1 root root 534 Sep 20 18:42 vm_images.xml

[root@centos8 ~]#cat /etc/libvirt/storage/vm_images.xml
<!--
WARNING: THIS IS AN AUTO-GENERATED FILE. CHANGES TO IT ARE LIKELY TO BE
OVERWRITTEN AND LOST. Changes to this xml configuration should be made using:
virsh pool-edit vm_images
or other application using the libvirt API.
-->
<pool type='dir'>
<name>vm_images</name>
<uuid>cc851d99-1726-4cf9-8853-820441585bfa</uuid>
<capacity unit='bytes'>0</capacity>
<allocation unit='bytes'>0</allocation>
<available unit='bytes'>0</available>
<source>
</source>
<target>
    <path>/data/vm_images</path>
</target>
</pool>
在virt-manager 工具可以管理和查看存储池
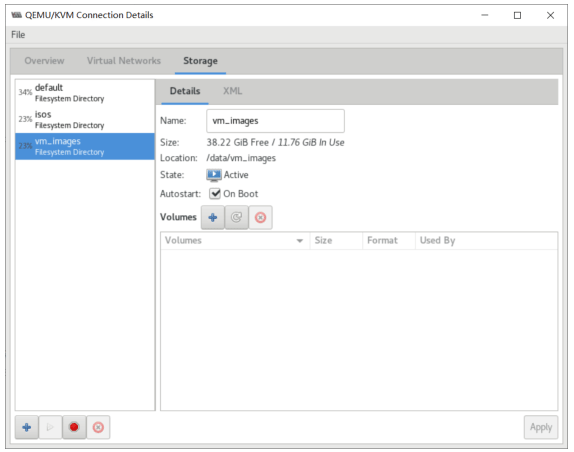
删除存储池
#先停止存储池后才能删除
[root@centos8 ~]#virsh pool-destroy --pool vm_images
Pool vm_images destroyed

[root@centos8 ~]#virsh pool-list --all
Name                                 State         Autostart
-------------------------------------------
default                         active         yes
isos                                 active         yes
vm_images                     inactive     yes

#删除存储池的相关数据目录
[root@centos8 ~]#virsh pool-delete --pool vm_images
Pool vm_images deleted
[root@centos8 ~]#ls /data
isos

#但存储池的配置还在
[root@centos8 ~]#virsh pool-list --all
Name                                 State         Autostart
-------------------------------------------
default                         active         yes
isos                                 active         yes
vm_images                     inactive     yes

#删除存储池配置文件
[root@centos8 ~]#virsh pool-undefine --pool vm_images
Pool vm_images has been undefined
[root@centos8 ~]#virsh pool-list --all
Name                                 State         Autostart
-------------------------------------------
default                         active         yes
isos                                 active         yes

[root@centos8 ~]#ll /etc/libvirt/storage/
total 8
drwxr-xr-x 2 root root     41 Sep 20 18:54 autostart
-rw------- 1 root root 538 Sep 13 19:05 default.xml
-rw------- 1 root root 519 Sep 13 19:28 isos.xml
基于文件系统的存储池
实现基于文件系统的存储池过程
准备分区并创建文件系统
fdisk /dev/sda
mkfs.ext4 /dev/sda6
- 准备存储池的挂载点目录 mkdir /vm_images
创建分区的存储池
virsh pool-define-as vm_images_fs fs --source-dev "/dev/sda6" --target "/vm_images"
#Source Path:块设备名
#Target Path : mount到的目录名
#libvirtd 会自动 mount 分区
管理基于分区的存储池
[root@centos8 ~]#lsblk
NAME     MAJ:MIN RM SIZE RO TYPE MOUNTPOINT
sda             8:0         0 200G     0 disk
├─sda1     8:1         0     1G     0 part /boot
├─sda2     8:2         0 100G     0 part /
├─sda3     8:3         0     50G     0 part /data
├─sda4     8:4         0     1K     0 part
└─sda5     8:5         0     2G     0 part [SWAP]
sr0         11:0         1     7.7G     0 rom

[root@centos8 ~]#fdisk /dev/sda

Command (m for help): n
All primary partitions are in use.
Adding logical partition 6
First sector (320870400-419430399, default 320870400):
Last sector, +sectors or +size{K,M,G,T,P} (320870400-419430399, default
419430399): +10G
Created a new partition 6 of type 'Linux' and of size 10 GiB.
Command (m for help): w
The partition table has been altered.
Syncing disks.

[root@centos8 ~]#mkfs.ext4 /dev/sda6

[root@centos8 ~]#lsblk
NAME     MAJ:MIN RM SIZE RO TYPE MOUNTPOINT
sda             8:0         0 200G     0 disk
├─sda1     8:1         0     1G     0 part /boot
├─sda2     8:2         0 100G     0 part /
├─sda3     8:3         0     50G     0 part /data
├─sda4     8:4         0     1K     0 part
├─sda5     8:5         0     2G     0 part [SWAP]
└─sda6     8:6         0     10G     0 part
sr0         11:0         1     7.7G     0 rom

#创建存储池定义
[root@centos8 ~]#virsh pool-define-as vm_images_fs fs --source-dev "/dev/sda6" --target "/vm_images"
Pool vm_images_fs defined

[root@centos8 ~]#virsh pool-list --all
Name                                 State         Autostart
-------------------------------------------
default                         active         yes
isos                                 active         yes
vm_images_fs                 inactive     no
[root@centos8 ~]#df
Filesystem         1K-blocks         Used Available Use% Mounted on
devtmpfs                 4050832                 0     4050832     0% /dev
tmpfs                         4067612                 0     4067612     0% /dev/shm
tmpfs                         4067612         9380     4058232     1% /run
tmpfs                         4067612                 0     4067612     0% /sys/fs/cgroup
/dev/sda2             104806400 36337664     68468736     35% /
/dev/sda3             52403200 12331584     40071616     24% /data
/dev/sda1                 999320     120528         809980     13% /boot
tmpfs                         813520                 8         813512     1% /run/user/0

#因为没有挂载点无法启动
[root@centos8 ~]#virsh pool-start vm_images_fs
error: Failed to start pool vm_images_fs
error: internal error: Child process (/usr/bin/mount -t auto /dev/sda6
/vm_images) unexpected exit status 32: mount: /vm_images: mount point does not
exist.

#构建存储池会自动创建挂截点
[root@centos8 ~]#virsh pool-build vm_images_fs
Pool vm_images_fs built
[root@centos8 ~]#ll -d /vm_images/
drwx--x--x 2 root root 6 Sep 20 19:18 /vm_images/

#启动存储池,自动挂载
[root@centos8 ~]#virsh pool-start vm_images_fs
Pool vm_images_fs started
[root@centos8 ~]#df
Filesystem         1K-blocks         Used Available Use% Mounted on
devtmpfs                 4050832                 0     4050832     0% /dev
tmpfs                         4067612                 0     4067612     0% /dev/shm
tmpfs                         4067612         9384     4058228     1% /run
tmpfs                         4067612                 0     4067612     0% /sys/fs/cgroup
/dev/sda2             104806400 36337648     68468752     35% /
/dev/sda3             52403200 12331584     40071616     24% /data
/dev/sda1                 999320     120528         809980     13% /boot
tmpfs                         813520                 8         813512     1% /run/user/0
/dev/sda6             10255636         36888     9678076     1% /vm_images

[root@centos8 ~]#virsh pool-info vm_images_fs
Name:                     vm_images_fs
UUID:                     157759a3-46ce-49ed-ba9d-eaf71c6dde30
State:                 running
Persistent:         yes
Autostart:         no
Capacity:             9.78 GiB
Allocation:         36.02 MiB
Available:             9.75 GiB
[root@centos8 ~]#virsh pool-list --all
Name                                 State         Autostart
-------------------------------------------
default                         active         yes
isos                                 active         yes
vm_images_fs                 active         no

#由于没有设为自动启动,重启后不会挂载
[root@centos8 ~]#reboot
[root@centos8 ~]#df
Filesystem         1K-blocks         Used Available Use% Mounted on
devtmpfs                 4050832                 0     4050832     0% /dev
tmpfs                         4067612                 0     4067612     0% /dev/shm
tmpfs                         4067612         9372     4058240     1% /run
tmpfs                         4067612                 0     4067612     0% /sys/fs/cgroup
/dev/sda2             104806400 36339572     68466828     35% /
/dev/sda3             52403200 12331584     40071616     24% /data
/dev/sda1                 999320     120528         809980     13% /boot
tmpfs                         813520                 0         813520     0% /run/user/0
[root@centos8 ~]#virsh pool-list --all
Name                                 State         Autostart
-------------------------------------------
default                         active         yes
isos                                 active         yes
vm_images_fs                 inactive     no

#设为自动启动
[root@centos8 ~]#virsh pool-autostart vm_images_fs
Pool vm_images_fs marked as autostarted
[root@centos8 ~]#virsh pool-list --all
Name                                 State         Autostart
-------------------------------------------
default                         active         yes
isos                                 active         yes
vm_images_fs                 inactive     yes

#重新启动自动启动存储池并挂载
[root@centos8 ~]#reboot
[root@centos8 ~]#virsh pool-list
Name                                 State         Autostart
-------------------------------------------
default                         active         yes
isos                                 active         yes
vm_images_fs                 active         yes
[root@centos8 ~]#df
Filesystem         1K-blocks         Used Available Use% Mounted on
devtmpfs                 4050824                 0     4050824     0% /dev
tmpfs                         4067604                 0     4067604     0% /dev/shm
tmpfs                         4067604         9364     4058240     1% /run
tmpfs                         4067604                 0     4067604     0% /sys/fs/cgroup
/dev/sda2             104806400 36340572     68465828     35% /
/dev/sda3             52403200 12331584     40071616     24% /data
/dev/sda1                 999320     120528         809980     13% /boot
/dev/sda6             10255636         36888     9678076     1% /vm_images
tmpfs                         813520                 0         813520     0% /run/user/0
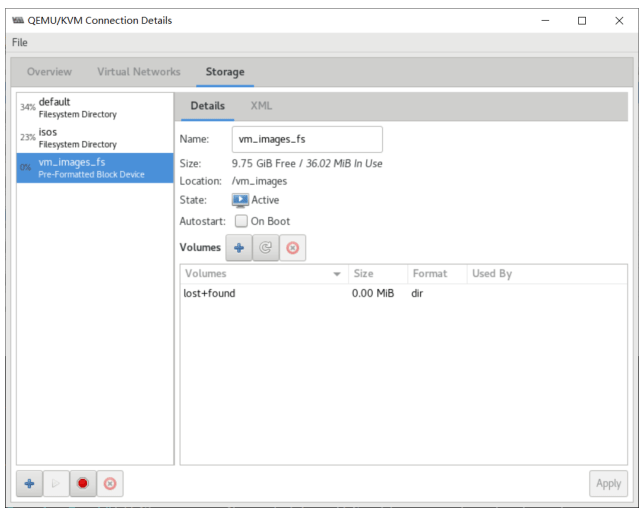
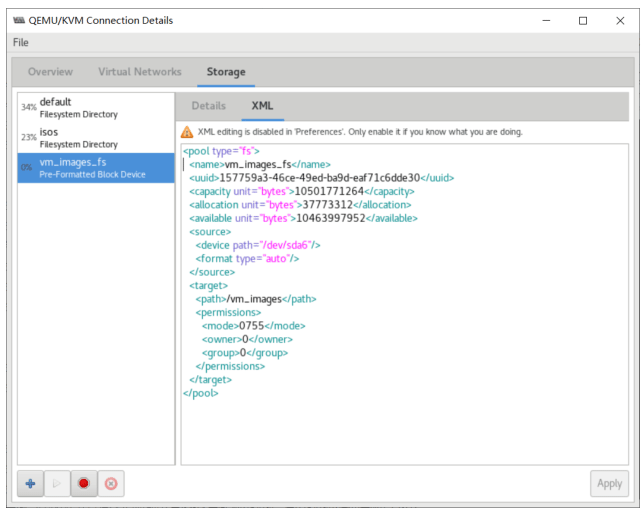
删除基于分区的存储池
[root@centos8 ~]#virsh pool-destroy vm_images_fs
Pool vm_images_fs destroyed

[root@centos8 ~]#virsh pool-delete vm_images_fs
Pool vm_images_fs deleted

[root@centos8 ~]#virsh pool-undefine vm_images_fs
Pool vm_images_fs has been undefined

[root@centos8 ~]#df
Filesystem         1K-blocks         Used Available Use% Mounted on
devtmpfs                 4050824                 0     4050824     0% /dev
tmpfs                         4067604                 0     4067604     0% /dev/shm
tmpfs                         4067604         9360     4058244     1% /run
tmpfs                         4067604                 0     4067604     0% /sys/fs/cgroup
/dev/sda2             104806400 36340696     68465704     35% /
/dev/sda3             52403200 12331584     40071616     24% /data
/dev/sda1                 999320     120528         809980     13% /boot
tmpfs                         813520                 0         813520     0% /run/user/0
[root@centos8 ~]#ll /vm_images/
total 0
[root@centos8 ~]#virsh pool-list --all
Name                                 State         Autostart
-------------------------------------------
default                         active         yes
isos                                 active         yes
[root@centos8 ~]#ll /etc/libvirt/storage/
total 8
drwxr-xr-x 2 root root     41 Sep 20 19:30 autostart
-rw------- 1 root root 538 Sep 13 19:05 default.xml
-rw------- 1 root root 519 Sep 13 19:28 isos.xml
基于磁盘的存储池
创建前需要添加新的磁盘
[root@centos8 ~]#lsblk
NAME     MAJ:MIN RM SIZE RO TYPE MOUNTPOINT
sda             8:0         0 200G     0 disk
├─sda1     8:1         0     1G     0 part /boot
├─sda2     8:2         0 100G     0 part /
├─sda3     8:3         0     50G     0 part /data
├─sda4     8:4         0     1K     0 part
├─sda5     8:5         0     2G     0 part [SWAP]
└─sda6     8:6         0     10G     0 part
sdb             8:16     0     20G     0 disk #新添加的磁盘
sr0         11:0         1     7.7G     0 rom

[root@centos8 ~]#parted /dev/sdb mklabel gpt
Information: You may need to update /etc/fstab.

[root@centos8 ~]#parted /dev/sdb print
Model: VMware, VMware Virtual S (scsi)
Disk /dev/sdb: 21.5GB
Sector size (logical/physical): 512B/512B
Partition Table: gpt
Disk Flags:
Number Start End Size File system Name Flags

#准备磁盘存储池对应的xml文件
[root@centos8 ~]#vim vm_images_disk.xml
[root@centos8 ~]#cat vm_images_disk.xml
<pool type='disk'>
<name>vm_images_disk</name>
<source>
    <device path='/dev/sdb'/>
    <format type='gpt'/>
</source>
<target>
    <path>/dev</path>
</target>
</pool>

#基于XML创建存储池
[root@centos8 ~]#virsh pool-define vm_images_disk.xml
Pool vm_images_disk defined from vm_images_disk.xml
[root@centos8 ~]#virsh pool-start vm_images_disk
Pool vm_images_disk started
[root@centos8 ~]#virsh pool-list
Name                                 State         Autostart
default                         active         yes
isos                                 active         yes
vm_images_disk             active         no
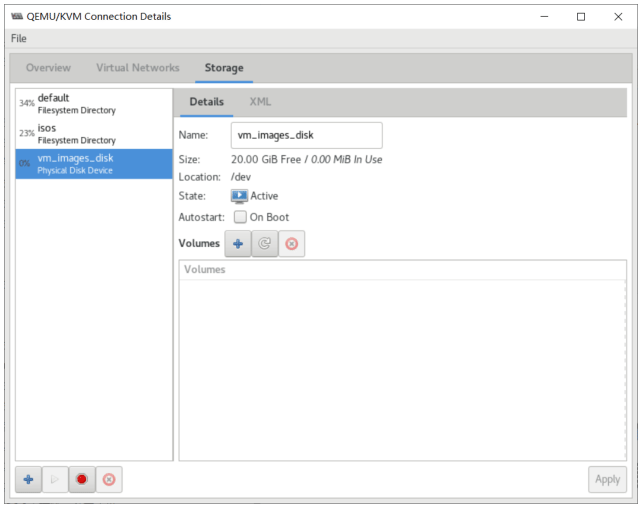
#停止存储池
[root@centos8 ~]#virsh pool-destroy vm_images_disk
Pool vm_images_disk destroyed
#再删除,注意基于磁盘的存储池不支持pool-delete
[root@centos8 ~]#virsh pool-undefine vm_images_disk
Pool vm_images_disk has been undefined
[root@centos8 ~]#virsh pool-list
Name                                 State         Autostart
-------------------------------------------
default                         active         yes
isos                                 active         yes
基于LVM的存储池
基于LVM的存储池要求使用VG中的全部磁盘空间
创建存储池,有两种方法
- 创建新的 VG 创建存储池
- 使用现有的 VG 创建存储池
无存在的卷组直接创建存储池
#source-dev 指定硬盘设备,事先无卷组时此项才需要指定
#source-name 指定已有卷组名,此项利用已有卷组创建存储池才需指定,事先无卷组无需指定

[root@centos8 ~]#pvs
[root@centos8 ~]#virsh pool-define-as vm_images_lvm logical --source-dev=/dev/sdb
Pool vm_images_lvm defined

#无卷组无法启存储池
[root@centos8 ~]#virsh pool-start vm_images_lvm
error: Failed to start pool vm_images_lvm
error: unsupported configuration: cannot find logical volume group name 'vm_images_lvm'

#构建存储池同时创建卷组
[root@centos8 ~]#virsh pool-build vm_images_lvm
Pool vm_images_lvm built

[root@centos8 ~]#virsh pool-start vm_images_lvm
Pool vm_images_lvm started

[root@centos8 ~]#virsh pool-list
Name                                 State         Autostart
-------------------------------------------
default                         active         yes
isos                                 active         yes
vm_images_lvm             active         no

[root@centos8 ~]#pvs
PV                 VG                     Fmt Attr PSize     PFree
/dev/sdb     vm_images_lvm lvm2 a-- <20.00g <20.00g
[root@centos8 ~]#vgs
VG                         #PV #LV #SN Attr     VSize     VFree
vm_images_lvm     1     0     0 wz--n- <20.00g <20.00g
[root@centos8 ~]#pvs
PV                 VG                     Fmt Attr PSize     PFree
/dev/sdb     vm_images_lvm lvm2 a-- <20.00g <20.00g
[root@centos8 ~]#vgs
VG                         #PV #LV #SN Attr     VSize     VFree
vm_images_lvm     1     0     0 wz--n- <20.00g <20.00g
利用已有的卷组创建存储池
[root@centos8 ~]#virsh pool-define-as vm_images_lvm logical --source-name=vm_images_lvm
Pool vm_images_lvm defined

[root@centos8 ~]#virsh pool-start vm_images_lvm
Pool vm_images_lvm started
[root@centos8 ~]#virsh pool-list
Name                                 State         Autostart
-------------------------------------------
default                         active         yes
isos                                 active         yes
vm_images_lvm             active         no
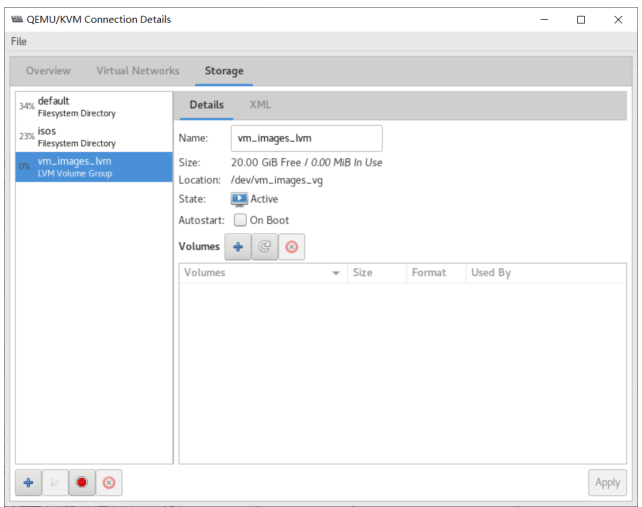
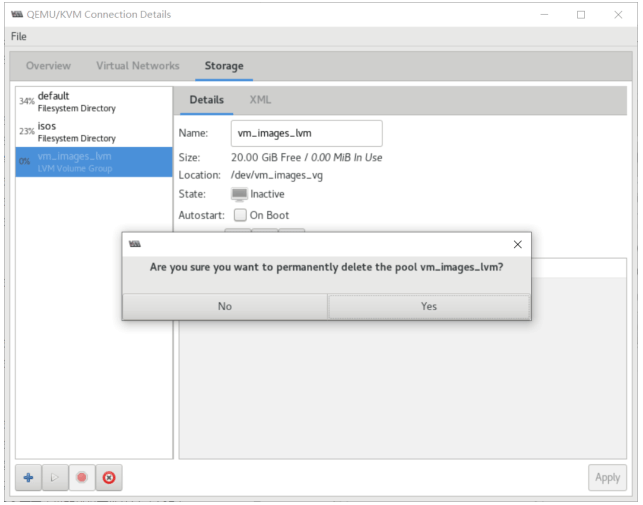
virt-manager 利用已有的卷组创建存储池
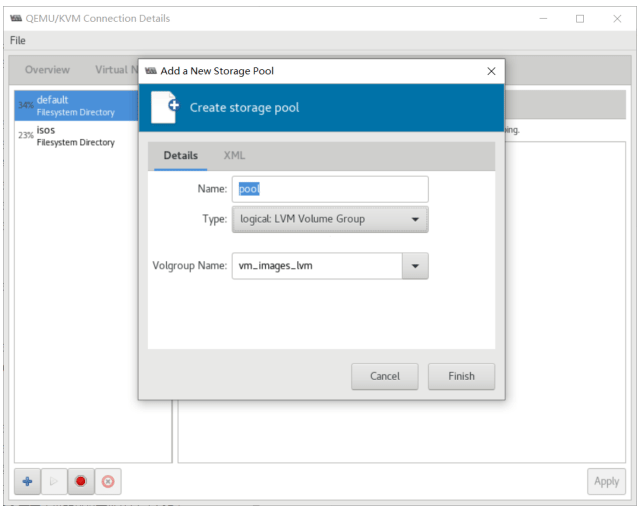
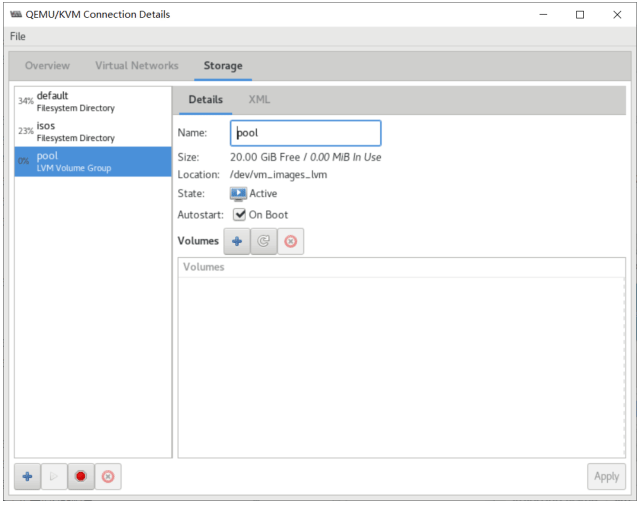
基于NFS的存储池
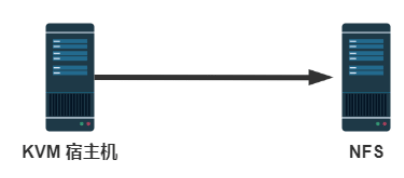
创建NFS共享
先在另一台主机10.0.0.18 创建NFS服务及共享NFS目录
[root@centos8 ~]#dnf -y install nfs-utils

[root@centos8 ~]#mkdir /data/kvmdata

[root@centos8 ~]#cat /etc/exports
/data/kvmdata *(rw,no_root_squash)

[root@centos8 ~]#systemctl enable --now nfs-server.service
[root@centos8 ~]#exportfs -v
/data/kvmdata <world> (sync,wdelay,hide,no_subtree_check,sec=sys,rw,secure,no_root_squash,no_all_squash)
创建基于NFS服务的存储池
在宿主机创建存储池
[root@centos8 ~]#virsh pool-define-as vm_images_nfs netfs --source-host 10.0.0.18 --source-path /data/kvmdata --target /data/vm_images_nfs
Pool vm_images_nfs defined

#pool-build自动生成挂载点
[root@centos8 ~]#virsh pool-build vm_images_nfs
Pool vm_images_nfs built
#或者手动创建挂载点
[root@centos8 ~]#mkdir /data/vm_images_nfs

[root@centos8 ~]#virsh pool-start vm_images_nfs
Pool vm_images_nfs started

[root@centos8 ~]#virsh pool-list
Name                                 State         Autostart
-------------------------------------------
default                         active         yes
isos                                 active         yes
vm_images_nfs             active         no

[root@centos8 ~]#virsh pool-info vm_images_nfs
Name:                     vm_images_nfs
UUID:                     215ed00d-5462-48af-bdf6-d3caf6f58b04
State:                 running
Persistent:         yes
Autostart:         no
Capacity:             49.98 GiB
Allocation:         389.00 MiB
Available:             49.60 GiB
[root@centos8 ~]#cat /etc/libvirt/storage/vm_images_nfs.xml
<!--
WARNING: THIS IS AN AUTO-GENERATED FILE. CHANGES TO IT ARE LIKELY TO BE
OVERWRITTEN AND LOST. Changes to this xml configuration should be made using:
virsh pool-edit vm_images_nfs
or other application using the libvirt API.
-->
<pool type='netfs'>
<name>vm_images_nfs</name>
<uuid>215ed00d-5462-48af-bdf6-d3caf6f58b04</uuid>
<capacity unit='bytes'>0</capacity>
<allocation unit='bytes'>0</allocation>
<available unit='bytes'>0</available>
<source>
    <host name='10.0.0.18'/>
    <dir path='/data/kvmdata'/>
    <format type='auto'/>
</source>
<target>
    <path>/data/vm_images_nfs</path>
</target>
</pool>

[root@centos8 ~]#df
Filesystem                         1K-blocks         Used Available Use% Mounted on
devtmpfs                                     4050832                 0     4050832     0% /dev
tmpfs                                         4067612                 0     4067612     0% /dev/shm
tmpfs                                         4067612         9396     4058216     1% /run
tmpfs                                         4067612                 0     4067612     0% /sys/fs/cgroup
/dev/sda2                             104806400 36338748     68467652     35% /
/dev/sda3                                 52403200 12331584     40071616     24% /data
/dev/sda1                                     999320     120528         809980     13% /boot
tmpfs                                             813520                 8         813512     1% /run/user/0
10.0.0.18:/data/kvmdata     52403200     398336     52004864     1% /data/vm_images_nfs
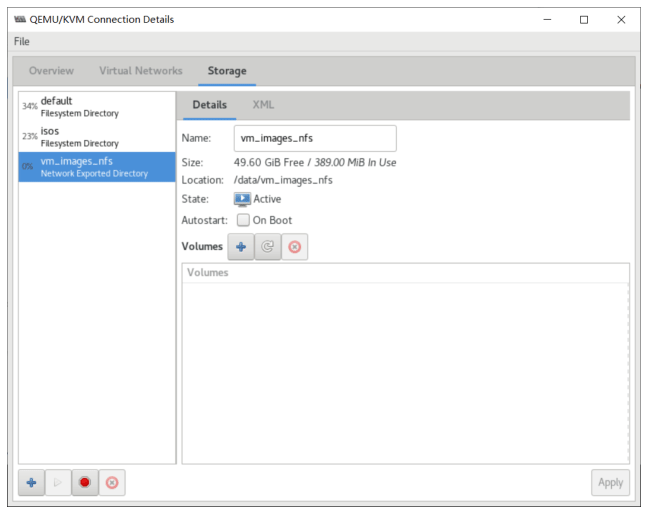
删除存储池
[root@centos8 ~]#virsh pool-destroy vm_images_nfs
Pool vm_images_nfs destroyed
[root@centos8 ~]#df
Filesystem         1K-blocks         Used Available Use% Mounted on
devtmpfs                 4050832                 0     4050832     0% /dev
tmpfs                         4067612                 0     4067612     0% /dev/shm
tmpfs                         4067612         9388     4058224     1% /run
tmpfs                         4067612                 0     4067612     0% /sys/fs/cgroup
/dev/sda2             104806400 36339252     68467148     35% /
/dev/sda3             52403200 12331584     40071616     24% /data
/dev/sda1                 999320     120528         809980     13% /boot
[root@centos8 ~]#virsh pool-undefine vm_images_nfs
Pool vm_images_nfs has been undefined
[root@centos8 ~]#ls /data/
isos/                 vm_images_nfs/
[root@centos8 ~]#virsh pool-list --all
Name                                 State         Autostart
-------------------------------------------
default                         active         yes
isos                                 active         yes
存储卷管理
存储卷概述
存储卷介绍
一个存储池被分割为多个存储卷(Storage Volume)
存储卷可以为以下多种形式
- 文件
- 块设备(如物理分区、LVM逻辑卷等)
- libvirt管理的其他类型存储的抽象
存储卷管理相关命令
vol-clone             #克隆卷
vol-create-as      #通过一组参数创建卷
vol-create           #通过XML文件创建卷
vol-create-from #通过输入的其他卷创建—个新的卷
vol-delete           #删除一个卷
vol-download    #下载卷的内容到一个文件
vol-dumpxml     #保存卷信息的信息到xML文件中
vol-info              #存储卷的信息
vol-key              #根据卷名或路径返回卷的key
vol-list              #列出卷
vol-name          #根据卷的key或路径返回卷名
vol-path           #根据卷名或key返回卷的路径
vol-pool            #根据卷的key或路径返回存储池
vol-resize        #调整卷大小
vol-upload     #上传文件内容到一个卷
vol-wipe       #wipe ─个卷
范例: 查看帮助
[root@centos8 ~]#virsh help volume
Storage Volume (help keyword 'volume'):
    vol-clone                                         clone a volume.
    vol-create-as                                 create a volume from a set of args
    vol-create                                         create a vol from an XML file
    vol-create-from                             create a vol, using another volume as input
    vol-delete                                         delete a vol
    vol-download                                     download volume contents to a file
    vol-dumpxml                                     vol information in XML
    vol-info                                             storage vol information
    vol-key                                             returns the volume key for a given volume
name or path
    vol-list                                             list vols
    vol-name                                             returns the volume name for a given volume
key or path
    vol-path                                             returns the volume path for a given volume
name or key
    vol-pool                                             returns the storage pool for a given volume
key or path
    vol-resize                                         resize a vol
    vol-upload                                         upload file contents to a volume
    vol-wipe                                             wipe a vol

[root@centos8 ~]#virsh vol-create-as --help
NAME
    vol-create-as - create a volume from a set of args
SYNOPSIS
    vol-create-as <pool> <name> <capacity> [--allocation <string>] [--format
<string>] [--backing-vol <string>] [--backing-vol-format <string>] [--prealloc-
metadata] [--print-xml]
DESCRIPTION
    Create a vol.
OPTIONS
    [--pool] <string> pool name
    [--name] <string> name of the volume
    [--capacity] <string> size of the vol, as scaled integer (default bytes)
        --allocation <string> initial allocation size, as scaled integer (default
bytes)
        --format <string> file format type raw,bochs,qcow,qcow2,qed,vmdk
        --backing-vol <string> the backing volume if taking a snapshot
        --backing-vol-format <string> format of backing volume if taking a snapshot
        --prealloc-metadata preallocate metadata (for qcow2 instead of full
allocation)
        --print-xml         print XML document, but don't define/create
基于目录的存储池的存储卷管理
创建基于目录的存储池
[root@centos8 ~]#mkdir /data/vm_images_dir
[root@centos8 ~]#virsh pool-define-as vm_images_dir dir --target /data/vm_images_dir
Pool vm_images_dir defined

[root@centos8 ~]#virsh pool-start vm_images_dir
Pool vm_images_dir started
[root@centos8 ~]#virsh pool-list
Name                                 State         Autostart
-------------------------------------------
default                         active         yes
isos                                 active         yes
vm_images_dir             active         no

[root@centos8 ~]#virsh pool-dumpxml vm_images_dir
<pool type='dir'>
<name>vm_images_dir</name>
<uuid>7d7fdbf5-d098-4a79-ba93-9d31c22d8fc8</uuid>
<capacity unit='bytes'>53660876800</capacity>
<allocation unit='bytes'>12627574784</allocation>
<available unit='bytes'>41033302016</available>
<source>
</source>
<target>
    <path>/data/vm_images_dir</path>
    <permissions>
        <mode>0755</mode>
        <owner>0</owner>
        <group>0</group>
    </permissions>
</target>
</pool>
创建基于目录的存储池的存储卷
[root@centos8 ~]#virsh vol-create-as vm_images_dir test1.qcow2 1g --format qcow2
Vol test1.qcow2 created

[root@centos8 ~]#ls /data/vm_images_dir/ -lh
total 196K
-rw------- 1 root root 193K Sep 20 21:47 test1.qcow2

[root@centos8 ~]#virsh vol-list vm_images_dir
Name                                 Path
------------------------------------------------------------------------------
test1.qcow2                 /data/vm_images_dir/test1.qcow2
[root@centos8 ~]#virsh vol-info test1.qcow2 --pool vm_images_dir
Name:                     test1.qcow2
Type:                     file
Capacity:             1.00 GiB
Allocation:         196.00 KiB

[root@centos8 ~]#virsh vol-info /data/vm_images_dir/test1.qcow2
Name:                     test1.qcow2
Type:                     file
Capacity:             1.00 GiB
Allocation:         196.00 KiB

[root@centos8 ~]#qemu-img info /data/vm_images_dir/test1.qcow2
image: /data/vm_images_dir/test1.qcow2
file format: qcow2
virtual size: 1.0G (1073741824 bytes)
disk size: 196K
cluster_size: 65536
Format specific information:
    compat: 0.10
    refcount bits: 16
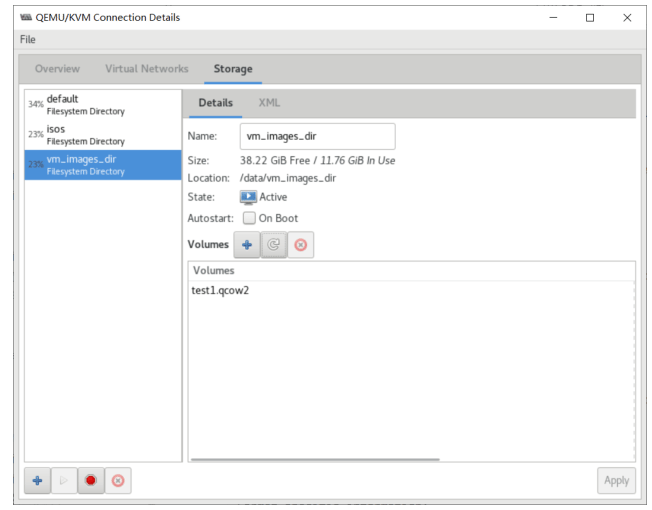
删除基于目录的存储池的存储卷
[root@centos8 ~]#virsh vol-delete     test1.qcow2 vm_images_dir
Vol test1.qcow2 deleted

[root@centos8 ~]#ls /data/
isos/                 vm_images_dir/ vm_images_nfs/
[root@centos8 ~]#ls /data/vm_images_dir/
[root@centos8 ~]#
基于LVM的存储池的存储卷管理
创建基于LVM的存储池
[root@centos8 ~]#pvs
#添加新硬盘
[root@centos8 ~]#lsblk
NAME     MAJ:MIN RM SIZE RO TYPE MOUNTPOINT
sda             8:0         0 200G     0 disk
├─sda1     8:1         0     1G     0 part /boot
├─sda2     8:2         0 100G     0 part /
├─sda3     8:3         0     50G     0 part /data
├─sda4     8:4         0     1K     0 part
├─sda5     8:5         0     2G     0 part [SWAP]
└─sda6     8:6         0     10G     0 part
sdb             8:16     0     20G     0 disk
sr0         11:0         1     7.7G     0 rom

#指定新硬盘直接创建基于LVM的存储池
[root@centos8 ~]#virsh pool-define-as vm_images_lvm logical --source-dev=/dev/sdb
Pool vm_images_lvm defined

[root@centos8 ~]#virsh pool-build vm_images_lvm
Pool vm_images_lvm built

[root@centos8 ~]#pvs
PV                 VG                     Fmt Attr PSize     PFree
/dev/sdb     vm_images_lvm lvm2 a-- <20.00g <20.00g

[root@centos8 ~]#vgs
VG                         #PV #LV #SN Attr     VSize     VFree
vm_images_lvm     1     0     0 wz--n- <20.00g <20.00g

[root@centos8 ~]#virsh pool-start vm_images_lvm
Pool vm_images_lvm started

[root@centos8 ~]#virsh pool-list
Name                                 State         Autostart
-------------------------------------------
default                         active         yes
isos                                 active         yes
vm_images_dir             active         no
vm_images_lvm             active         no
#没有逻辑卷
[root@centos8 ~]#lvs
创建基于LVM的存储池的存储卷
[root@centos8 ~]#virsh vol-create-as vm_images_lvm lvvol1 10g
Vol lvvol1 created

#自动创建逻辑卷
[root@centos8 ~]#lvs
LV         VG                     Attr             LSize Pool Origin Data% Meta% Move Log
Cpy%Sync Convert
lvvol1 vm_images_lvm -wi-a----- 10.00g

[root@centos8 ~]#virsh vol-list vm_images_lvm
Name                                 Path
------------------------------------------------------------------------------
lvvol1                             /dev/vm_images_lvm/lvvol1
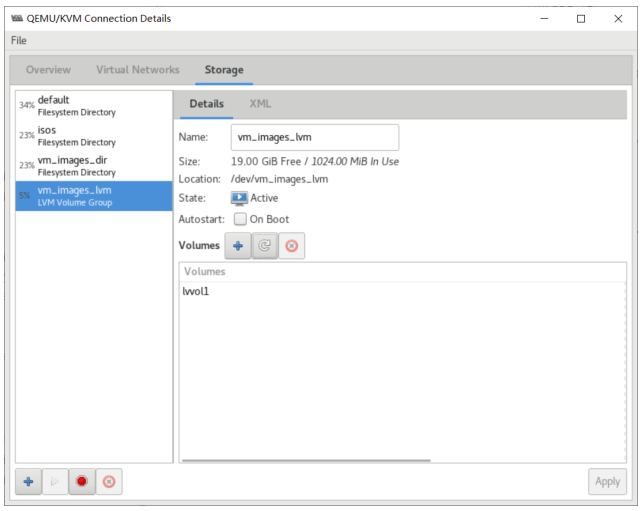
利用存储卷创建虚拟机
virt-manager 创建新虚拟机
选择–Local install media(ISO image or CDROM)
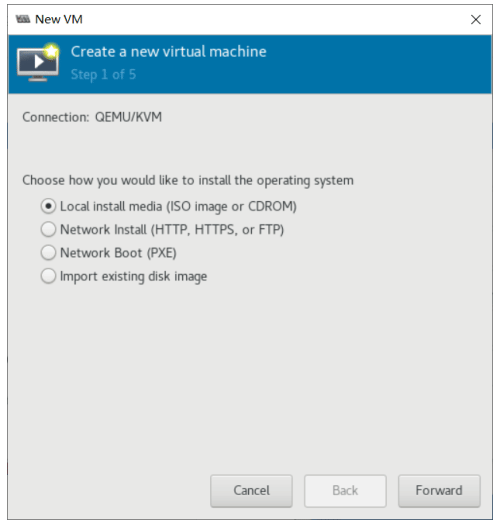
选择iso镜像文件
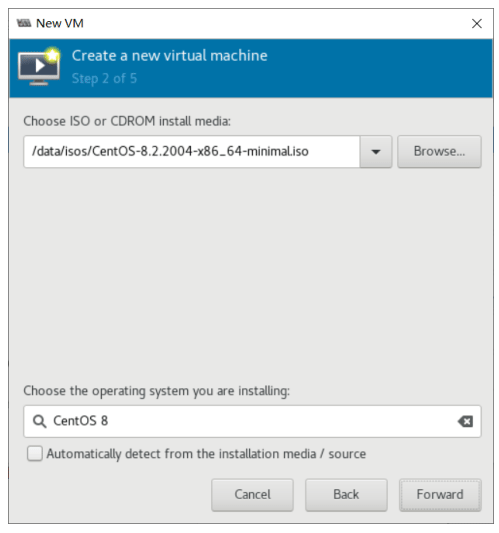
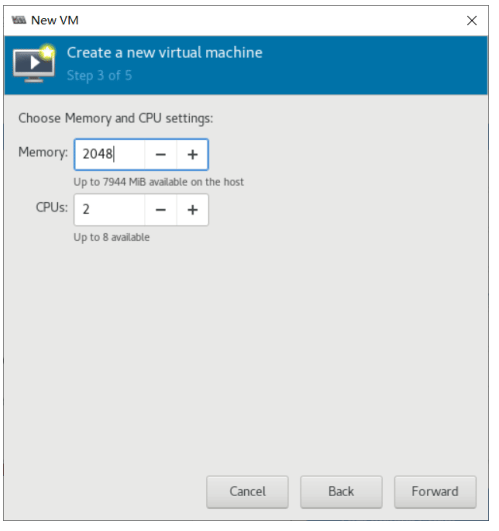
选择自定义存储,找到vm_images_lvm 中卷 lvv0l1
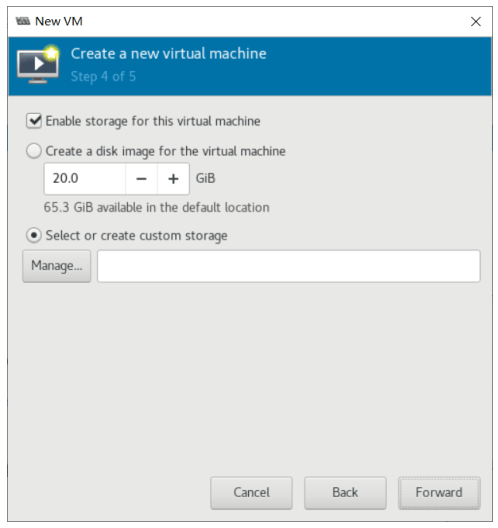
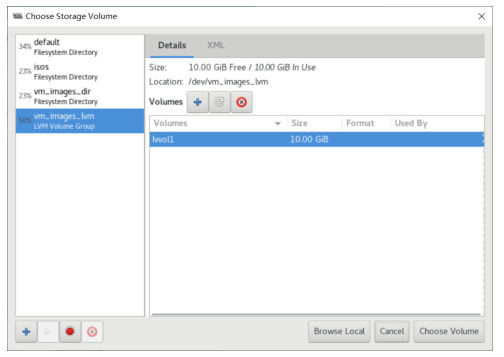
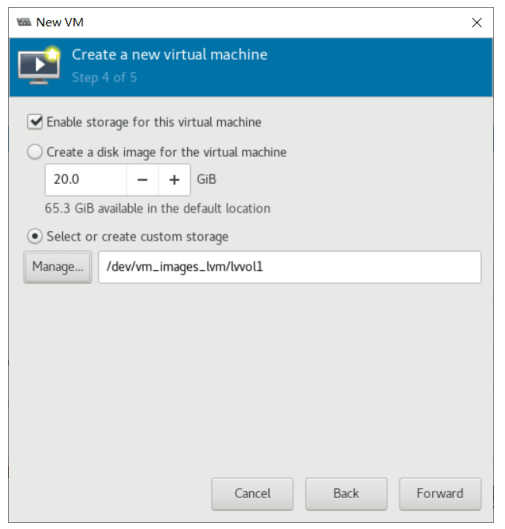
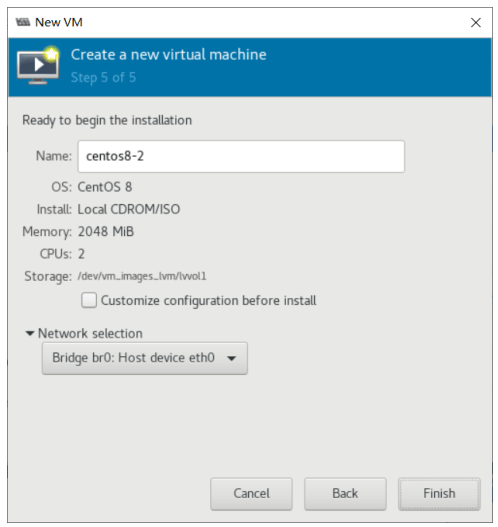
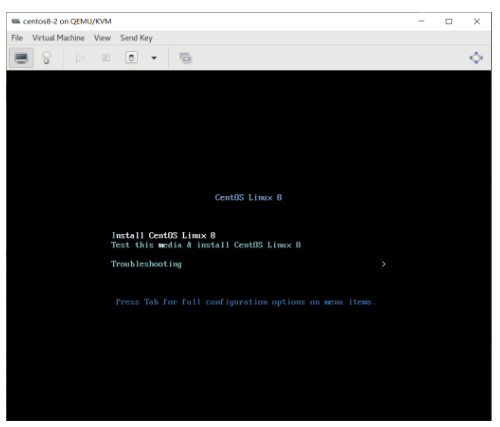
删除基于LVM的存储池的存储卷
[root@centos8 ~]#virsh vol-delete     lvvol1 vm_images_lvm
Vol lvvol1 deleted
[root@centos8 ~]#lvs
克隆存储卷
克隆基于文件的存储卷
[root@centos8 ~]#virsh vol-list default
Name                                 Path
------------------------------------------------------------------------------
centos7-vm1.qcow2     /var/lib/libvirt/images/centos7-vm1.qcow2
centos7-vm2.qcow2     /var/lib/libvirt/images/centos7-vm2.qcow2
centos7.qcow2             /var/lib/libvirt/images/centos7.qcow2
centos8-test1.qcow2 /var/lib/libvirt/images/centos8-test1.qcow2
centos8.qcow2             /var/lib/libvirt/images/centos8.qcow2
Windows-2008_r2-x86_64.qcow2 /var/lib/libvirt/images/Windows-2008_r2-x86_64.qcow2

[root@centos8 ~]#virsh vol-info     centos7.qcow2 default
Name:                     centos7.qcow2
Type:                     file
Capacity:             20.00 GiB
Allocation:         1.56 GiB

#克隆,实际就是拷贝
[root@centos8 ~]#virsh vol-clone centos7.qcow2 centos7_clone.qcow2 default
Vol centos7_clone.qcow2 cloned from centos7.qcow2

[root@centos8 ~]#virsh vol-info     centos7_clone.qcow2 default
Name:                     centos7_clone.qcow2
Type:                     file
Capacity:             20.00 GiB
Allocation:         1.52 GiB

[root@centos8 ~]#virsh vol-list default
Name                                 Path
------------------------------------------------------------------------------
centos7-vm1.qcow2     /var/lib/libvirt/images/centos7-vm1.qcow2
centos7-vm2.qcow2     /var/lib/libvirt/images/centos7-vm2.qcow2
centos7.qcow2             /var/lib/libvirt/images/centos7.qcow2
centos7_clone.qcow2 /var/lib/libvirt/images/centos7_clone.qcow2
centos8-test1.qcow2 /var/lib/libvirt/images/centos8-test1.qcow2
centos8.qcow2             /var/lib/libvirt/images/centos8.qcow2
Windows-2008_r2-x86_64.qcow2 /var/lib/libvirt/images/Windows-2008_r2-x86_64.qcow2

root@centos8 ~]#ll -h /var/lib/libvirt/images/centos7.qcow2 /var/lib/libvirt/images/centos7_clone.qcow2
-rw-r--r-- 1 root root 1.6G Sep 20 22:22 /var/lib/libvirt/images/centos7_clone.qcow2
-rw-r--r-- 1 root root 1.6G Sep 20 18:09 /var/lib/libvirt/images/centos7.qcow2
克隆基于LVM的存储卷
[root@centos8 ~]#virsh vol-list vm_images_lvm
Name                                 Path
------------------------------------------------------------------------------
lvvol1                             /dev/vm_images_lvm/lvvol1

[root@centos8 ~]#virsh vol-clone     lvvol1 lvvol1_clone vm_images_lvm
Vol lvvol1_clone cloned from lvvol1

[root@centos8 ~]#virsh vol-list vm_images_lvm
Name                                 Path
------------------------------------------------------------------------------
lvvol1                             /dev/vm_images_lvm/lvvol1
lvvol1_clone                 /dev/vm_images_lvm/lvvol1_clone
[root@centos8 ~]#lvs
LV                     VG                     Attr             LSize Pool Origin Data% Meta% Move Log
Cpy%Sync Convert
lvvol1             vm_images_lvm -wi-a----- 1.00g

lvvol1_clone vm_images_lvm -wi-a----- 1.00g
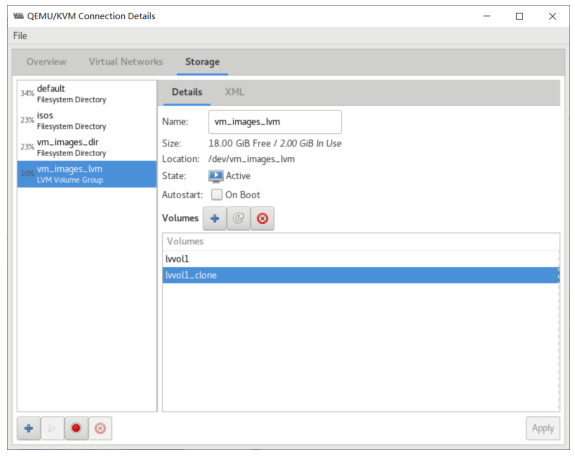
向虚拟机添加存储卷
可以通过attach-device和attach-disk给现有虚拟机添加存储卷,从而实现给虚拟机新添加虚拟磁盘
attach-device 通过XML文件给已有虚拟机添加存储卷
[root@centos8 ~]#virsh vol-list vm_images_dir
Name                                 Path
------------------------------------------------------------------------------
test1.qcow2                 /data/vm_images_dir/test1.qcow2

[root@centos8 ~]#cat disk.xml
<disk type='file' device='disk'>
<driver name='qemu' type='qcow2' cache='none'/>
<source file='/data/vm_images_dir/test1.qcow2'/>
<target dev='vdb'/>
</disk>

[root@centos8 ~]#virsh start centos7
Domain centos7 started

#默认只是临时添加设备,使用选项--persistent实现持久保存
[root@centos8 ~]#virsh attach-device centos7 disk.xml --persistent
Device attached successfully
#查看虚拟机当前的块设备信息
[root@centos8 ~]#virsh domblklist centos7
Target         Source
------------------------------------------------
vdb             /data/vm_images_dir/test1.qcow2
vdc             /var/lib/libvirt/images/centos7.qcow2
hdb                 -
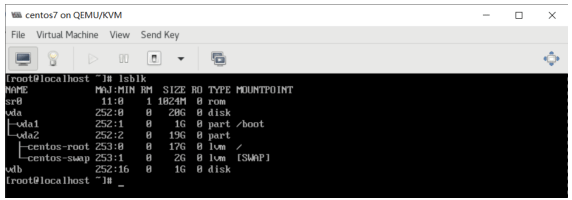
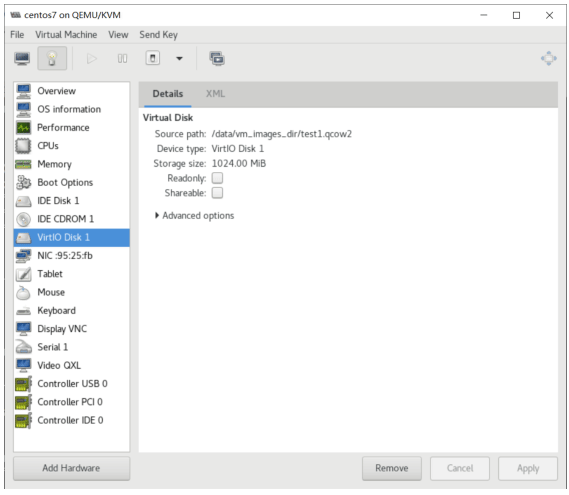
attach-disk 给已有虚拟机添加存储卷
[root@centos8 ~]#virsh start centos7
Domain centos7 started

[root@centos8 ~]#virsh attach-disk --domain centos7 --sourcetype block --source /dev/vm_images_lvm/lvvol1 --target vdb
Disk attached successfully
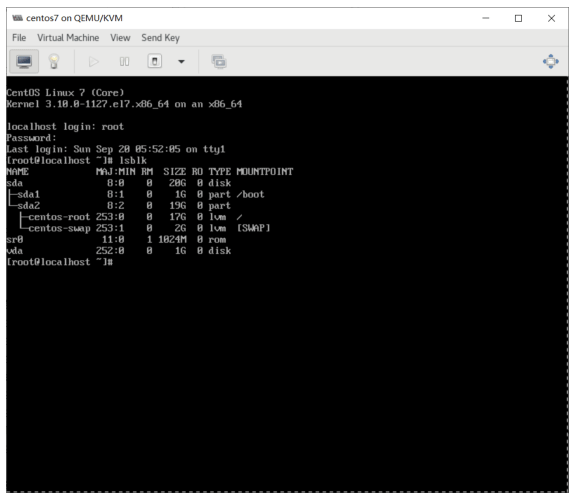
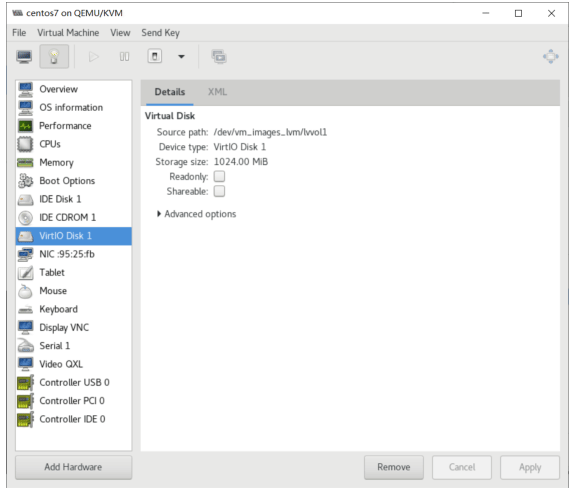
离线工具
不启动虚拟机的情况下,直接访问管理虚拟机对应的磁盘,即离线访问
离线工具应用
- 观看或下载位于虚拟机磁盘中的文件
- 编辑或上传文件到虚拟机磁盘
- 读取或写入的虚拟机配置
- 准备新的磁盘映像,其中包含文件、目录、文件系统、分区、逻辑卷和其他选项
- 拯救和修复客户无法启动或需要更改启动配置的虚拟机
- 监控虚拟机的磁盘使用情况
- 根据组织安全标准审计虚拟机的合规性
- 通过克隆和修改模板来部署虚拟机
- 读取CD和DVD ISO和软盘映像
guestfs 工具
Libguestfs 提供了一个简单地访问虚机磁盘镜像文件的方法,即使是在虚拟机无法启动的情况下
Libguestfs 是由一组丰富的工具集组成,可以让管理员访问虚机文件,甚至调整和挽救文件。
guestfish 是一个基于libguestfs API的交互shell
安装和使用guestfs
[root@centos8 ~]#dnf -y install libguestfs-tools

#查看虚拟机的磁盘文件
[root@centos8 ~]#virsh domblklist centos7
Target         Source
------------------------------------------------
vdc             /var/lib/libvirt/images/centos7.qcow2
hdb                 -

#只读方式打开虚拟磁盘
[root@centos8 ~]#guestfish --ro -a /var/lib/libvirt/images/centos7.qcow2
Welcome to guestfish, the guest filesystem shell for
editing virtual machine filesystems and disk images.
Type: ‘help’ for help on commands
        ‘man’ to read the manual
        ‘quit’ to quit the shell
><fs> help
Add disk images to examine using the ‘-a’ or ‘-d’ options, or the ‘add’
command.
Or create a new disk image using ‘-N’, or the ‘alloc’ or ‘sparse’ commands.
Once you have done this, use the ‘run’ command.
For more information about a command, use ‘help cmd’.
To read the manual, type ‘man’.
><fs> run                             #扫描磁盘
◓ 75% ⟦▒▒▒▒▒▒▒▒▒▒▒▒▒▒▒▒▒▒▒▒▒▒▒▒▒▒▒▒▒▒▒▒▒▒▒▒▒▒▒▒▒▒▒▒▒▒▒▒▒▒▒▒▒▒▒▒▒▒▒▒▒▒▒ 100%
⟦▒▒▒▒▒▒▒▒▒▒▒▒▒▒▒▒▒▒▒▒▒▒▒▒▒▒▒▒▒▒▒▒▒▒▒▒▒▒▒▒▒▒▒▒▒▒▒▒▒▒▒▒▒▒▒▒▒▒▒▒▒▒▒▒▒▒▒▒▒▒▒▒▒▒▒▒▒▒▒
▒▒▒▒▒▒▒▒▒▒▒▒▒▒▒▒▒▒▒▒▒▒▒▒▒▒▒▒▒▒▒▒▒▒▒▒▒▒▒▒⟧ 00:00
><fs> list-filesystems     #列出文件系统
/dev/sda1: xfs
/dev/centos/root: xfs
/dev/centos/swap: swap
><fs>
><fs> mount /dev/sda1 /         #挂载
><fs> ls / #查看
.vmlinuz-3.10.0-1127.el7.x86_64.hmac
System.map-3.10.0-1127.el7.x86_64
config-3.10.0-1127.el7.x86_64
efi
grub
grub2
initramfs-0-rescue-1d660cbcc84f4a399d9f991578c3c6f8.img
initramfs-3.10.0-1127.el7.x86_64.img
initramfs-3.10.0-1127.el7.x86_64kdump.img
symvers-3.10.0-1127.el7.x86_64.gz
vmlinuz-0-rescue-1d660cbcc84f4a399d9f991578c3c6f8
vmlinuz-3.10.0-1127.el7.x86_64
guestfs 自动挂载文件系统
#虚拟机开机无法访问虚拟磁盘
#选项-d指定虚拟机domain打开虚拟磁盘
[root@centos8 ~]#guestfish -d centos7
libguestfs: error: error: domain is a live virtual machine.
Writing to the disks of a running virtual machine can cause disk corruption.
Either use read-only access, or if the guest is running the guestfsd daemon
specify live access. In most libguestfs tools these options are --ro or
--live respectively. Consult the documentation for further information.

[root@centos8 ~]#virsh destroy centos7
Domain centos7 destroyed

#选项-i 可以实现自动探查后进行自动挂载
[root@centos8 ~]#guestfish --ro -a /var/lib/libvirt/images/centos7.qcow2 -i
Welcome to guestfish, the guest filesystem shell for
editing virtual machine filesystems and disk images.
Type: ‘help’ for help on commands
        ‘man’ to read the manual
        ‘quit’ to quit the shell
Operating system: CentOS Linux release 7.8.2003 (Core)
/dev/centos/root mounted on /
/dev/sda1 mounted on /boot
><fs> ls /
bin
boot
dev
etc
home
lib
lib64
media
mnt
opt
proc
root
run
sbin
srv
sys
tmp
usr
var
guestfs 离线修改虚拟磁盘内的文件
#默认读写方式打开虚拟磁盘
[root@centos8 ~]#guestfish -d centos7 -i
Welcome to guestfish, the guest filesystem shell for
editing virtual machine filesystems and disk images.
Type: ‘help’ for help on commands
        ‘man’ to read the manual
        ‘quit’ to quit the shell
Operating system: CentOS Linux release 7.8.2003 (Core)
/dev/centos/root mounted on /
/dev/sda1 mounted on /boot
><fs> edit /etc/issue     #调用vi打开修改文件
welcomt to me
\S

Kernel \r on an \m
><fs> exit
[root@centos8 ~]#virsh start centos7
Domain centos7 started

其它离线工具
virt-df              #监视磁盘使用
virt-resize      #离线调整虚拟磁盘大小
virt-inspector #虚拟机检视
virt-win-reg   #Windows注册表读取和修改
virt-sysprep   #虚拟机设置重置
网络管理(重要)
官方文档: https://wiki.libvirt.org/page/VirtualNetworking
- 虚拟机间互相通信、跨缩主机虚拟机之间的通信
Linux 网桥实现
#创建网桥
nmcli con add type bridge con-name br0 ifname br0
nmcli connection modify br0 ipv4.addresses 10.0.0.100/24 ipv4.method manual
nmcli con up br0

#加入物理网卡
nmcli con add type bridge-slave con-name br0-port0 ifname eth0 master br0
nmcli con add type bridge-slave con-name br0-port1 ifname eth1 master br0
nmcli con up br0-port0
nmcli con up br0-port1

#查看网桥配置文件
cat /etc/sysconfig/network-scripts/ifcfg-br0
DEVICE=br0
NAME=br0
STP=yes
TYPE=Bridge
BOOTPROTO=static
IPADDR=10.0.0.100
PREFIX=24

cat /etc/sysconfig/network-scripts/ifcfg-br0-port0
TYPE=Ethernet
NAME=br0-port0
DEVICE=eth0
ONBOOT=yes
BRIDGE=br0
UUID=23f41d3b-b57c-4e26-9b17-d5f02dafd12d

#安装管理软件包,注意:CentOS8取消了此包
yum install bridge-utils

#查看网桥
brctl show
ip link show master br0
bridge link show

#删除br0
nmcli con down br0
rm /etc/sysconfig/network-scripts/ifcfg-br0*
nmcli con reload
qemu-kvm支持的网络
虚拟机的网络模式:
- 基于NAT ( Network Addresss Translation)的虚拟网络,此为virt-install的默认模式
- 基于自定义网桥(Bridge )的虚拟网络
- 用户自定义的隔离的虚拟网络
- 直接分配物理网络设备(包括VT-d和SR-IOV),性能最好
虚拟机的网卡设备:
- RTL8139、e1000、….
- virtio 生产建议使用
范例: 查看qemu-kvm支持的网卡型号
[root@centos8 ~]#/usr/libexec/qemu-kvm -net nic,model=?
qemu: Supported NIC models: e1000,e1000-82540em,e1000e,rtl8139,virtio-net-pci
默认的网络配置NAT模式
默认网络连接的架构图
默认虚拟机网络配置为NAT模式,相当于vmware的NAT模式的Vmnet8
宿主机默认网络相关服务和信息
默认宿主机安装dnsmasq包指供DHCP服务
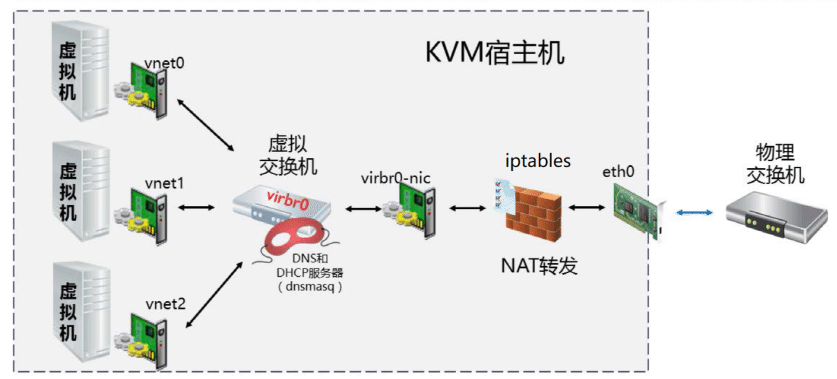
#查看缩主机是否是dhcp获取ip
~]# nmcli con show
NAME      UUID
enp1s0    xxxxx

~]# nmcli con show enp1s0
.....
ipv4.method    auto
ipv6.method    auto

~]# ss -tnul |grep 67
  0.0.0.0%virbr0:67

#查看缩主机是否安装了dhcp服务
~]# rpm -q dhcp
package dhcp is not installed

#查看监控67端口的程序是dnsmasq, 它是简化版本的dhcp和dns综合体
~]# ss -tnulp |grep 67
"dnsmasq"   0.0.0.0%virbr0:67
查看虚拟机的ip地址范围
[root@centos8 ~]#rpm -q dnsmasq
dnsmasq-2.79-11.el8.x86_64
[root@centos8 ~]#cat /var/lib/libvirt/dnsmasq/default.conf
##WARNING: THIS IS AN AUTO-GENERATED FILE. CHANGES TO IT ARE LIKELY TO BE
##OVERWRITTEN AND LOST. Changes to this configuration should be made using:
##     virsh net-edit default
## or other application using the libvirt API.
##
## dnsmasq conf file created by libvirt
strict-order
pid-file=/var/run/libvirt/network/default.pid
except-interface=lo
bind-dynamic
interface=virbr0
dhcp-range=192.168.122.2,192.168.122.254
dhcp-no-override
dhcp-authoritative
dhcp-lease-max=253
dhcp-hostsfile=/var/lib/libvirt/dnsmasq/default.hostsfile
addn-hosts=/var/lib/libvirt/dnsmasq/default.addnhosts
范例: 查看宿主机的网桥信息
[root@centos8 ~]#virsh list --all
Id     Name                                                     State
----------------------------------------------------
-         centos7                                             shut off
-         centos7-2                                         shut off
-         centos8                                             shut off
-         Win_2008_r2-x86_64                         shut off
[root@centos8 ~]#ip a
1: lo: <LOOPBACK,UP,LOWER_UP> mtu 65536 qdisc noqueue state UNKNOWN group
default qlen 1000
    link/loopback 00:00:00:00:00:00 brd 00:00:00:00:00:00
    inet 127.0.0.1/8 scope host lo
            valid_lft forever preferred_lft forever
    inet6 ::1/128 scope host
            valid_lft forever preferred_lft forever
2: eth0: <BROADCAST,MULTICAST,UP,LOWER_UP> mtu 1500 qdisc fq_codel state UP
group default qlen 1000
    link/ether 00:0c:29:44:c3:fe brd ff:ff:ff:ff:ff:ff
    inet 10.0.0.8/24 brd 10.0.0.255 scope global noprefixroute eth0
            valid_lft forever preferred_lft forever
    inet6 fe80::20c:29ff:fe44:c3fe/64 scope link
            valid_lft forever preferred_lft forever
3: virbr0: <NO-CARRIER,BROADCAST,MULTICAST,UP> mtu 1500 qdisc noqueue state DOWN
group default qlen 1000
    link/ether 52:54:00:52:f2:5c brd ff:ff:ff:ff:ff:ff
    inet 192.168.122.1/24 brd 192.168.122.255 scope global virbr0
            valid_lft forever preferred_lft forever
4: virbr0-nic: <BROADCAST,MULTICAST> mtu 1500 qdisc fq_codel master virbr0 state
DOWN group default qlen 1000
    link/ether 52:54:00:52:f2:5c brd ff:ff:ff:ff:ff:ff
[root@centos8 ~]#virsh list
Id     Name                                                     State
----------------------------------------------------
2         centos7                                             running
3         centos8                                             running
[root@centos8 ~]#virsh start centos7
Domain centos7 started
[root@centos8 ~]#virsh start centos8
Domain centos8 started
[root@centos8 ~]#ip a
1: lo: <LOOPBACK,UP,LOWER_UP> mtu 65536 qdisc noqueue state UNKNOWN group
default qlen 1000
    link/loopback 00:00:00:00:00:00 brd 00:00:00:00:00:00
    inet 127.0.0.1/8 scope host lo
            valid_lft forever preferred_lft forever
    inet6 ::1/128 scope host
            valid_lft forever preferred_lft forever
2: eth0: <BROADCAST,MULTICAST,UP,LOWER_UP> mtu 1500 qdisc fq_codel state UP
group default qlen 1000
    link/ether 00:0c:29:44:c3:fe brd ff:ff:ff:ff:ff:ff
    inet 10.0.0.8/24 brd 10.0.0.255 scope global noprefixroute eth0
            valid_lft forever preferred_lft forever
    inet6 fe80::20c:29ff:fe44:c3fe/64 scope link
            valid_lft forever preferred_lft forever
3: virbr0: <BROADCAST,MULTICAST,UP,LOWER_UP> mtu 1500 qdisc noqueue state UP
group default qlen 1000
    link/ether 52:54:00:52:f2:5c brd ff:ff:ff:ff:ff:ff
    inet 192.168.122.1/24 brd 192.168.122.255 scope global virbr0
            valid_lft forever preferred_lft forever
4: virbr0-nic: <BROADCAST,MULTICAST> mtu 1500 qdisc fq_codel master virbr0 state
DOWN group default qlen 1000
    link/ether 52:54:00:52:f2:5c brd ff:ff:ff:ff:ff:ff
6: vnet0: <BROADCAST,MULTICAST,UP,LOWER_UP> mtu 1500 qdisc fq_codel master
virbr0 state UNKNOWN group default qlen 1000
    link/ether fe:54:00:95:25:fb brd ff:ff:ff:ff:ff:ff
    inet6 fe80::fc54:ff:fe95:25fb/64 scope link
            valid_lft forever preferred_lft forever
7: vnet1: <BROADCAST,MULTICAST,UP,LOWER_UP> mtu 1500 qdisc fq_codel master
virbr0 state UNKNOWN group default qlen 1000
    link/ether fe:54:00:83:9d:51 brd ff:ff:ff:ff:ff:ff
    inet6 fe80::fc54:ff:fe83:9d51/64 scope link
            valid_lft forever preferred_lft forever


#查看virbr0网络的情况, virbr0中的成员
[root@centos8 ~]#ip link show master virbr0
4: virbr0-nic: <BROADCAST,MULTICAST> mtu 1500 qdisc fq_codel master virbr0 state
DOWN mode DEFAULT group default qlen 1000
    link/ether 52:54:00:52:f2:5c brd ff:ff:ff:ff:ff:ff
8: vnet0: <BROADCAST,MULTICAST,UP,LOWER_UP> mtu 1500 qdisc fq_codel master
virbr0 state UNKNOWN mode DEFAULT group default qlen 1000
    link/ether fe:54:00:95:25:fb brd ff:ff:ff:ff:ff:ff
9: vnet1: <BROADCAST,MULTICAST,UP,LOWER_UP> mtu 1500 qdisc fq_codel master
virbr0 state UNKNOWN mode DEFAULT group default qlen 1000
    link/ether fe:54:00:83:9d:51 brd ff:ff:ff:ff:ff:ff

#centos7 查看virbr0网络的情况, virbr0中的成员   brctl show

#查看所有桥接网卡信息及对应网桥
[root@centos8 ~]#bridge link show
4: virbr0-nic: <BROADCAST,MULTICAST> mtu 1500 master virbr0 state disabled priority 32 cost 100
8: vnet0: <BROADCAST,MULTICAST,UP,LOWER_UP> mtu 1500 master virbr0 state forwarding priority 32 cost 100
9: vnet1: <BROADCAST,MULTICAST,UP,LOWER_UP> mtu 1500 master virbr0 state forwarding priority 32 cost 100

#字符界面查看网桥成员信息
[root@centos8 ~]#nmtui
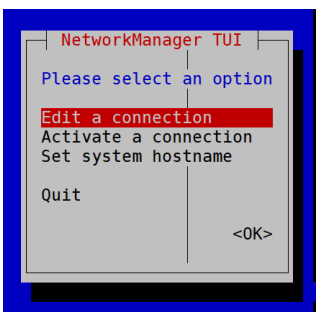
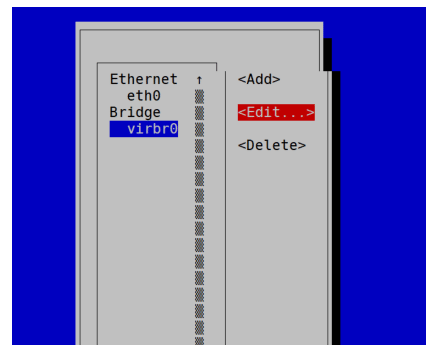
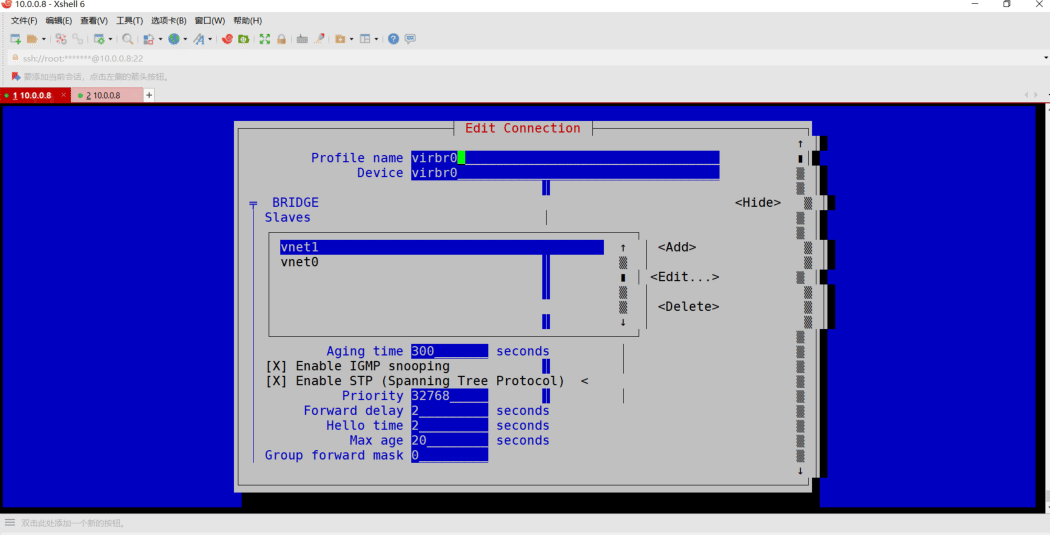

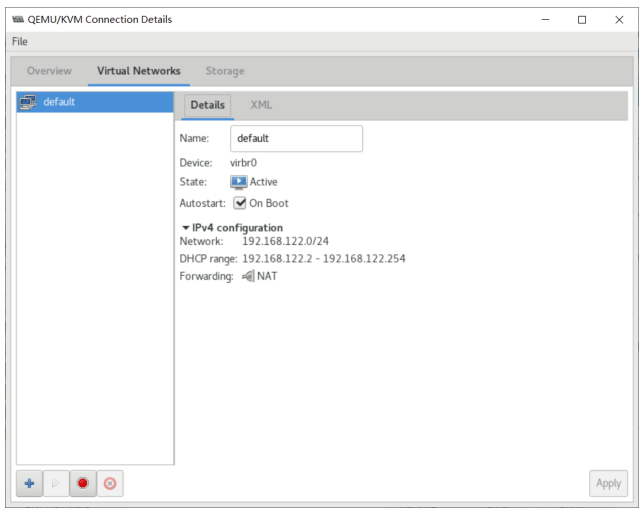
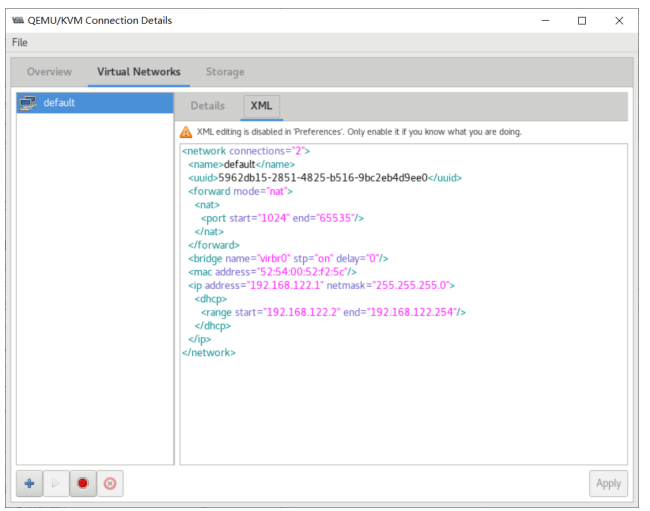
默认创建的虚拟机的网络连接是基于NAT模式的,NAT模式并不适合于生产环境使用。
NAT模式虚拟机能访问外网,但外部访问不了虚拟机。无法跨缩主机通信
[root@centos8 ~]#virsh net-list
Name                                 State         Autostart         Persistent
----------------------------------------------------------
default                         active         yes                     yes

#默认NAT模式
[root@centos8 ~]#cat /etc/libvirt/qemu/networks/default.xml
<!--
WARNING: THIS IS AN AUTO-GENERATED FILE. CHANGES TO IT ARE LIKELY TO BE
OVERWRITTEN AND LOST. Changes to this xml configuration should be made using:
virsh net-edit default
or other application using the libvirt API.
-->
<network>
<name>default</name>
<uuid>5962db15-2851-4825-b516-9bc2eb4d9ee0</uuid>
<forward mode='nat'/>
<bridge name='virbr0' stp='on' delay='0'/>
<mac address='52:54:00:52:f2:5c'/>
<ip address='192.168.122.1' netmask='255.255.255.0'>
    <dhcp>
        <range start='192.168.122.2' end='192.168.122.254'/>
    </dhcp>
</ip>
</network>

[root@centos8 ~]#virsh net-dumpxml default
<network connections='1'>
<name>default</name>
<uuid>5962db15-2851-4825-b516-9bc2eb4d9ee0</uuid>
<forward mode='nat'>
    <nat>
        <port start='1024' end='65535'/>
    </nat>
</forward>
<bridge name='virbr0' stp='on' delay='0'/>
<mac address='52:54:00:52:f2:5c'/>
<ip address='192.168.122.1' netmask='255.255.255.0'>
    <dhcp>
        <range start='192.168.122.2' end='192.168.122.254'/>
    </dhcp>
</ip>
</network>

#查看NAT策略实现从虚拟机可以访问外部网络,反之不通,此策略由libvirtd服务启动时自动加载到NAT表
[root@centos8 ~]#iptables -vnL -t nat
Chain PREROUTING (policy ACCEPT 0 packets, 0 bytes)
pkts bytes target         prot opt in         out         source                             destination

Chain INPUT (policy ACCEPT 0 packets, 0 bytes)
pkts bytes target         prot opt in         out         source                             destination

Chain POSTROUTING (policy ACCEPT 0 packets, 0 bytes)
pkts bytes target         prot opt in         out         source                             destination

        0         0 RETURN         all     -- *         *             192.168.122.0/24         224.0.0.0/24

        0         0 RETURN         all     -- *         *             192.168.122.0/24     255.255.255.255
        0         0 MASQUERADE tcp     -- *         *             192.168.122.0/24  !192.168.122.0/24         masq ports: 1024-65535
        8     608 MASQUERADE udp     -- *         *             192.168.122.0/24  !192.168.122.0/24         masq ports: 1024-65535
        1         84 MASQUERADE all     -- *         *             192.168.122.0/24  !192.168.122.0/24
Chain OUTPUT (policy ACCEPT 0 packets, 0 bytes)
pkts bytes target         prot opt in         out         source                             destination
虚拟机网卡默认设置
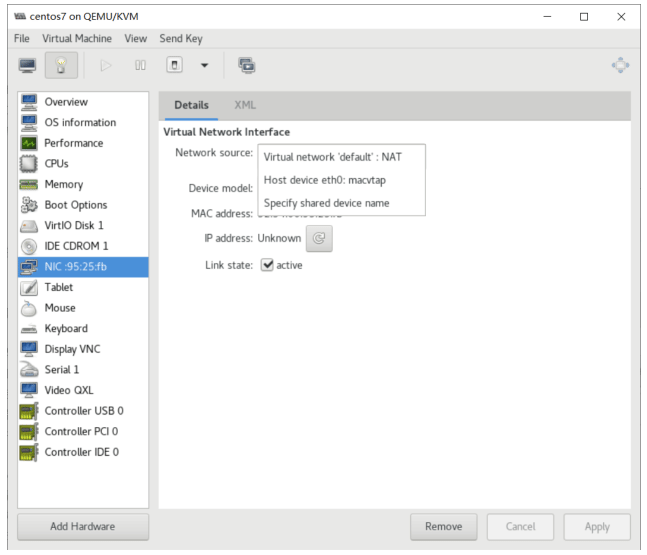
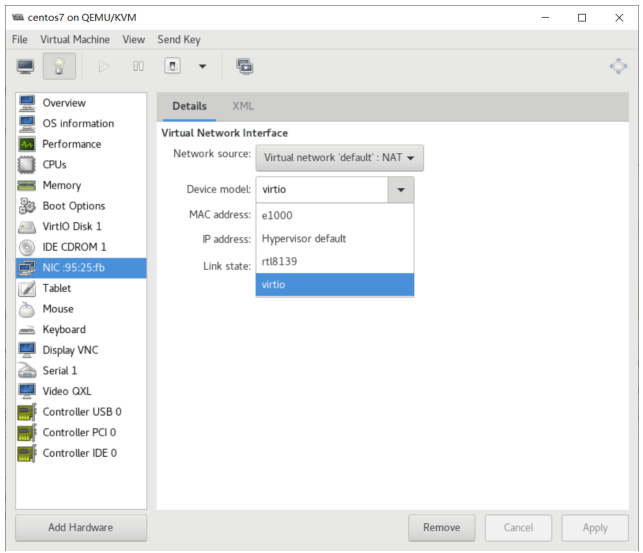
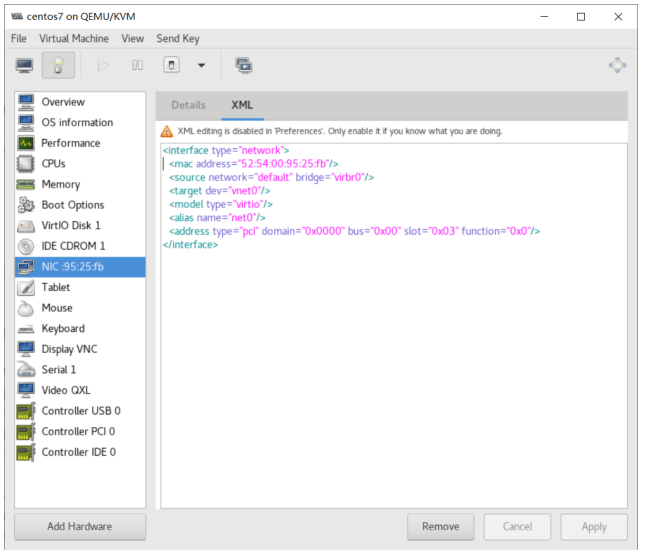
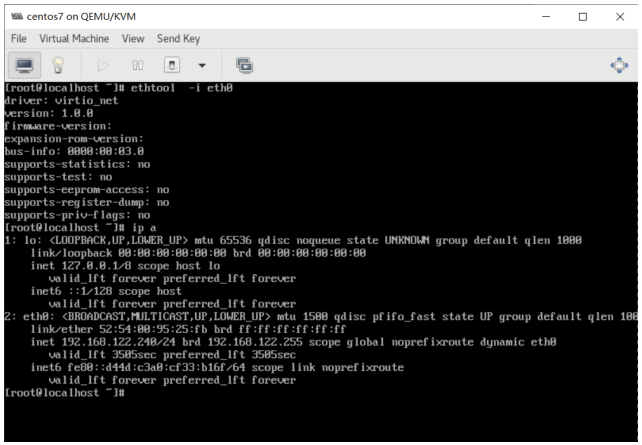
[root@centos8 ~]#virsh dumpxml centos7 |sed -n '/interface/,/interface/p'
    <interface type='network'>
        <mac address='52:54:00:95:25:fb'/>
        <source network='default' bridge='virbr0'/>
        <target dev='vnet0'/>
        <model type='virtio'/>
        <alias name='net0'/>
        <address type='pci' domain='0x0000' bus='0x00' slot='0x03'
function='0x0'/>
    </interface>
virsh 查看虚拟机网络配置
#查看虚拟机的网卡配置
[root@centos8 ~]#virsh domiflist centos8
Interface Type             Source         Model             MAC
-------------------------------------------------------
vnet0         network     default     virtio             52:54:00:83:9d:51

#查看虚拟机的网卡地址信息
[root@centos8 ~]#virsh domifaddr centos8
Name             MAC address                 Protocol         Address
-------------------------------------------------------------------------------
vnet0             52:54:00:83:9d:51     ipv4                 192.168.122.94/24

#查看虚拟机的指定网卡的状态
[root@centos8 ~]#virsh domifstat centos8 vnet0
vnet0 rx_bytes 39672
vnet0 rx_packets 739
vnet0 rx_errs 0
vnet0 rx_drop 0
vnet0 tx_bytes 1742
vnet0 tx_packets 19
vnet0 tx_errs 0
vnet0 tx_drop 0
向虚拟机添加虚拟网络连接
打开virt-manager添加网卡
模式有:
- NAT
- Routed
- Open
- Isolated
- SR-IOV pool
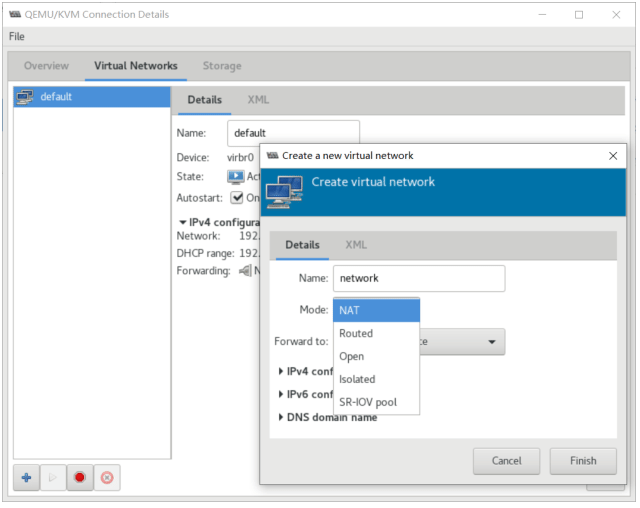
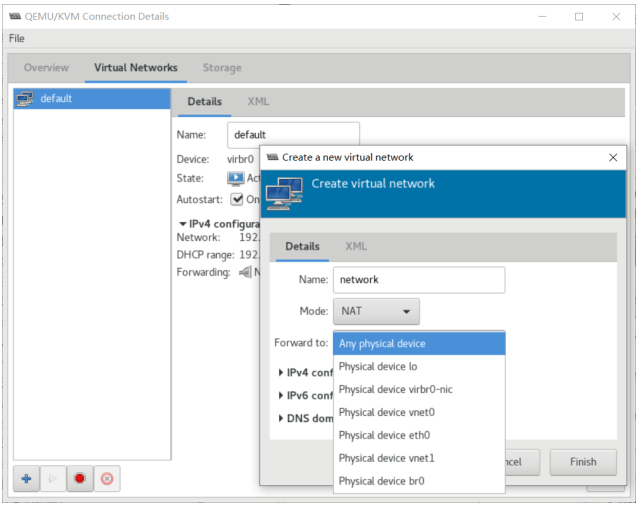
配置虚拟机网卡桥接到宿主机的物理网卡
相当于vmware的桥接模式的Vmnet0
在虚拟机配置中找到网卡 NIC:xxx , 修改Network source 主 Host device eth0: mactap, 选择Bridge桥接。重启虚拟机生效。
进入到虚拟机可以看到获取缩主机桥接的地址
ip a
10.0.0.150

#就可以和其他缩主机通信了
ping 10.0.0.7
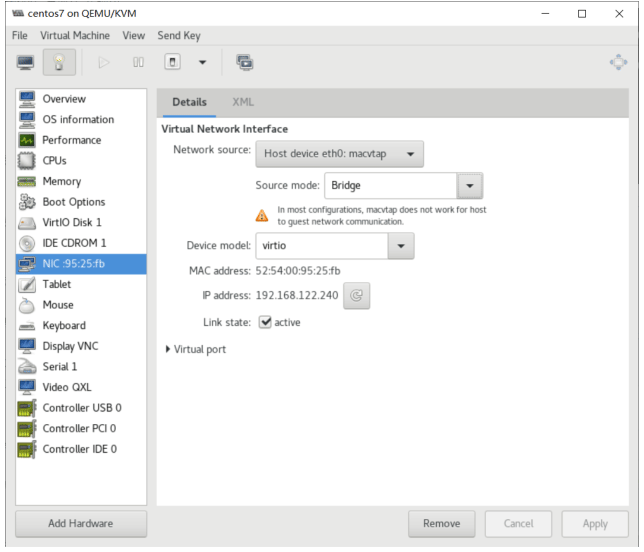
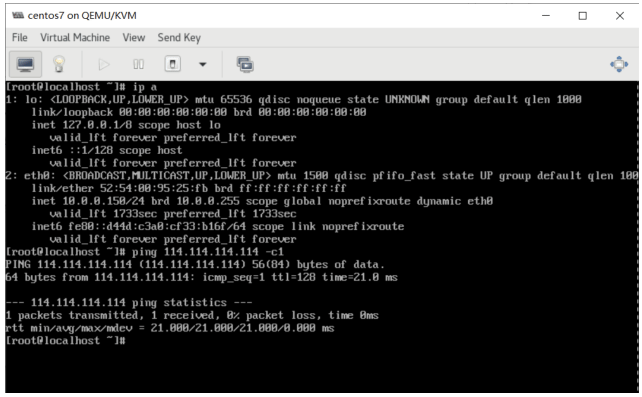
[root@centos8 ~]#virsh domiflist centos7
Interface Type             Source         Model             MAC
-------------------------------------------------------
macvtap0     direct         eth0             virtio             52:54:00:95:25:fb

[root@centos8 ~]#virsh domifaddr centos7
Name             MAC address                 Protocol         Address
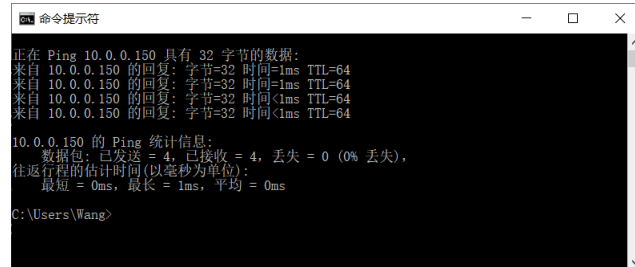
在宿主机上自动生成虚拟网卡macvtap0@eth0
[root@centos8 ~]#ip a
1: lo: <LOOPBACK,UP,LOWER_UP> mtu 65536 qdisc noqueue state UNKNOWN group
2: eth0: <BROADCAST,MULTICAST,UP,LOWER_UP> mtu 1500 qdisc fq_codel state UP
group default qlen 1000
    link/ether 00:0c:29:e1:0e:53 brd ff:ff:ff:ff:ff:ff
    inet 10.0.0.8/24 brd 10.0.0.255 scope global noprefixroute eth0
            valid_lft forever preferred_lft forever
3: virbr0: <NO-CARRIER,BROADCAST,MULTICAST,UP> mtu 1500 qdisc noqueue state DOWN
group default qlen 1000
    link/ether 52:54:00:8b:be:ee brd ff:ff:ff:ff:ff:ff
    inet 192.168.122.1/24 brd 192.168.122.255 scope global virbr0
            valid_lft forever preferred_lft forever
4: virbr0-nic: <BROADCAST,MULTICAST> mtu 1500 qdisc fq_codel master virbr0 state
DOWN group default qlen 1000
    link/ether 52:54:00:8b:be:ee brd ff:ff:ff:ff:ff:ff
6: macvtap0@eth0: <BROADCAST,MULTICAST,UP,LOWER_UP> mtu 1500 qdisc fq_codel
state UP group default qlen 500
    link/ether 52:54:00:0d:8a:0e brd ff:ff:ff:ff:ff:ff
    inet6 fe80::5054:ff:fe0d:8a0e/64 scope link
基于自定义网桥的虚拟网络
自定义网桥架构
桥接网络可以让运行在宿主机上的虚拟机使用和宿主机相同网段的IP,并且可以从外部直接访问到虚拟机,目前企业中大部分场景都使用桥接网络。
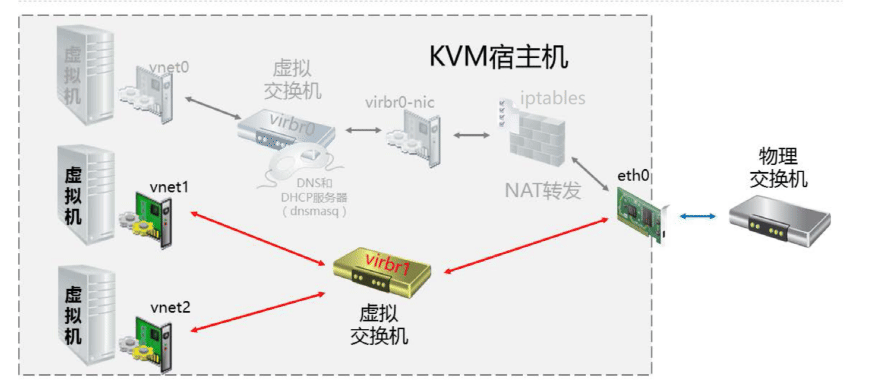
创建虚拟机PXE启动并利用kickstart自动安装系统
在宿主机准备PXE环境
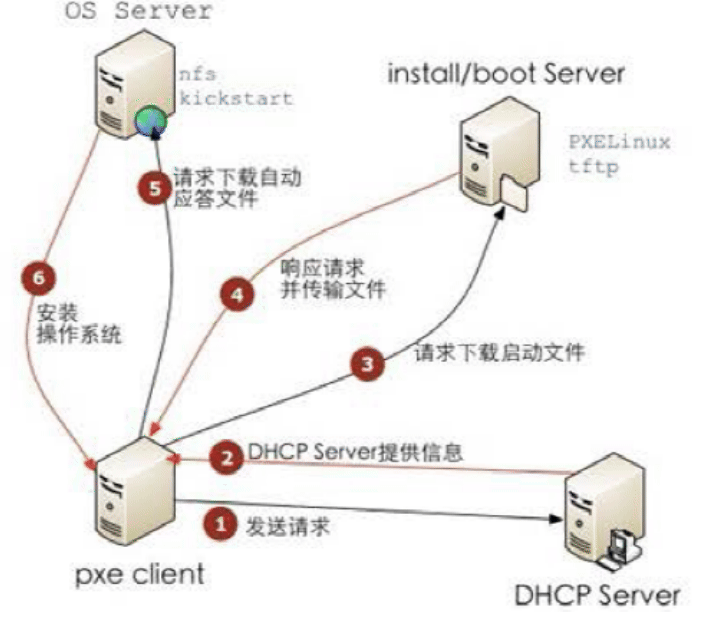
注意: 取消vmnet8的DHCP功能
[root@centos8 ~]#dnf -y install dhcp-server tftp-server httpd syslinux-nonlinux
[root@centos8 ~]#systemctl enable --now httpd tftp dhcpd

[root@centos8 ~]#cat /etc/dhcp/dhcpd.conf
option domain-name "me.org";
option domain-name-servers 180.76.76.76,223.6.6.6;
default-lease-time 600;
max-lease-time 7200;
log-facility local7;
subnet 10.0.0.0 netmask 255.255.255.0 {
range 10.0.0.100 10.0.0.200;
option routers 10.0.0.2;
next-server 10.0.0.8;
filename "pxelinux.0";
}

[root@centos8 ~]#systemctl start dhcpd

[root@centos8 ~]#mkdir /var/lib/tftpboot/centos{6,7,8}
[root@centos8 ~]#cp /usr/share/syslinux/{pxelinux.0,menu.c32}  /var/lib/tftpboot/
[root@centos8 ~]#cp /var/www/html/centos/8/os/x86_64/isolinux/{vmlinuz,initrd.img}  /var/lib/tftpboot/centos8
[root@centos8 ~]#cp /var/www/html/centos/8/os/x86_64/isolinux/{ldlinux.c32,libcom32.c32,libutil.c32}  /var/lib/tftpboot/
[root@centos8 ~]#mkdir /var/lib/tftpboot/pxelinux.cfg/
[root@centos8 ~]#cp /var/www/html/centos/8/os/x86_64/isolinux/isolinux.cfg /var/lib/tftpboot/pxelinux.cfg/default

[root@centos8 ~]#cat /var/lib/tftpboot/pxelinux.cfg/default
default menu.c32
timeout 600
menu title Install CentOS Linux

label linux8
  menu default
  menu label Auto Install CentOS Linux ^8
  kernel centos8/vmlinuz
  append initrd=centos8/initrd.img ks=http://10.0.0.8/ks/centos8.cfg

label manual
  menu label ^Manual Install CentOS Linux 8.0
  kernel centos8/vmlinuz
  append initrd=centos8/initrd.img inst.repo=http://10.0.0.8/centos/8/os/x86_64/

label rescue
  menu label ^Rescue a CentOS Linux system 8
  kernel centos8/vmlinuz
  append initrd=centos8/initrd.img inst.repo=http://10.0.0.8/centos/8/os/x86_64/ rescue

label local
  menu label Boot from ^local drive
  localboot 0xffff

[root@centos8 ~]#tree /var/lib/tftpboot/
/var/lib/tftpboot/
├── centos6
├── centos7
├── centos8
│        ├── initrd.img
│        └── vmlinuz
├── ldlinux.c32
├── libcom32.c32
├── libutil.c32
├── menu.c32
├── pxelinux.0
└── pxelinux.cfg
    └── default
4 directories, 8 files

#应答文件
[root@centos8 ~]#cat /var/www/html/ks/centos8.cfg
ignoredisk --only-use=vda     #因为使用virtIO磁盘,注意磁盘名称为vda
zerombr
text
reboot
clearpart --all --initlabel
selinux --disabled
firewall --disabled
url --url=http://10.0.0.8/centos/8/os/x86_64/
keyboard --vckeymap=us --xlayouts='us'
lang en_US.UTF-8

bootloader --append="net.ifnames=0" --location=mbr --boot-drive=vda     #因为使用virtIO磁盘,注意磁盘名称为vda
network     --bootproto=dhcp --device=eth0 --ipv6=auto --activate

network     --hostname=centos8.me.org
rootpw --iscrypted
$6$j9YhzDUnQVnxaAk8$qv7rkMcPAEbV5yvwsP666DXWYadd3jYjkA9fpxAo9qYotjGGBUclCGoP1TRvgHBpqgc5n0RypMsPTQnVDcpO01
firstboot --enable
skipx
services --disabled="chronyd"
timezone Asia/Shanghai --isUtc --nontp
user --name=wang --password=6oUfb/02CWfLb5l8f$sgEZeR7c7DpqfpmFDH6huSmDbW1XQNR4qKl2EPns.gOXqlnAIgv9pTogtFVaDtEpMOC.SWXKYqxfVtd9MCwxb1 --iscrypted --gecos="wang"

autopart --type=lvm
%packages
@^minimal-environment
kexec-tools
%end
%addon com_redhat_kdump --enable --reserve-mb='auto'
%end
%anaconda
pwpolicy root --minlen=6 --minquality=1 --notstrict --nochanges --notempty
pwpolicy user --minlen=6 --minquality=1 --notstrict --nochanges --emptyok
pwpolicy luks --minlen=6 --minquality=1 --notstrict --nochanges --notempty
%end

%post
useradd tester
echo me | passwd --stdin tester &> /dev/null
%end
在宿主机创建网桥
- CentOS 创建桥接网卡
[root@centos8 network-scripts]#pwd
/etc/sysconfig/network-scripts

#创建网桥配置文件
[root@centos8 network-scripts]#cat ifcfg-virbr1
TYPE=Bridge
NAME=virbr1
DEVICE=virbr1
ONBOOT=yes
BOOTPROTO=static
IPADDR=10.0.0.8
NETMASK=255.255.255.0
GATEWAY=10.0.0.2
DNS1=180.76.76.76
DNS2=223.6.6.6

#将物理网卡eth0加入网桥
[root@centos8 network-scripts]#cat ifcfg-eth0
TYPE=Ethernet
NAME=eth0
DEVICE=eth0
ONBOOT=yes
BRIDGE=virbr1

[root@centos8 network-scripts]#nmcli connection reload
[root@centos8 network-scripts]#nmcli connection up eth0 virbr1

[root@centos8 ~]#ip a
1: lo: <LOOPBACK,UP,LOWER_UP> mtu 65536 qdisc noqueue state UNKNOWN group
default qlen 1000
    link/loopback 00:00:00:00:00:00 brd 00:00:00:00:00:00
    inet 127.0.0.1/8 scope host lo
            valid_lft forever preferred_lft forever
    inet6 ::1/128 scope host
            valid_lft forever preferred_lft forever
2: eth0: <BROADCAST,MULTICAST,UP,LOWER_UP> mtu 1500 qdisc fq_codel master virbr1
state UP group default qlen 1000
    link/ether 00:0c:29:44:c3:fe brd ff:ff:ff:ff:ff:ff
4: virbr0: <NO-CARRIER,BROADCAST,MULTICAST,UP> mtu 1500 qdisc noqueue state DOWN
group default qlen 1000
    link/ether 52:54:00:52:f2:5c brd ff:ff:ff:ff:ff:ff
    inet 192.168.122.1/24 brd 192.168.122.255 scope global virbr0
            valid_lft forever preferred_lft forever
5: virbr0-nic: <BROADCAST,MULTICAST> mtu 1500 qdisc fq_codel master virbr0 state
DOWN group default qlen 1000
    link/ether 52:54:00:52:f2:5c brd ff:ff:ff:ff:ff:ff
18: virbr1: <BROADCAST,MULTICAST,UP,LOWER_UP> mtu 1500 qdisc noqueue state UP
group default qlen 1000
    link/ether 00:0c:29:44:c3:fe brd ff:ff:ff:ff:ff:ff
    inet 10.0.0.8/24 brd 10.0.0.255 scope global noprefixroute virbr1
            valid_lft forever preferred_lft forever
    inet6 fe80::8055:c0ff:fe4e:411e/64 scope link
            valid_lft forever preferred_lft forever
[root@centos8 ~]#bridge link show
2: eth0: <BROADCAST,MULTICAST,UP,LOWER_UP> mtu 1500 master virbr1 state
forwarding priority 32 cost 100
5: virbr0-nic: <BROADCAST,MULTICAST> mtu 1500 master virbr0 state disabled
priority 32 cost 100
[root@centos8 ~]#ip link show master virbr1
2: eth0: <BROADCAST,MULTICAST,UP,LOWER_UP> mtu 1500 qdisc fq_codel master virbr1
state UP mode DEFAULT group default qlen 1000
    link/ether 00:0c:29:44:c3:fe brd ff:ff:ff:ff:ff:ff
- Ubuntu 创建桥接网卡
# cat /etc/netplan/01-netcfg.yaml
# This file describes the network interfaces available on your system
# For more information, see netplan(5).
network:
version: 2
renderer: networkd
ethernets:
    eth0:
        dhcp4: no
        dhcp6: no
    bridges:
            br0:
        dhcp4: no
        dhcp6: no
        addresses: [10.0.0.100/16]
        gateway4: 10.0.0.2
        nameservers:
            addresses: [223.6.6.6]
        interfaces:
            - eth0
- 使用virt-manager创建网桥
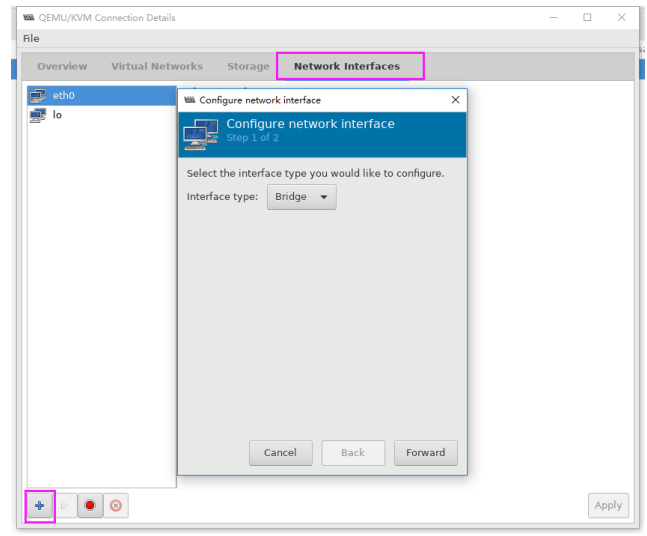
注意:CentOS8 取消了此功能,以下图示为CentOS8 的virt-manager界面
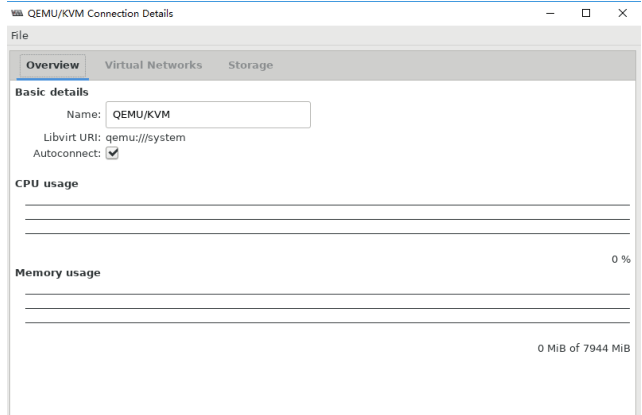
创建桥接自定网桥的虚拟机基于PXE启动并利用kickstart自动安装系统
#创建磁盘
[root@centos8 ~]#qemu-img create -f qcow2 /var/lib/libvirt/images/centos8-pxe.qcow2 10G

#创建接自定网桥的虚拟机
[root@centos8 ~]#virt-install --virt-type kvm --name centos8-pxe --ram 2048 --vcpus 2 --disk bus=virtio,path=/var/lib/libvirt/images/centos8-pxe.qcow2     --graphics vnc,listen=0.0.0.0 --network=bridge:virbr1,model=virtio --pxe
虚拟机安装过程
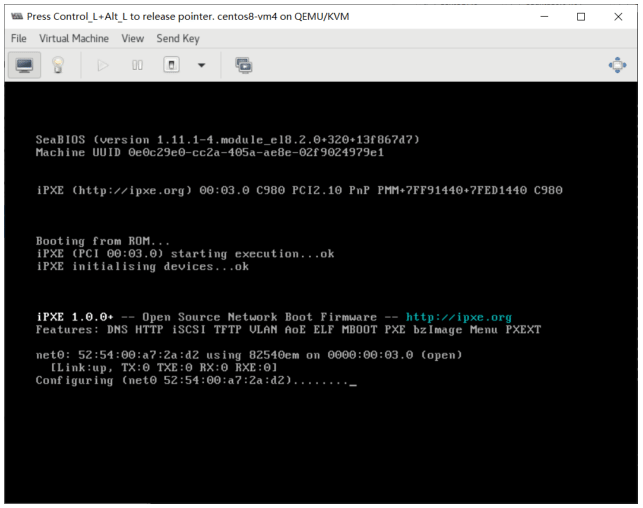
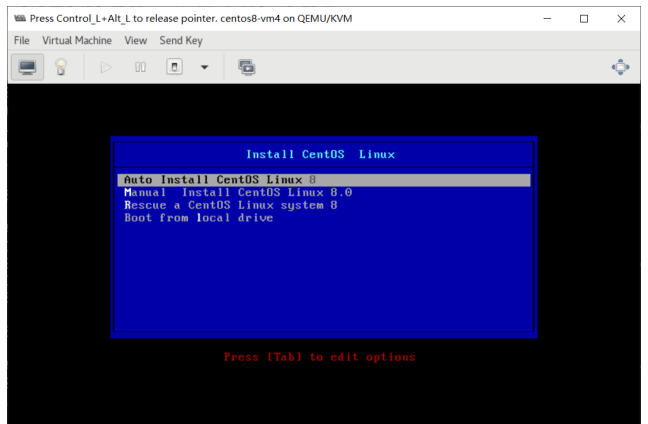
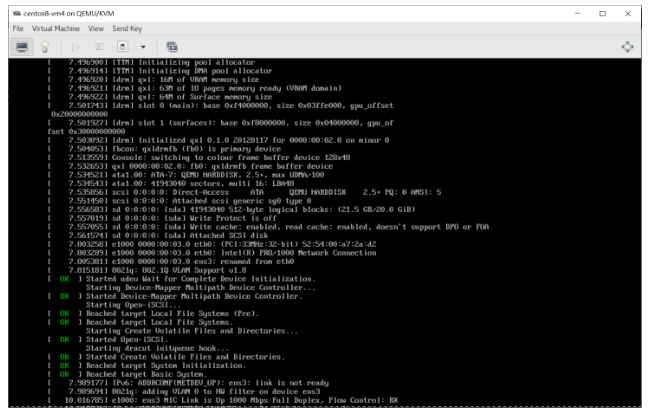
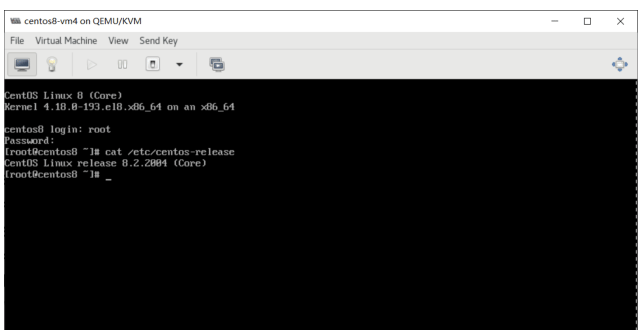
验证虚拟机设置
[root@centos8 ~]#ip link show master virbr1
2: eth0: <BROADCAST,MULTICAST,UP,LOWER_UP> mtu 1500 qdisc fq_codel master virbr1
state UP mode DEFAULT group default qlen 1000
    link/ether 00:0c:29:44:c3:fe brd ff:ff:ff:ff:ff:ff
27: vnet0: <BROADCAST,MULTICAST,UP,LOWER_UP> mtu 1500 qdisc fq_codel master
virbr1 state UNKNOWN mode DEFAULT group default qlen 1000
    link/ether fe:54:00:c5:0a:9d brd ff:ff:ff:ff:ff:ff
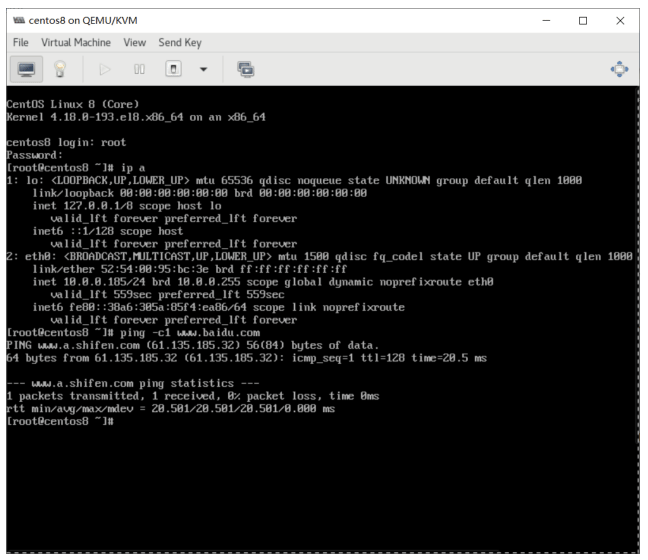
在virt-manager 查看网桥
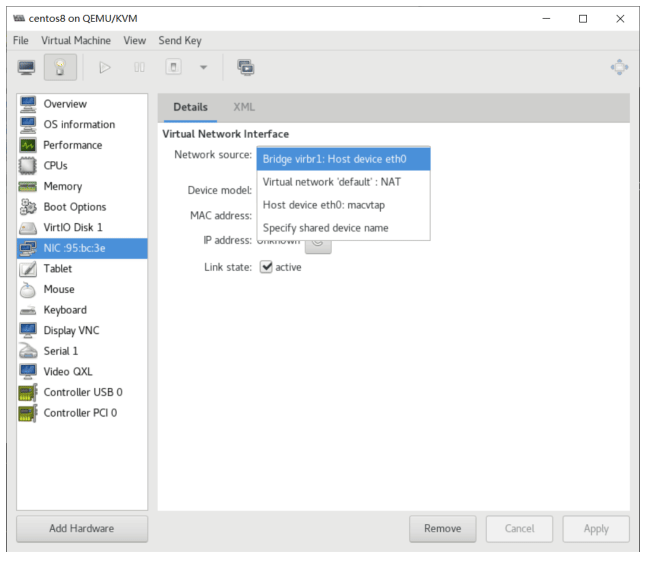
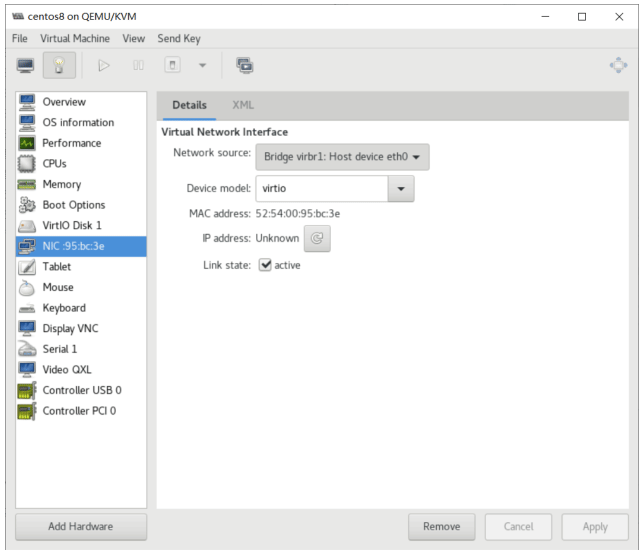
从外部主机连接虚拟机
C:\Users\Wang>ssh [email protected]
The authenticity of host '10.0.0.185 (10.0.0.185)' can't be established.
ECDSA key fingerprint is SHA256:0yIg7Pvfpp5C0w5CT/AmJsGfBdVnQm9wQXqn9gSirno.
Are you sure you want to continue connecting (yes/no)? yes
Warning: Permanently added '10.0.0.185' (ECDSA) to the list of known hosts.
[email protected]'s password:
Last login: Mon Sep 21 23:25:42 2020 from 10.0.0.1
Last login: Mon Sep 21 23:25:42 2020 from 10.0.0.1

[root@centos8 ~]# hostname -I
10.0.0.185

[root@centos8 ~]# dnf -yq install pciutils
warning: /var/cache/dnf/BaseOS-929b586ef1f72f69/packages/pciutils-3.5.6-
4.el8.x86_64.rpm: Header V3 RSA/SHA256 Signature, key ID 8483c65d: NOKEY
Importing GPG key 0x8483C65D:
Userid         : "CentOS (CentOS Official Signing Key) <[email protected]>"
Fingerprint: 99DB 70FA E1D7 CE22 7FB6 4882 05B5 55B3 8483 C65D
From             : /etc/pki/rpm-gpg/RPM-GPG-KEY-centosofficial

[root@centos8 ~]# lspci
00:00.0 Host bridge: Intel Corporation 440FX - 82441FX PMC [Natoma] (rev 02)
00:01.0 ISA bridge: Intel Corporation 82371SB PIIX3 ISA [Natoma/Triton II]
00:01.1 IDE interface: Intel Corporation 82371SB PIIX3 IDE [Natoma/Triton II]
00:01.3 Bridge: Intel Corporation 82371AB/EB/MB PIIX4 ACPI (rev 03)
00:02.0 VGA compatible controller: Red Hat, Inc. QXL paravirtual graphic card
(rev 04)
00:03.0 Ethernet controller: Red Hat, Inc. Virtio network device
00:04.0 USB controller: Intel Corporation 82801I (ICH9 Family) USB UHCI
Controller #1 (rev 03)
00:04.1 USB controller: Intel Corporation 82801I (ICH9 Family) USB UHCI
Controller #2 (rev 03)
00:04.2 USB controller: Intel Corporation 82801I (ICH9 Family) USB UHCI
Controller #3 (rev 03)
00:04.7 USB controller: Intel Corporation 82801I (ICH9 Family) USB2 EHCI
Controller #1 (rev 03)
00:05.0 SCSI storage controller: Red Hat, Inc. Virtio block device
00:06.0 Unclassified device [00ff]: Red Hat, Inc. Virtio memory balloon
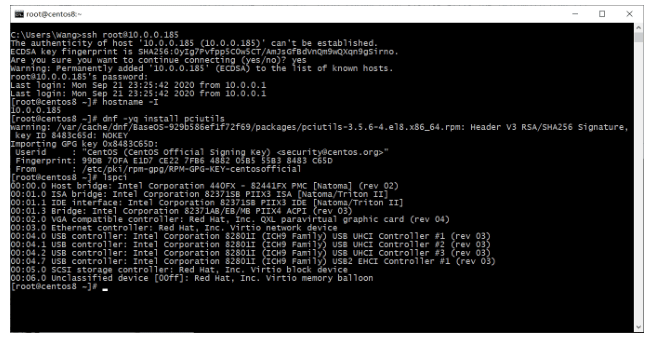
虚拟机手动克隆
先关机后再克隆
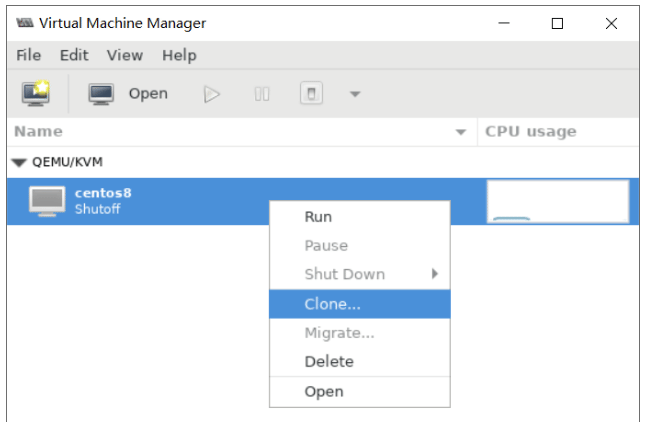
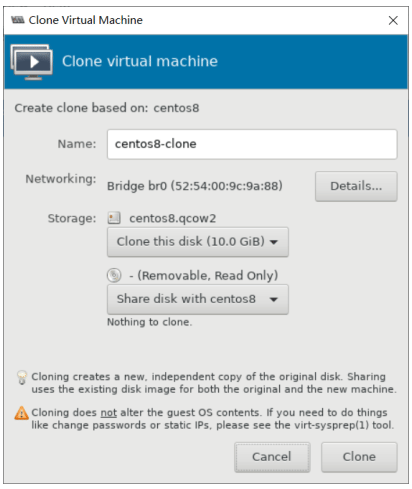
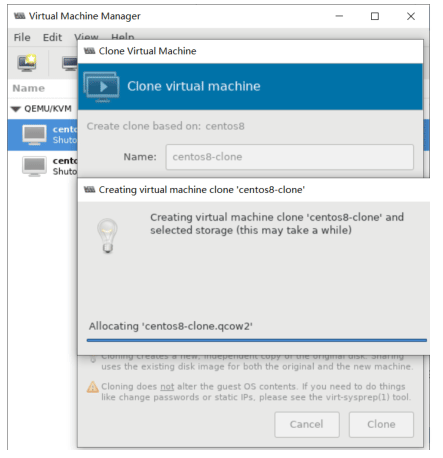
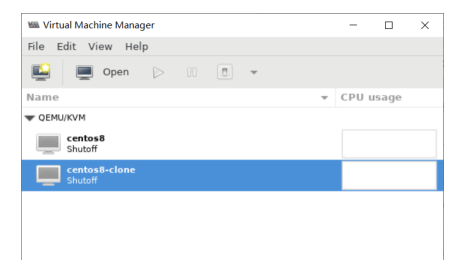
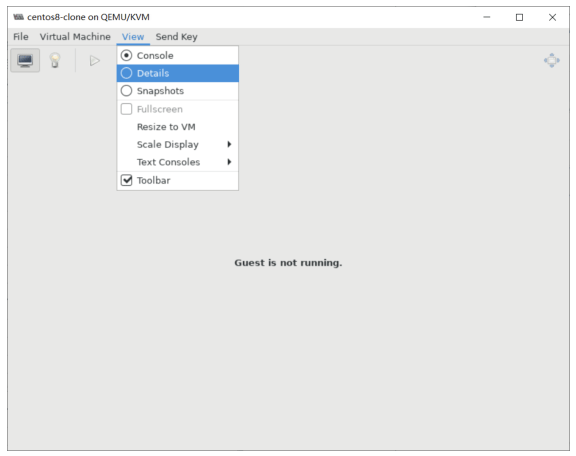
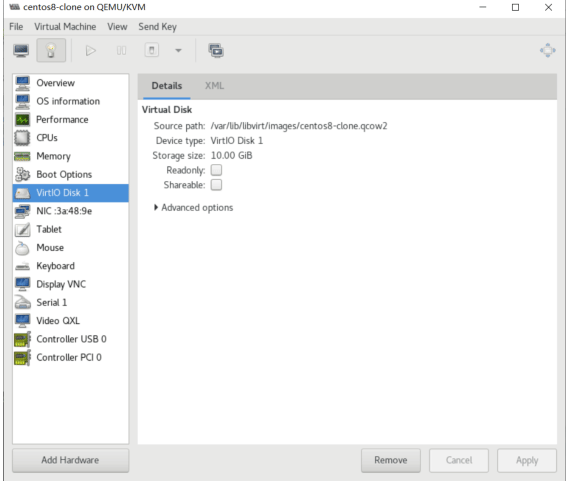
[root@centos8 ~]#ll -h /var/lib/libvirt/images/
total 5.7G
-rw------- 1 root root 1.8G Sep 21 23:33 centos8-clone.qcow2
-rw-r--r-- 1 root root 1.9G Sep 21 23:32 centos8.qcow2
基于现有虚拟机镜像批量创建新虚拟机
将前面生成的虚拟机做为模版,生成新的虚拟机
注意:先在前面的模块虚拟机修改配置,如:关闭firewalld和SELinux,禁用NetworkManager(CentOS7)等,安装常用包等
[root@centos8 images]#pwd
/var/lib/libvirt/images
[root@centos8 images]#cp centos8.qcow2 centos8-2.qcow2
[root@centos8 images]#virt-install --virt-type kvm --name centos8-2 --ram 2048 --vcpus 2 --disk bus=virtio,path=/var/lib/libvirt/images/centos8-2.qcow2 --network bridge=virbr1,model=virtio --graphics vnc,listen=0.0.0.0 --noautoconsole --autostart --boot hd
WARNING No operating system detected, VM performance may suffer. Specify an OS
with --os-variant for optimal results.
Starting install...
Domain creation completed.

#运行工具,可以看到下面出现新的虚拟机
[root@centos8 images]#virt-manager

#开启的虚拟机磁盘文件所有者为qemu,关闭后为root
[root@centos8 ~]#ll /var/lib/libvirt/images
total 9977352
-rw-r--r-- 1 qemu qemu 2029518848 Sep 21 23:37 centos8-2.qcow2
-rw------- 1 root root 1929183232 Sep 21 23:33 centos8-clone.qcow2
-rw-r--r-- 1 root root 2004221952 Sep 21 23:32 centos8.qcow2
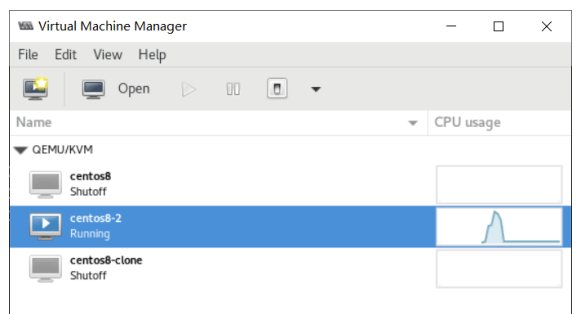
查看新虚拟机设置
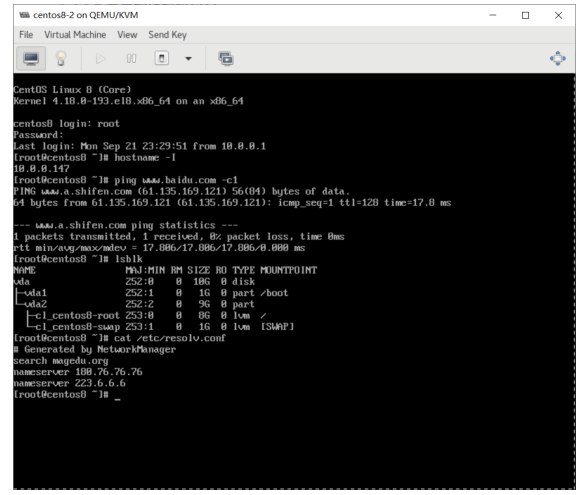
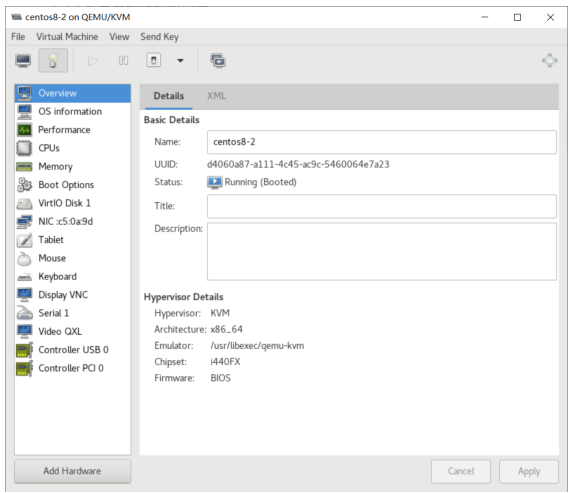
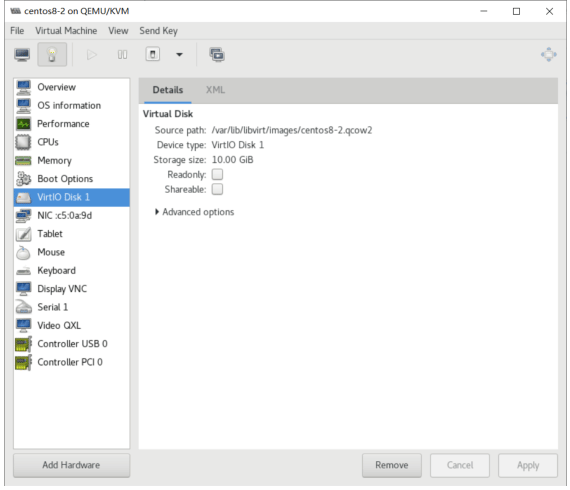
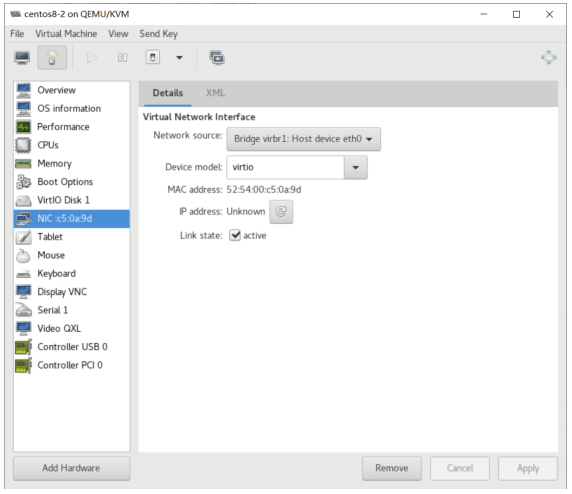
用户自定义的隔离的虚拟网络
此模式类似于Vmware中的仅主机的网卡模式,但无法和物理主机相通,只能在虚拟机之间互通
用户自定义的隔离的虚拟网络架构
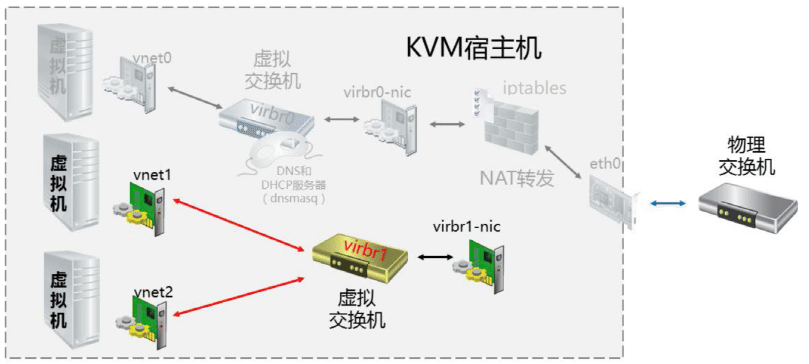
创建用户自定义的隔离的虚拟网络
使用virt-manager创建网桥
菜单栏—Edit–Connect–Virtual Networks – 添加—模式选择Isolated
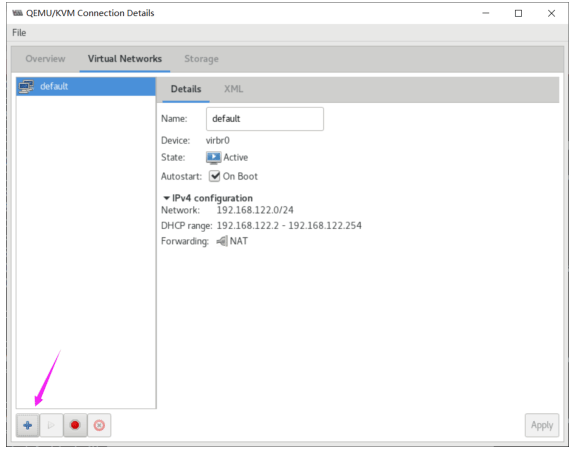
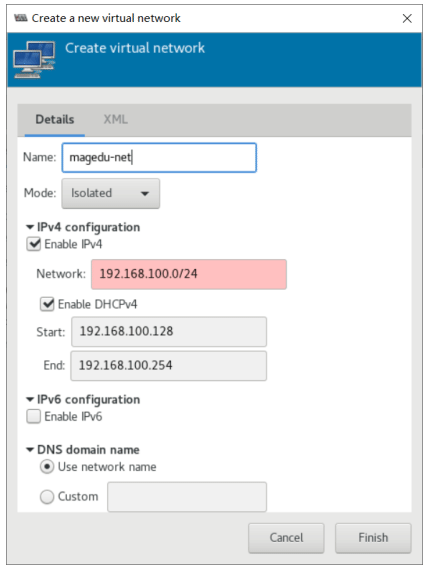
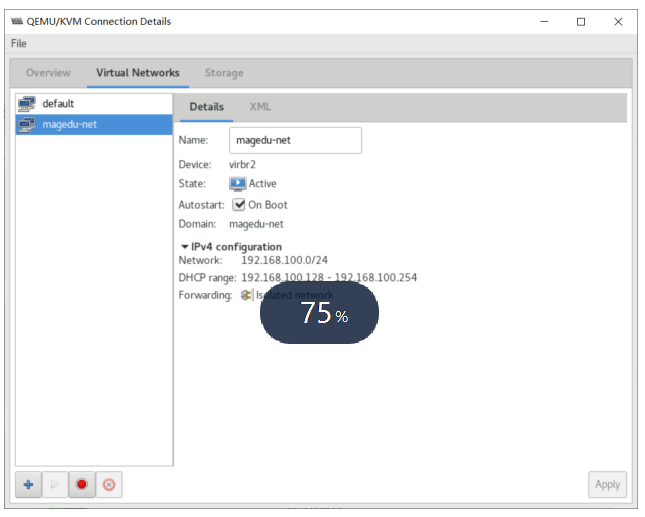
[root@centos8 ~]#ip a
......
29: virbr2: <NO-CARRIER,BROADCAST,MULTICAST,UP> mtu 1500 qdisc noqueue state
DOWN group default qlen 1000
    link/ether 52:54:00:66:cd:2c brd ff:ff:ff:ff:ff:ff
    inet 192.168.100.1/24 brd 192.168.100.255 scope global virbr2
            valid_lft forever preferred_lft forever
30: virbr2-nic: <BROADCAST,MULTICAST> mtu 1500 qdisc fq_codel master virbr2
state DOWN group default qlen 1000
    link/ether 52:54:00:66:cd:2c brd ff:ff:ff:ff:ff:ff


[root@centos8 ~]#ip link show master virbr2
30: virbr2-nic: <BROADCAST,MULTICAST> mtu 1500 qdisc fq_codel master virbr2
state DOWN mode DEFAULT group default qlen 1000
    link/ether 52:54:00:66:cd:2c brd ff:ff:ff:ff:ff:ff
[root@centos8 ~]#bridge     link show
2: eth0: <BROADCAST,MULTICAST,UP,LOWER_UP> mtu 1500 master virbr1 state
forwarding priority 32 cost 100
5: virbr0-nic: <BROADCAST,MULTICAST> mtu 1500 master virbr0 state disabled
priority 32 cost 100
30: virbr2-nic: <BROADCAST,MULTICAST> mtu 1500 master virbr2 state disabled
priority 32 cost 100

#查看网络
[root@centos8 ~]#virsh net-list
Name                                 State         Autostart         Persistent
----------------------------------------------------------
default                         active         yes            yes
me-net                     active         yes                     yes
修改虚拟机的网卡使用创建的隔离网络
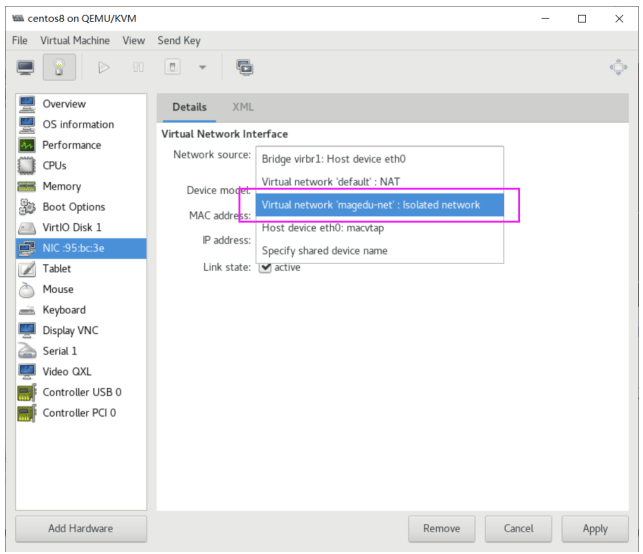
修改第二个虚拟机也使用一样的网络
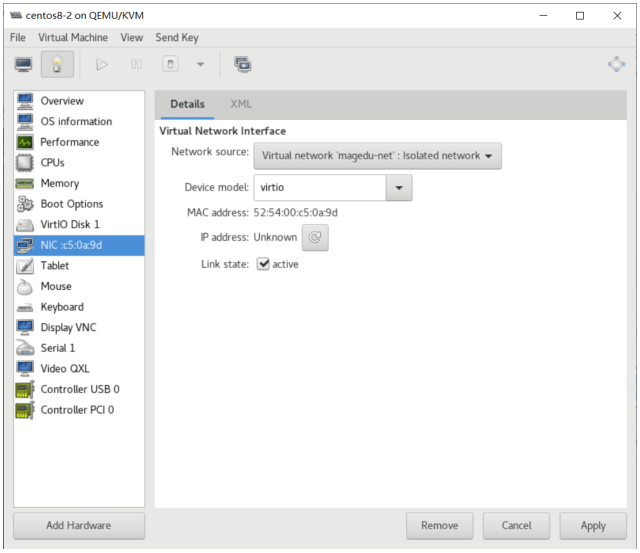
验证自定义的隔离网络主机之间通信
#查看2个虚拟的ip
virsh domifaddr  centos8
virsh domifaddr  centos8-2

#相互ping,通过
#连接互联网,不通
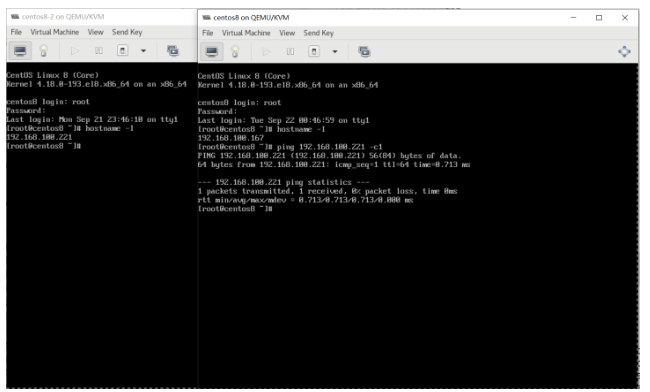
宿主机查看桥接关系
[root@centos8 ~]#bridge     link show
2: eth0: <BROADCAST,MULTICAST,UP,LOWER_UP> mtu 1500 master virbr1 state
forwarding priority 32 cost 100
5: virbr0-nic: <BROADCAST,MULTICAST> mtu 1500 master virbr0 state disabled
priority 32 cost 100
30: virbr2-nic: <BROADCAST,MULTICAST> mtu 1500 master virbr2 state disabled
priority 32 cost 100
31: vnet0: <BROADCAST,MULTICAST,UP,LOWER_UP> mtu 1500 master virbr2 state
forwarding priority 32 cost 100
32: vnet1: <BROADCAST,MULTICAST,UP,LOWER_UP> mtu 1500 master virbr2 state
forwarding priority 32 cost 100
实战案例
连接NAS共享存储实现虚拟机实时迁移
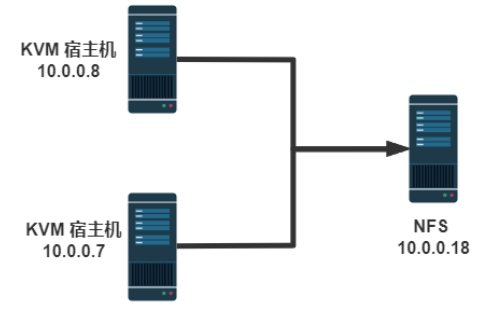
用户访问不停顿的情况下,实时迁移
环境: 三台主机

两台KVM宿主机
一台CentOS8 10.0.0.8
一台CentOS7 10.0.0.7
一台NFS服务器: CentOS8 10.0.0.18

#注意:
两台宿主机的虚拟机都要一样的网卡配置,都事先实现virbr1的桥接
要迁移的虚拟机必须是运行状态才可以迁移
建议从低版本向高版本的宿主机迁移,如:将CentOS7宿主机虚拟机迁移到CentOS8的宿主机上,反之可能失败
第一台KVM宿主机虚拟机
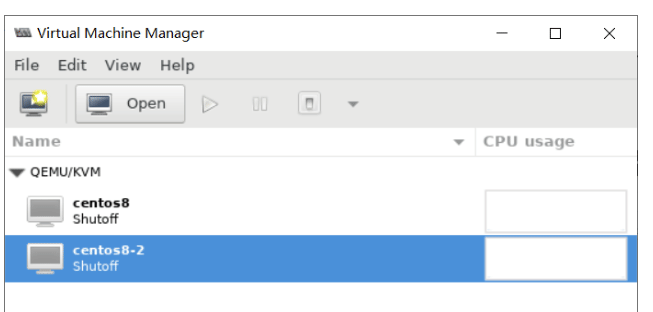
第二台KVM宿主机虚拟机
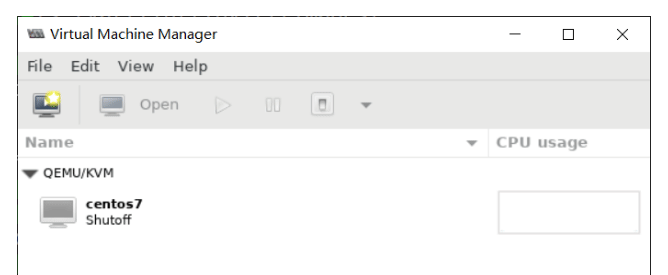
第一台宿主机的虚拟机网络
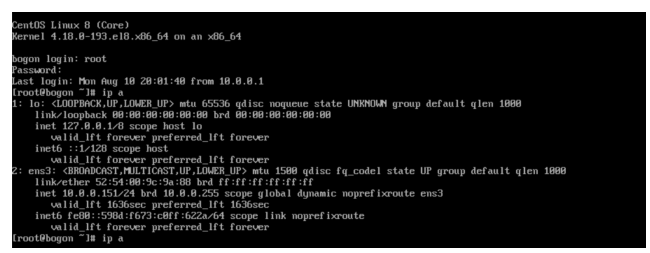
第二台宿主机的虚拟机网络
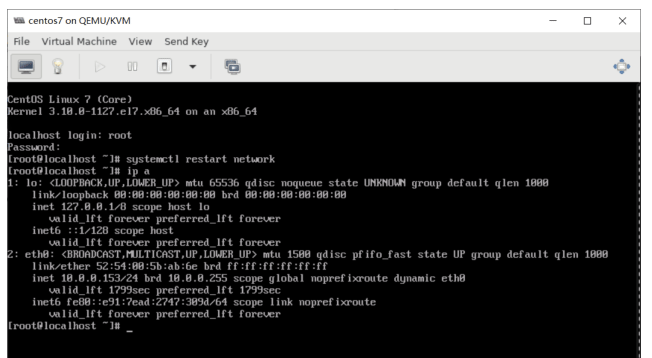
将第二台宿主机的虚拟机迁移动到第一台宿主机上
#第一台宿主机的网络配置
[root@centos8 ~]#ip a
1: lo: <LOOPBACK,UP,LOWER_UP> mtu 65536 qdisc noqueue state UNKNOWN group
default qlen 1000
    link/loopback 00:00:00:00:00:00 brd 00:00:00:00:00:00
    inet 127.0.0.1/8 scope host lo
            valid_lft forever preferred_lft forever
    inet6 ::1/128 scope host
            valid_lft forever preferred_lft forever
2: eth0: <BROADCAST,MULTICAST,UP,LOWER_UP> mtu 1500 qdisc fq_codel master virbr1
state UP group default qlen 1000
    link/ether 00:0c:29:8a:51:21 brd ff:ff:ff:ff:ff:ff
3: virbr1: <BROADCAST,MULTICAST,UP,LOWER_UP> mtu 1500 qdisc noqueue state UP
group default qlen 1000
    link/ether 00:0c:29:8a:51:21 brd ff:ff:ff:ff:ff:ff
    inet 10.0.0.8/24 brd 10.0.0.255 scope global noprefixroute virbr1
            valid_lft forever preferred_lft forever
    inet6 fe80::b441:41ff:fed6:f6f3/64 scope link
            valid_lft forever preferred_lft forever
4: virbr0: <NO-CARRIER,BROADCAST,MULTICAST,UP> mtu 1500 qdisc noqueue state DOWN
group default qlen 1000
    link/ether 52:54:00:23:8b:86 brd ff:ff:ff:ff:ff:ff
    inet 192.168.122.1/24 brd 192.168.122.255 scope global virbr0
            valid_lft forever preferred_lft forever
5: virbr0-nic: <BROADCAST,MULTICAST> mtu 1500 qdisc fq_codel master virbr0 state
DOWN group default qlen 1000
    link/ether 52:54:00:23:8b:86 brd ff:ff:ff:ff:ff:ff
8: vnet0: <BROADCAST,MULTICAST,UP,LOWER_UP> mtu 1500 qdisc fq_codel master
virbr1 state UNKNOWN group default qlen 1000
    link/ether fe:54:00:9c:9a:88 brd ff:ff:ff:ff:ff:ff
    inet6 fe80::fc54:ff:fe9c:9a88/64 scope link
            valid_lft forever preferred_lft forever
10: vnet1: <BROADCAST,MULTICAST,UP,LOWER_UP> mtu 1500 qdisc fq_codel master
virbr1 state UNKNOWN group default qlen 1000
    link/ether fe:54:00:5b:ab:6e brd ff:ff:ff:ff:ff:ff
    inet6 fe80::fc54:ff:fe5b:ab6e/64 scope link
            valid_lft forever preferred_lft forever

#第二台宿主机的网络配置
[root@centos7 ~]#ip a
1: lo: <LOOPBACK,UP,LOWER_UP> mtu 65536 qdisc noqueue state UNKNOWN group
default qlen 1000
    link/loopback 00:00:00:00:00:00 brd 00:00:00:00:00:00
    inet 127.0.0.1/8 scope host lo
            valid_lft forever preferred_lft forever
    inet6 ::1/128 scope host
            valid_lft forever preferred_lft forever
2: eth0: <BROADCAST,MULTICAST,UP,LOWER_UP> mtu 1500 qdisc pfifo_fast master
virbr1 state UP group default qlen 1000
    link/ether 00:0c:29:01:f9:48 brd ff:ff:ff:ff:ff:ff
3: virbr0: <NO-CARRIER,BROADCAST,MULTICAST,UP> mtu 1500 qdisc noqueue state DOWN
group default qlen 1000
    link/ether 52:54:00:83:1f:cb brd ff:ff:ff:ff:ff:ff
    inet 192.168.122.1/24 brd 192.168.122.255 scope global virbr0
            valid_lft forever preferred_lft forever
4: virbr0-nic: <BROADCAST,MULTICAST> mtu 1500 qdisc pfifo_fast master virbr0
state DOWN group default qlen 1000
    link/ether 52:54:00:83:1f:cb brd ff:ff:ff:ff:ff:ff
8: virbr1: <BROADCAST,MULTICAST,UP,LOWER_UP> mtu 1500 qdisc noqueue state UP
group default qlen 1000
    link/ether 00:0c:29:01:f9:48 brd ff:ff:ff:ff:ff:ff
    inet 10.0.0.7/24 brd 10.0.0.255 scope global noprefixroute virbr1
            valid_lft forever preferred_lft forever
    inet6 fe80::20c:29ff:fe01:f948/64 scope link
            valid_lft forever preferred_lft forever
先实现NFS服务
[root@centos8 ~]#dnf -y install nfs-utils
[root@centos8 ~]#mkdir /data/kvmdata
[root@centos8 ~]#cat /etc/exports
/data/kvmdata *(rw,no_root_squash)

[root@centos8 ~]#systemctl enable --now nfs-server.service
在宿主机的磁盘文件从目录中移到临时目录
[root@centos8 ~]#mv /var/lib/libvirt/images/* /opt
[root@centos7 ~]#mv /var/lib/libvirt/images/* /opt
在两台宿主机都实现存储
在第一台宿主机实现
virt-manager菜单栏
Edit—Connection Details—Storage点+加号,添加存储池。Type类型选择netfs
Name: kvmdata
Type: netfs
Target Path: /var/lib/libvirt/images
Format: auto
Host Name: 10.0.0.18
Source Path: /data/kvmdata
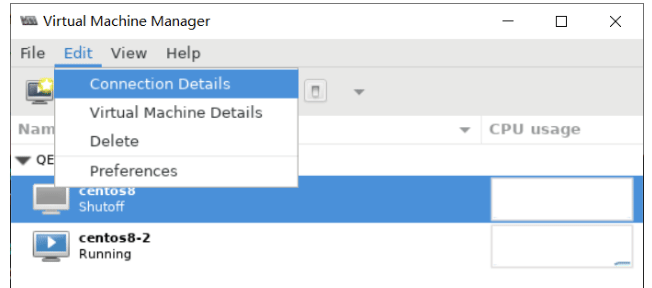
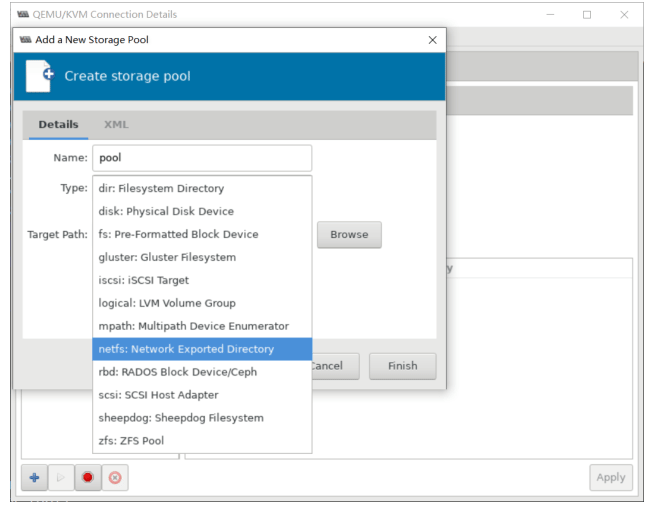
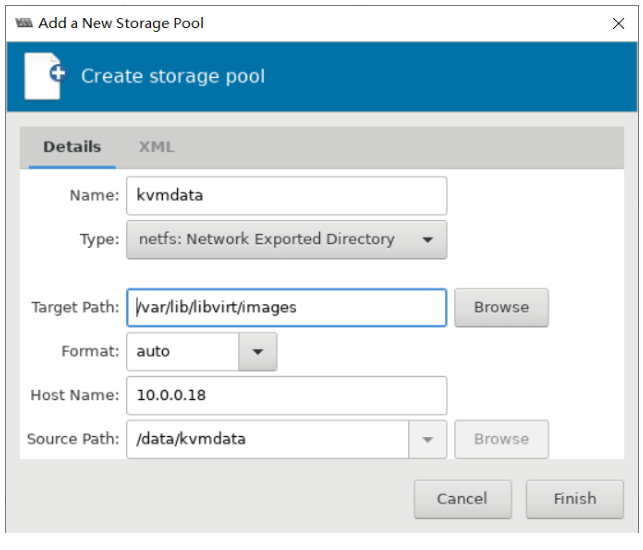
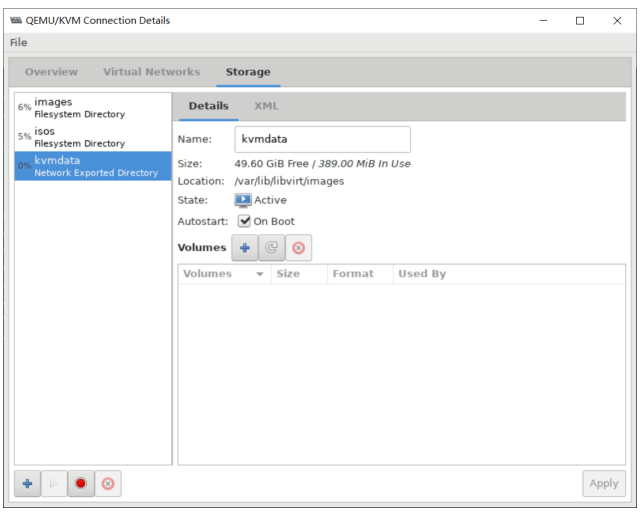
[root@centos8 ~]#df
Filesystem                         1K-blocks     Used Available Use% Mounted on
devtmpfs                                     4050832             0     4050832     0% /dev
tmpfs                                         4067612             0     4067612     0% /dev/shm
tmpfs                                         4067612         9316     4058296     1% /run
tmpfs                                         4067612             0     4067612     0% /sys/fs/cgroup
/dev/sda2                             104806400 6816776     97989624     7% /
/dev/sda3                                 52403200 3136576     49266624     6% /data
/dev/sda1                                     999320     120528         809980     13% /boot
tmpfs                                             813520             8         813512     1% /run/user/0
10.0.0.18:/data/kvmdata     52403200     398336     52004864     1% /var/lib/libvirt/images
在第二台宿主机实现
同样方法做nfs存储池
virt-manager菜单栏
Edit—Connection Details—Storage点+加号,添加存储池。Type类型选择netfs
Name: kvmdata
Type: netfs
Target Path: /var/lib/libvirt/images
Format: auto
Host Name: 10.0.0.18
Source Path: /data/kvmdata
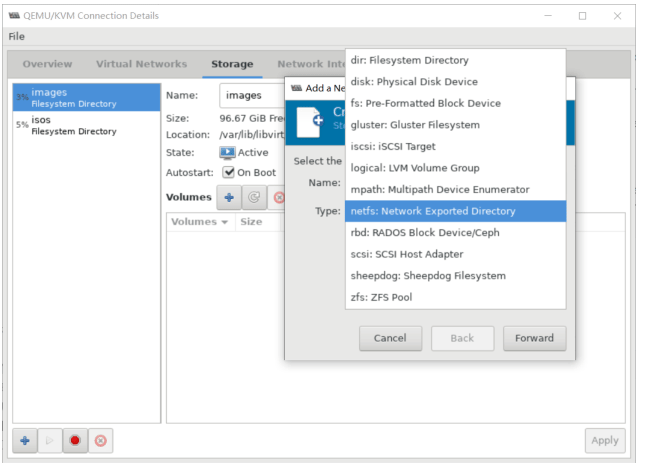
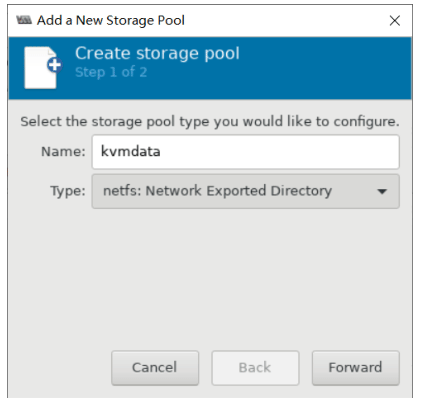
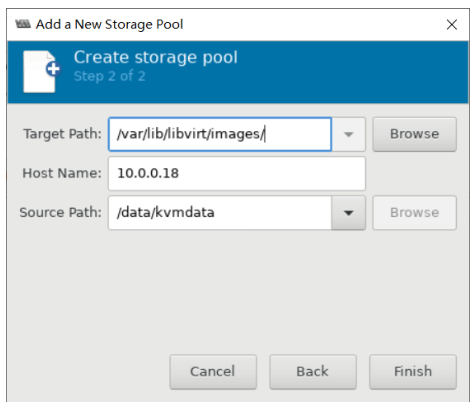
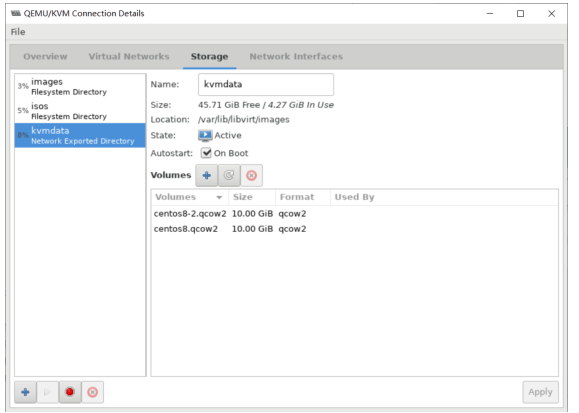
将原有磁盘文件从临时目录移回原目录
[root@centos8 ~]#mv /opt/centos8* /var/lib/libvirt/images/
[root@centos7 ~]#mv /opt/centos7.qcow2 /var/lib/libvirt/images/
[root@centos8 ~]#ll /var/lib/libvirt/images/
total 5724996
-rw-r--r-- 1 root root 1688731648 Aug 11 10:03 centos7.qcow2
-rw-r--r-- 1 root root 2081947648 Aug 11 09:38 centos8-2.qcow2
-rw-r--r-- 1 root root 2091712512 Aug 11 09:26 centos8.qcow2
在第一台宿主机连接到第二台宿主机
打开 virt-manager, File—Add Connection
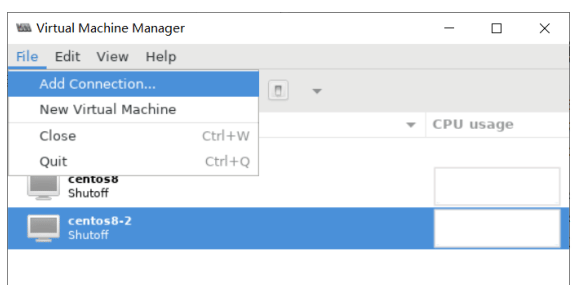
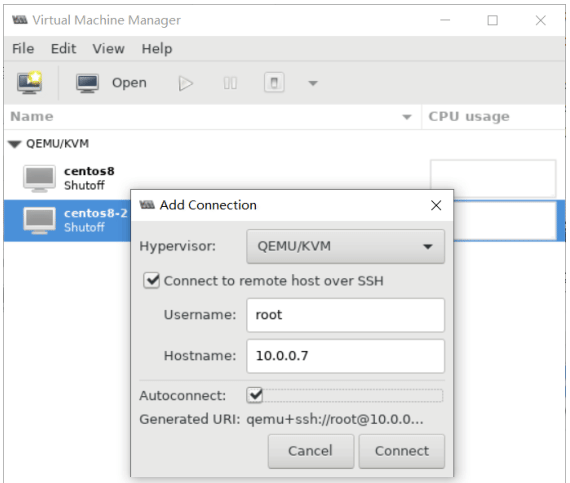
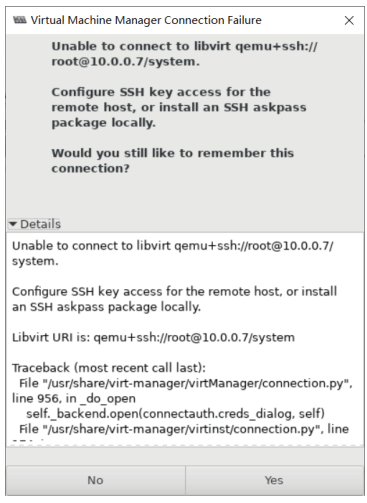
在第一台宿主机安装相关软件包或配置基于Key验证
[root@centos8 ~]#yum -y install openssh-askpass
再次连接,可以看到提示
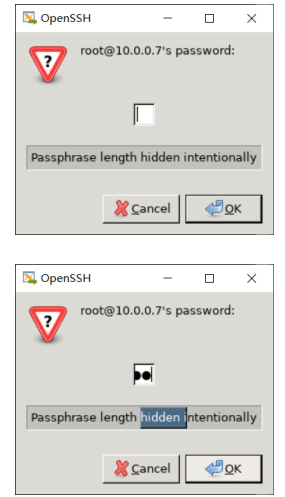
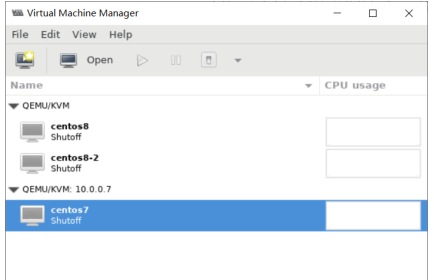
进行迁移
virt-manager中右键10.0.0.7缩主机中的虚拟机,Migrate迁移
Mode: Direct 直连
Address: 写对应目标缩主机IP
Advanced options:
- Allow unsafe 允许非安全,勾选
点击Migrate. 迁移过程可能会丢失几个数据包。
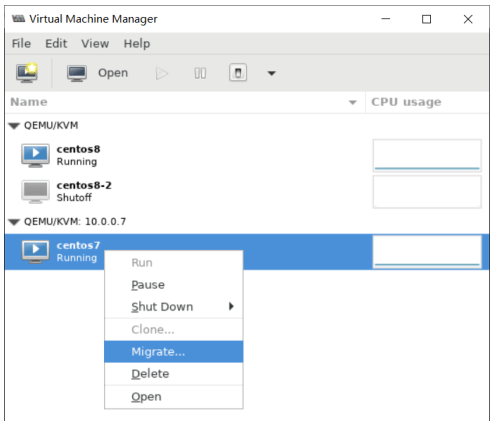
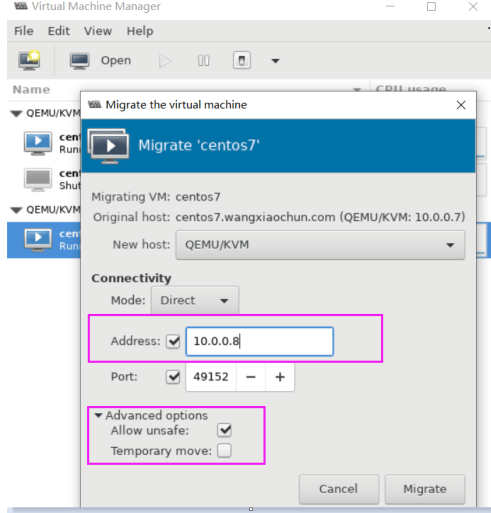
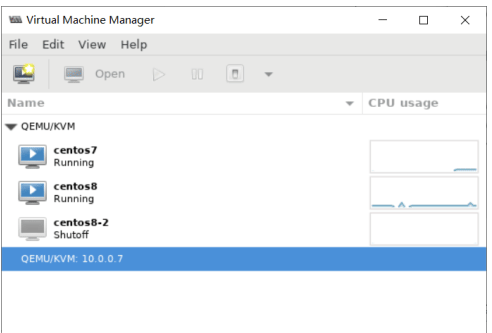
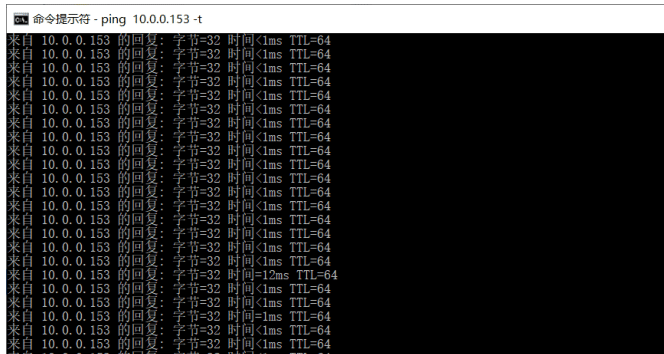
#可以看到迁移过来的虚拟机文件已经被移动到目标宿主机
[root@centos8 ~]#tree /etc/libvirt/qemu
/etc/libvirt/qemu
├── autostart
│        ├── centos8-2.xml -> /etc/libvirt/qemu/centos8-2.xml
│        └── centos8.xml -> /etc/libvirt/qemu/centos8.xml
├── centos7.xml
├── centos8-2.xml
├── centos8.xml
└── networks
    ├── autostart
    │        └── default.xml -> ../default.xml
    └── default.xml
3 directories, 7 files

#在源宿主机虚拟机文件被删除
[root@centos7 ~]#tree /etc/libvirt/qemu
/etc/libvirt/qemu
├── autostart
└── networks
    ├── autostart
    │        └── default.xml -> ../default.xml
    └── default.xml
3 directories, 2 files
再迁移回来
[root@centos8 ~]#cat /etc/hosts
127.0.0.1     localhost localhost.localdomain localhost4 localhost4.localdomain4
centos8.cicin.com
::1                 localhost localhost.localdomain localhost6 localhost6.localdomain6
10.0.0.7 centos7.cicin.com
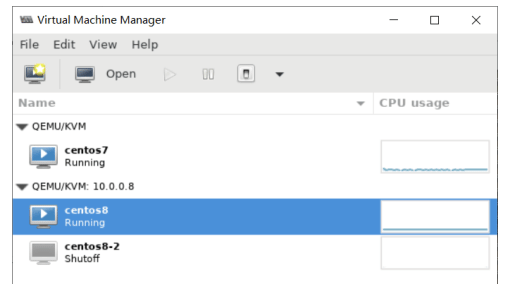
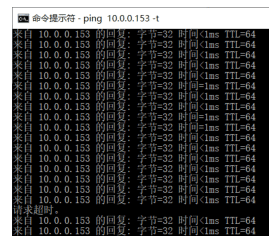
将CentOS8 的虚拟移到CentOS7 是会报错
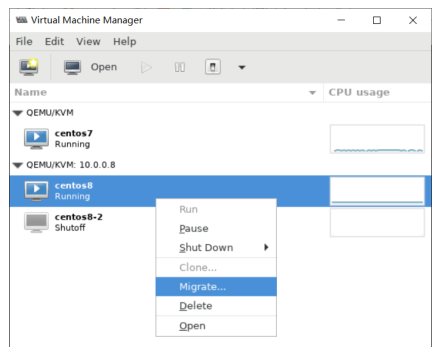
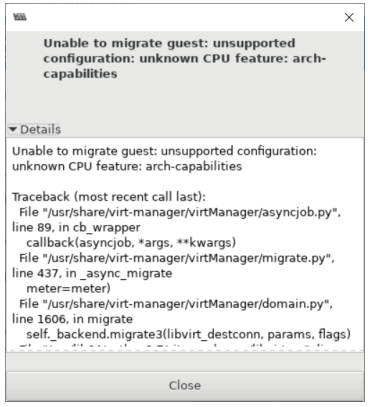
内外网络隔离综合案例
实现一个外网的web服务和内网的数据库相互隔离的环境 两台宿主机host1和host2 每个宿主机上面各有两个虚拟机,分别连接外网和内网交换机
一个缩主机一般会有多块网卡。多网卡绑定是可以容错的,同时宽带相加。
